Savory Baked Cheese Rolls with Caramelized Onions
Looking for a comforting snack? Try my warm Bake Cheese Rolls with Savory Onions! They're easy to make and perfect for any occasion. Let's dive in!

Just picture this: a chilly evening, the scent of warm bread teasing your senses, and there it is— bake cheese rolls with savory onions cooling on the kitchen counter, waiting for you.
A few years ago, i was at a friend's party, and someone brought these heavenly little bites. honestly, i couldn't stop pulling them from the platter until it was completely empty! ever since that night, i've been on a quest to recreate that cozy comfort.
And let me tell you, friends, mastering cheese roll recipes isn't just about feeding your belly—it's about feeding your soul.
From caramelized onion recipes to cheesy snacks that'll make you swoon, there’s something elegant yet homey about these rolls that screams comfort food.
Plus, if you’re looking for easy baking recipes that don’t break the bank, you’ve landed in the right spot!
Recipe Overview
So where do these delicious rolls come from? the concept of cheesy treats tucked inside flaky pastry rolls has european roots—think rustic european bakery recipes that echo through the years.
I mean, who can resist a cheese and onion filling wrapped snugly in soft dough? these little wonders have evolved into modern favorites at parties and gatherings.
They fit perfectly for everything from game day snacks to fancy soirees.
Now, let's break it down: preparing these savory pastries takes about 1 hour and 15 minutes , which sounds like a lot, but most of that is just dough rising time.
There's nothing complicated about it; it’s medium difficulty at most, so even if you’re not a pro in the kitchen, you can totally nail it.
Plus, they yield about 12 rolls , making them perfect for sharing—unless you’re feeling greedy (no judgment here!).
Key Benefits
Now, onto the key benefits of making these glorious cheese rolls. first off, the health aspect—while these are indulgent, you can easily substitute with healthy baking substitutes or choose a lower-fat cheese to lighten things up.
Plus, the caramelized onions add a subtle sweetness and nutritional value, making this a balanced treat.
Speaking of unique selling points, these savory rolls are beyond versatile. they jazz up any dinner, serve as perfect party appetizer ideas , or even double as finger food recipes at your next gathering.
Want to impress your friends? bring a tray of these bad boys, and you’ll be the star of the night!
One of the best things about these rolls is their adaptability. you can swap cheeses, toss in fresh herbs, or sneak in some sautéed veggies—endless cheese roll variations exist! trust me; once you get the hang of the dough rising tips and dough preparation techniques , each batch can be a fresh adventure.
So, are you ready to dive into making your own homemade cheese rolls ? You’ll want to get your ingredients lined up because next, we’re jumping into the list that will turn your kitchen into a tasty wonderland!
Let’s get rolling (pun intended)! 🎉
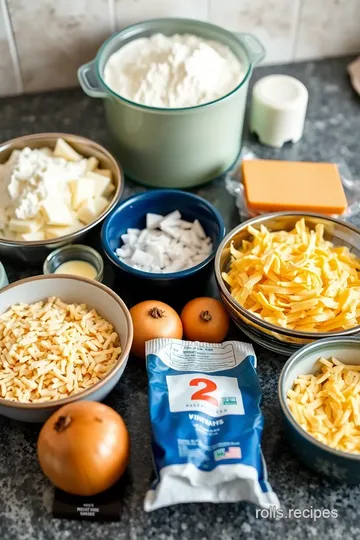
Your Go-To Guide for Essential Ingredients
When it comes to whipping up something delicious, having the right ingredients makes all the difference. whether you're trying to bake cheese rolls with savory onions or experiment with new baked cheese appetizers , knowing your basics is incredibly important.
So grab a cozy cup of coffee, and let’s dive into the essentials!
Premium Core Components
First things first, let's talk measurements. if you’re like me, the kitchen can feel a bit like a science lab at times.
Here’s a handy breakdown. for every 3 ¼ cups of all-purpose flour , you'll need about 400g . and when you're pouring a cup of warm milk, that's about 240ml .
Always check for quality indicators —look for flour that’s finely milled and milk that’s fresh.
Now, how do you store these perks of the culinary world? flour can sit in an airtight container for a pretty long time, usually up to 6 months in a cool place.
And milk? it’s best to use within a week after opening. honestly, fresh is the way to go! think of it like dating—fresh ingredients really do give you that spark you’re looking for.
Signature Seasoning Blend
Let’s jazz things up a bit, right? no dish is complete without a signature spice combo. picture this: a blend of garlic powder, paprika, and a hint of oregano .
You can even pair herbs like thyme and parsley for that fresh taste! mixing flavors can take your dish from zero to hero.
And guess what? if you’re feeling adventurous, explore regional variations . a bit of chili powder can give you that southern kick, while a sprinkle of dill adds a scandinavian twist.
Smart Substitutions
Have you ever forgotten an ingredient mid-cook? ugh! not fun, right? but don’t stress! there are common alternatives that can save the day.
If you’re out of mozzarella for your cheese rolls, go for cheddar or gouda; both melt beautifully! if you need something lighter, try using greek yogurt instead of sour cream.
Looking for dietary modifications ? Swap out regular flour for whole wheat for a healthier punch or use a dairy-free cheese alternative. Your taste buds will hardly notice the difference, I promise!
Kitchen Equipment Essentials
You can’t bake without the right tools! make sure you've got the must-have essentials in your kitchen. a mixing bowl, a rolling pin, and a baking sheet are crucial for your cheese roll adventures.
And if you don't have a fancy dough cutter? no sweat! you can use a sharp knife to cut your dough into squares for those adorable mini cheese rolls.
Don't forget about storage solutions . i’ve found that keeping my flour and sugar in clear jars not only looks cute but also lets me know when it's time for a grocery run.
It makes me feel all organized and put together, which is a nice bonus.
Revisiting those delightful savory baked cheese rolls with caramelized onions , you see how both the ingredients and tools work together harmoniously.
To make it easier for you to put this all into action, i'm about to break down the step-by-step instructions.
Trust me, baking these rolls not only brings comfort on a chilly evening but also makes for impressive party appetizer ideas! so buckle up; we’re about to dive into some serious baking glory!
Elevate Your Cooking: Mastering the Art of Savory Baked Cheese Rolls
Let’s talk about something scrumptious today: savory baked cheese rolls with caramelized onions. seriously, if you're into cheese roll recipes and baked goodies that bring the vibes of a cozy european bakery right into your kitchen, stick around.
This little adventure starts with some solid professional cooking methods to ensure your rolls come out perfect every single time.
Worth it? i say absolutely!
Essential Preparation Steps
First, let’s chat about mise en place, because it’s the holy grail of cooking. this fancy french term just means getting everything ready before you begin cooking.
So, measure out your ingredients, chop your onions, and shred that cheesy goodness. keep it neat!
Time management is key! you’ll be multitasking, so while your dough is rising (which takes about 30 minutes ), you can caramelize your onions, a task that’ll take around 15- 20 minutes .
You get to be a kitchen ninja!
Organization strategies ? oh, for sure! keep your workspace tidy. have your mixing bowls, rolling pin, and baking sheets handy.
This prevents any chaotic dance around the kitchen looking for that one missing tool. trust me, been there, done that!
And don’t forget safety considerations ! The last thing you want is a kitchen mishap. Be careful with that hot skillet when caramelizing onions—nobody wants to end up in the ER over a sizzling onion!
Step-by-Step Process
Now, let’s break it down into easy-to-follow steps. Are you ready?
-
Prepare the Dough:
- Combine 1 cup warm milk (it should be about 110° F ) with 2 tablespoons of sugar and 1 packet of yeast . Let this blob sit for 5 minutes until frothy.
- In another bowl, whisk 3 ¼ cups flour and ½ teaspoon salt . Toss in the yeast mix, 4 tablespoons melted butter , and 1 egg . Mix until a dough forms.
- Knead for about 5- 7 minutes —until it’s smooth like butter!
- Pop it into a greased bowl, cover it up, and let it rise in a warm spot for 30 minutes .
-
Caramelize the Onions:
- Crank up your skillet to medium, add 2 tablespoons olive oil , and toss in those thinly sliced onions. Stir them around until they turn golden brown—this will take about 15- 20 minutes . Sprinkle with salt and pepper, then let them chill for a moment.
-
Assemble the Rolls:
- Preheat the oven to 375° F (that's about 190° C ).
- Roll out your dough to ¼-inch thick . Cut nice squares and lay a spoonful of that sweet onion and your favorite shredded cheese right in the center. Then fold and seal those babies up!
-
Bake:
- Line your baking sheet with parchment paper, placing the rolls seam-side down. Bake 'em for 20- 25 minutes until they’re golden-brown and calling out to you. Let cool slightly before digging in.
Expert Techniques for Perfection
When you're tackling those rolls, here are some critical steps explained:
- Kneading the dough well is essential because it gives elasticity. You don't want tough rolls, right?
- Timing precision helps you not overbake. Keep an eye out as they approach that 20-minute mark !
- For those who love good visual cues, look for a golden brown top and a hollow sound when tapped. That's your signal!
- Troubleshooting? If your rolls end up a bit too doughy, consider letting them bake an extra minute or two. Just keep an eye on them!
Success Strategies to Nail the Recipe
Nobody’s perfect, right? So let’s chat about common mistakes to avoid. For instance, don’t rush the caramelization. It’s super tempting to crank up the heat to speed things along, but those onions need love—about 15- 20 minutes worth!
Quality assurance? Always taste your cheese and onion filling before sealing those rolls. You want that cheese and onion filling to sing, not clash!
And here’s something cool: if you want to make ahead, you can freeze the assembled rolls before baking. just pop them in the oven straight from your freezer at 375° f —add a couple of extra minutes to that baking time to make sure they cook through.
Additional Information
This recipe is truly versatile, and with some tweaks, you can make it fit any occasion! whether you’re whipping these up as party appetizer ideas or simply for a cozy snack at home, these savory pastry rolls will make your heart melt.
So, roll up those sleeves and give it a go! i promise, you’ll be the kitchen superstar with these savory baked appetizers !

Baked Cheese Rolls with Savory Onions: Your Go-To Comfort Treat
Pro Tips & Secrets
Honestly, I can’t believe how good these Bake Cheese Rolls with Savory Onions turn out every single time! Here’s the scoop on making them perfection.
Get the dough right: the key here is really in the kneading. you want your dough smooth and elastic, so it’s like a fluffy cloud when baked.
A little trick? knead it for about 5- 7 minutes . trust me, it makes all the difference!
Time-saving picks: want to save some time? you can make your caramelized onions ahead of time. just store them in the fridge! pull them out when you're ready to assemble.
It cuts your prep time like a pro.
Max flavor boost: are you feeling adventurous? add some fresh herbs into the cheese filling! thyme or parsley works wonders.
It gives the rolls a subtle flair that your taste buds will thank you for.
Presentation matters: for a wow factor, use a sharp knife to score the tops of the rolls before baking. it allows steam to escape and looks super fancy too.
Serve them on a rustic wooden board, and i swear your guests will think you’re a culinary genius.
Perfect Presentation
Alright, the secret to making your rolls look as good as they taste is all in the plating.
Garnish game strong: a sprinkle of fresh herbs on top right before serving? yes, please! it adds a pop of color to your dish.
I'm always on the hunt for color combinations that wow, so if you have sweet chili sauce or a tangy dip, throw that on the side for a splash of red!
Layering for Impact: Keep it simple, too. A few cheese rolls stacked against a side of marinara sauce? Killer combo. Seriously, it’s finger food perfection.
Storage & Make-Ahead
So, life gets busy, right? If you’ve got a stash of homemade cheese rolls waiting in the fridge, you've already beaten the weekday stress!
Storage guidelines: once baked, let them cool and pop in an airtight container. they can chill in the fridge for about 3 days .
But if you want to keep them even longer, wrap them up tightly and freeze—up to 3 months !
Reheating magic: when you need that cheesy goodness in your life again, toss them in the oven at 350° f ( 175° c) for about 10- 15 minutes .
You’ll get that flaky crust back, and the cheese will ooze perfectly.
Creative Variations
Sometimes you just want to mix things up, right? Here are some fun twists on our classic rolls!
Flavor Adaptations: How about you try adding spinach or mushrooms to the filling for some extra nutrition? Or maybe swap the cheese for something zesty like gouda ? Sky's the limit!
Seasonal Twists: Based on what’s in season, you could even use squash in the filling for a fall vibe or fresh tomatoes in summer. It’s all about those fresh ingredients!
Complete Nutrition Guide
It's always good to know what you're eating, right? These little treats pack a punch!
Nutritional Breakdown: Each roll is about 200 calories , loaded with protein and comforting carbohydrates. Plus, cheese adds that creamy goodness that'll make you feel cozy all over.
Health Considerations: Don't shy away from enjoying them, but maybe swap all-purpose flour for whole grain if you’re looking to boost fiber.
Expert FAQ Solutions
Okay, let’s tackle some common questions. You might be wondering about:
- What if my dough doesn’t rise? It’s probably too cold! Make sure to give it a warm home while it’s rising.
- Can I make these in advance? Absolutely! Just make the dough and fill the rolls, then freeze before baking. When you're ready, bake from frozen—just add a few extra minutes.
Wrap Up!
So, there you have it! these savory baked cheese rolls with caramelized onions are more than just a recipe; they’re an experience, a comfort food that warms the soul.
Whether you’re having friends over or just treating yourself, these rolls are sure to be a hit and to elevate your appetizer game!
Now, grab your ingredients and get baking! Your kitchen is about to smell amazing, and you are in for one delicious treat! Happy eating, friend!

Savory Baked Cheese Rolls with Caramelized Onions Card

⚖️ Ingredients:
- 3 ¼ cups all-purpose flour (400g)
- 1 cup warm milk (240ml)
- 2 tablespoons sugar (25g)
- 1 packet (2 ¼ teaspoons) active dry yeast
- ½ teaspoon salt (3g)
- 1 large egg (50g)
- 4 tablespoons unsalted butter, melted (56g)
- 2 cups shredded cheese (such as mozzarella or cheddar) (200g)
- 2 medium onions, thinly sliced
- 2 tablespoons olive oil (30ml)
- Salt and pepper, to taste
- Fresh herbs (optional, e.g., thyme or parsley)
🥄 Instructions:
- Step 1: In a mixing bowl, dissolve sugar and yeast in warm milk. Let sit for 5 minutes until bubbly.
- Step 2: In a separate bowl, whisk together flour and salt.
- Step 3: Add the yeast mixture, melted butter, and egg to the flour. Combine until a dough forms.
- Step 4: Knead the dough for about 5-7 minutes until smooth.
- Step 5: Place in a greased bowl, cover, and let rise in a warm place for 30 minutes.
- Step 6: Heat olive oil in a skillet over medium heat and add sliced onions, cooking until golden and caramelized (about 15-20 minutes).
- Step 7: Season with salt and pepper and let cool slightly.
- Step 8: Preheat the oven to 375°F (190°C). Roll out the dough on a floured surface to about ¼-inch thick.
- Step 9: Cut into squares or rectangles, placing a spoonful of caramelized onions and shredded cheese in the center of each piece.
- Step 10: Fold and seal the edges securely, shaping into rolls.
- Step 11: Place rolls seam-side down on a baking sheet lined with parchment paper.
- Step 12: Bake for 20-25 minutes until golden brown and cool slightly before serving.
Previous Recipe: Delicious Quick Pizza Rolls with Cheesy Goodness: How to Savor Every Bite!
Next Recipe: How to Make Bake Cheese Sausage Rolls - Quick & Tasty Bites!