Delicious Bake Cheesy Garlic Hawaiian Rolls
Craving the best Bake Cheesy Garlic Hawaiian Rolls in 35 Min? My simple herb-glazed version is juicy and flavorful, perfect for any gathering!

Oh my gosh, have you ever stumbled upon a recipe that makes your mouth water just by reading the ingredients? let me tell you about the first time i made bake cheesy garlic hawaiian rolls in 35 minutes .
It was a lazy sunday, and i wanted something comforting but didn’t want to spend hours in the kitchen. i just wanted something fun and delicious, so i turned to the sweet, pillowy goodness of hawaiian rolls .
Before i knew it, my kitchen was filled with the heavenly aroma of garlic and cheese, and i was in foodie heaven! i'm not kidding when i say these fluffy rolls are like a warm hug for your tastebuds, combining that soft sweetness with a savory twist.
So let’s dive into why these rolls are so great!
Recipe Overview
These cheesy garlic rolls have a history that dates back to hawaii, where the iconic sweet rolls originated. they’ve survived the test of time and evolved into something even more spectacular! nowadays, everyone can appreciate them at parties, as comforting side dishes , or even at those late-night snack attacks.
With just 35 minutes from start to finish, they fit perfectly into our fast-paced lives. honestly, anyone can whip these up, whether you’re a pro or just starting your adventure in the kitchen.
You can expect to yield about 12 rolls—perfect for sharing, or, let’s be real, keeping all to yourself! And the cost? Super budget-friendly! I mean, we all love easy and delicious recipes that won’t break the bank, right?
Key Benefits
Now, let’s talk about why these rolls are life-changing! first off, they pack a punch in the nutrition department. made with sweet hawaiian bread, they’re elevated with mouthwatering mozarella and cheddar cheeses and power-packed with garlic .
Garlic is known as a superstar for boosting your immune system, so not only are you indulging but also giving your body a little tlc.
But the best part? they’re incredibly flexible! whether it’s a cozy family dinner, a party, or even a picnic, these savory garlic bread rolls will steal the show.
They make for great easy party snacks , and trust me, no one can resist a cheesy garlic dipping sauce on the side.
Why are these rolls better than similar recipes? well, for starters, they’re a complete flavor bomb! you get that delightful melt-in-your-mouth texture paired with garlicky goodness that just can’t be beaten.
Plus, who doesn’t love a recipe that’s perfect to whip up when friends drop by ? they’re quick to make and will have everyone raving!
The moment those rolls come out of the oven, you’ll be greeted with the perfect golden crust and that irresistible cheesy pull.
I always say, once you've had these, you'll find excuses to make them again and again!
Ready to gather your ingredients? make sure to grab some soft hawaiian rolls, some creamy mozzarella, and a touch of garlic.
You won’t want to miss out on this delicious journey! let’s get cooking!
Your Go-To Guide for Essential Ingredients
Cooking is all about having the right tools and ingredients, right? whether you’re planning to bake cheesy garlic hawaiian rolls in 35 min or tackle a gourmet dinner, knowing your essentials makes all the difference.
Let’s break it down!
Premium Core Components
First things first, when we talk about premium core components , don’t skimp on quality. Here’s a quick rundown:
-
Detailed Measurements : Always have cups and grams handy. For instance, our cheesy rolls need 4 tablespoons (56g) of melted butter. Get a scale—it’s a game changer!
-
Quality Indicators : Freshness matters! Look for garlic that’s firm and free of spots. For cheese, go for blocks rather than pre-shredded; it melts better.
-
Storage Guidelines : Keep your spices in a cool, dark place. Butter? Fridge it, and it'll last about 1-3 months unopened.
-
Freshness Tips : Inspect herbs for vibrancy—if they're wilting, they’ve seen better days.
Signature Seasoning Blend
Next, let’s chat about that signature seasoning blend . You gotta know your spices!
-
Essential Spice Combinations : For those garlic butter rolls , garlic powder, parsley, and a touch of salt create magic. Don’t underestimate them!
-
Herb Selections : Fresh is best! Basil works well if you’re feeling fancy, but dried herbs can step in during off-seasons.
-
Flavor Enhancers : A sprinkle of smoked paprika or a squeeze of lemon can elevate your dish to rockstar status.
-
Regional Variations : If you’re feeling adventurous, try adding some taco seasoning for a fun twist on your rolls!
Smart Substitutions
Okay, life happens, and when you run out of something, don’t panic. Check out these smart substitutions :
-
Common Alternatives : No mozzarella? Cream cheese or even feta can work in a pinch!
-
Dietary Modifications : Vegan butter and nutritional yeast can cover those cheesy cravings—trust me on this one!
-
Emergency Replacements : Running low on flour? Ground oats can save the day for those just-baked rolls!
-
Seasonal Options : Summer? Toss in fresh basil for a bright twist. Fall? A sprinkle of nutmeg can warm you right up.
Kitchen Equipment Essentials
Let’s not forget about your tools! Here are some kitchen equipment essentials that every cook should have:
-
Must-Have Tools : A trusty 9x13-inch baking dish and a mixing bowl are absolute musts for our 35-minute roll recipe.
-
Alternative Equipment : Don’t have a pastry brush? A spoon works just fine!
-
Preparation Tips : Keep your workspace clear. It makes everything run smoother.
-
Storage Solutions : Invest in airtight containers for those leftover rolls—nobody likes stale bread!
Now that we’ve set the stage with our essential ingredients, you’re ready to dive into the delicious part. picture this: light, fluffy, and loaded with cheesy goodness, these cheesy garlic hawaiian rolls bring comfort food to a whole new level.
Seriously, they’ll steal the show at any gathering—perfect as easy party snacks or a satisfying side dish .
Feeling inspired? Let’s move on to how you can whip these bad boys up in no time! Grab those ingredients, and let’s get baking!

Professional Cooking Method
Cooking is an art, and every artist needs the right tools and techniques. if you're prepping to bake cheesy garlic hawaiian rolls in 35 min , let’s dive in! we want those rolls to come out fluffy with cheesy goodness, perfectly golden on top, and utterly irresistible.
This recipe can also serve as a great introduction to professional cooking methods to elevate your game in the kitchen.
Essential Preparation Steps
Before you even put the oven on, let’s get organized. start by practicing mise en place (french for “everything in its place”).
This means measuring out all your ingredients and having everything at hand. it saves precious time. grab those sweet hawaiian rolls, shredded mozzarella, garlic, and butter ready to go.
Speaking of time, keep an eye on it! when working with recipes like this, you’ll want to manage your time wisely.
Set a timer! this helps you juggle prep and baking without losing track. that’s crucial when your goal is to get those cheesy garlic rolls out in 35 minutes ! having everything laid out will prevent running back and forth, which we all know can become a chaotic mess.
Don't forget about safety considerations ! make sure to use oven mitts when handling hot pans and keep knives away from your fingers.
We want to enjoy our delicious snacks, not a trip to the er!
Step-by-Step Process
Are you ready? Let’s get into the nitty-gritty. Here’s your step-by-step guide to bring these sweet Hawaiian rolls to life:
-
Preheat the Oven: Fire up that oven to 350° F ( 175° C) . A hot oven is key for getting those rolls nice and fluffy.
-
Prepare the butter mixture: grab a small saucepan and melt down 4 tablespoons (56g) of butter with 4 cloves of minced garlic over medium heat until it’s fragrant, about 1- 2 minutes .
Set this aromatic goodness aside.
-
Mix the cheese and seasoning: in a mixing bowl, toss together 1 cup (100g) of shredded mozzarella, 1/2 cup (50g) of shredded cheddar, fresh parsley, salt, and pepper.
This cheesy combination is what will make your rolls extra special.
-
Assemble the rolls: carefully slice the 12 hawaiian sweet rolls horizontally in half, keeping the tops attached. place the bottoms in a greased baking dish and evenly sprinkle that cheesy mix on top.
-
Drizzle with Garlic Butter: Time to pour that garlic butter all over the cheesy rolls you just assembled! Yum!
-
Cover and bake: place the tops back on and optionally cover with aluminum foil. bake for 15- 20 minutes until the cheese is melted and golden.
Pro tip: keep an eye on them. you want golden tops, not burnt!
-
Serve: Once baked, let those bad boys cool for a minute before cutting into them. Serve warm and relish the gooey goodness.
Expert Techniques
To serve up the best hawaiian rolls recipe , you’ve got to sweat the details. one critical step is monitoring your temperatures and timing.
Utilizing kitchen thermometers can be the edge you need. when your cheese hits around 160° f ( 71° c) , you’ll know it's perfectly melted and delicious.
Now for quality checkpoints—do a little visual inspection. are the tops golden? is the cheese bubbling? if not, check every couple of minutes! remember, patience is key, but you're in it for a buttery, cheesy heaven.
If you think something went wrong (and it might—it happens!), don’t sweat it. always keep a troubleshooting attitude. did the rolls get too browned? maybe your oven runs hot.
Adjust temperatures or cover them with foil next time. bottom line: learn from every bake!
Success Strategies
Alright, let’s wrap this up with some final success strategies. Here’s what you shouldn't do: don’t skimp on ingredients. Use quality butter and fresh garlic—trust me; it makes a world of difference.
And before you go, be aware of common mistakes . missing the garlic butter, or not letting the rolls cool a bit before slicing can ruin your experience.
You want those cheesy rolls to be ooey-gooey, not falling apart!
And if you’re looking for make-ahead options , you can assemble these rolls a day ahead, stick them in the fridge, and pop them in the oven just before serving.
Perfect for entertaining!
Stay tuned for more deliciousness in the next section, where I’ll share Additional Information that’ll keep your baking game strong!

Pro Tips & Secrets
Oh my gosh, if there’s one thing i’ve learned in my kitchen adventures, it’s that a little insider knowledge can go a long way.
Here’s how to elevate your cheesy hawaiian rolls game! when you’re about to bake cheesy garlic hawaiian rolls in 35 min , keep these pro tips in mind.
First off, quality ingredients matter! use good butter. seriously, this will make your garlic butter rolls taste heavenly. and fresh garlic? don’t even think about using that jarred stuff; the flavor just isn’t the same.
Time-saving secrets? Pre-chop your garlic and cheese ahead of time. It’s a little extra work at the start but will make the assembly a breeze!
Flavor enhancement tip: don’t be shy with your seasonings. a pinch of fresh herbs like parsley or even some thyme sprinkled in can change the whole flavor profile of your rolls.
Trust me, you’ll feel like a gourmet chef.
Oh, and let’s talk presentation. a quick brush of that buttery garlic mix on the tops of your rolls before they go in the oven? game changer.
They’ll look like they came right outta a fancy restaurant!
Perfect Presentation
So, you’ve baked those flavorful savory garlic bread rolls to perfection, but how do you make them look like a million bucks? Plating is key here, folks.
Think about your color combinations . Those golden-brown tops with the white melty cheese? Gorgeous! Have some fresh parsley? Chop it up and sprinkle it on top for that pop of green—it’s like the cherry on your cake, but, you know, for bread!
Consider using a simple serving platter or even a rustic wooden board to give it that homey feel. you can place a small bowl of cheesy garlic dipping sauce next to your rolls.
Not only is it enticing, but it also invites everyone to dig in!
Storage & Make-Ahead
Sometimes, you gotta plan ahead. If you’re making these for a party—because let’s be real, these Hawaiian rolls variations are a hit—you can prepare them the night before!
Here’s how: just assemble your rolls but don’t bake them. cover tightly with plastic wrap and pop them in the fridge.
When you’re ready to roll (pun intended), just take them out, let them sit for about 20 minutes to come to room temp, and bake ‘em as usual.
As for storage, any leftovers (if you're so lucky) can be kept in an airtight container. these rolls are best eaten within 2 days.
Just reheat them in the oven for about 10 minutes at 350° f to regain that soft, fresh-out-of-the-oven taste.
Creative Variations
Let’s spice things up, shall we? the beauty of this quick hawaiian bread recipe is how adaptable it is. first up, how about a spicy garlic rolls recipe ? toss in some chopped jalapeños with the cheese for a flavorful punch.
If you’re looking for dietary modifications , switch the cheese to something like a vegan cheese alternative—it still provides that melty goodness.
Feeling seasonal? When summer rolls around, try using fresh basil or even sun-dried tomatoes in the mix. These add bright flavors that just scream summer!
And don't forget regional twists! Throw in some crumbled bacon for a Southern touch or add a bit of smoked paprika for that smoky flavor kick.
Complete Nutrition Guide
So, we’ve tackled the fun stuff—now let’s get down to business. here’s a quick and dirty nutrition breakdown for our delicious rolls.
Each roll packs about 210 calories , with 6 grams of protein and 12 grams of fat. not too shabby, right?
And let’s not forget the health perks! garlic is known for its health benefits—goodbye, cold season! but remember, moderation is key.
Don’t dive headfirst into a mountain of rolls, even though they’re that good.
And if you’re portioning them out for a gathering, aim for one or two per person. Trust me, these cheesy sweetness bombs will leave folks satisfied without overstuffing them.
Final Thoughts
Alright, my friends, it’s time to wrap this up! the bake cheesy garlic hawaiian rolls in 35 min recipe is not just food; it’s an experience.
Whether you’re serving these as a bread rolls appetizer or as part of the main course, they’ll be the stars of your meal.
So get in that kitchen, whip up these easy party snacks , and enjoy the smiles on everyone’s faces! these rolls are the perfect comfort food and will make any gathering feel a bit more special.
Look into into your baking adventure and share your stories—they’re just as important as the meals we create! happy baking!
Frequently Asked Questions
How can I Bake Cheesy Garlic Hawaiian Rolls in 35 Min without making a mess in the kitchen?
To minimize mess, prepare all your ingredients beforehand and use a greased baking dish. Have a clean workspace and keep utensils organized for easy access. Following the steps closely will help you stay efficient and tidy!
Can I make Bake Cheesy Garlic Hawaiian Rolls in 35 Min ahead of time?
Yes, you can prepare the rolls up to the baking point and then cover and refrigerate them for up to 24 hours. Just allow them to come to room temperature before baking, and skip the foil covering if you want a crispier top.
What are some variations I can try with my Bake Cheesy Garlic Hawaiian Rolls?
For a spicy kick, add chopped jalapeños or crushed red pepper flakes to the cheese filling. Alternatively, mix in fresh herbs like basil or substitute the cheeses with pepper jack or gouda for different flavors.
How should I store leftover Bake Cheesy Garlic Hawaiian Rolls?
Store leftover rolls in an airtight container in the refrigerator for up to 3 days. Reheat them in the oven or microwave before serving for the best texture and flavor. You can also freeze them for longer storage, but it's best to enjoy them fresh!
What nutritional information should I know about Bake Cheesy Garlic Hawaiian Rolls?
Each roll contains approximately 210 calories, 6g of protein, and 12g of fat. They are a delicious treat, but if you're watching your sodium intake, keep in mind they have about 380mg of sodium per serving. Customizing ingredients can help tailor them to your dietary needs.
Can I substitute ingredients in the Bake Cheesy Garlic Hawaiian Rolls recipe?
Absolutely! You can use any soft dinner rolls if Hawaiian rolls are not available. Additionally, if you're looking for a lighter option, substitute the butter with olive oil and feel free to try different cheeses for varied flavors.
Delicious Bake Cheesy Garlic Hawaiian Rolls Card

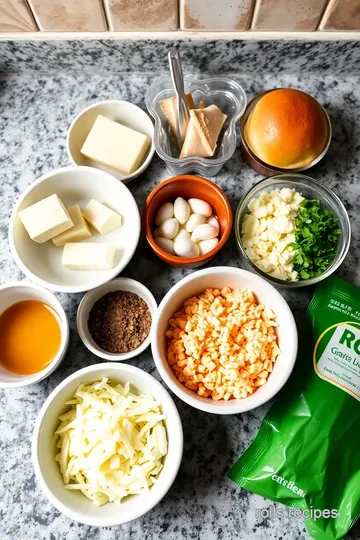
⚖️ Ingredients:
- 12 Hawaiian sweet rolls (about 340g, store-bought or homemade)
- 4 tablespoons (56g) unsalted butter, melted
- 4 cloves garlic, minced
- 1 cup (100g) shredded mozzarella cheese
- 1/2 cup (50g) shredded cheddar cheese
- 1/4 cup (15g) fresh parsley, finely chopped (optional)
- 1/2 teaspoon (2g) salt
- 1/4 teaspoon (1g) black pepper
🥄 Instructions:
- Step 1: Preheat to 350°F (175°C).
- Step 2: In a small saucepan, combine melted butter and minced garlic. Heat for 1-2 minutes until fragrant. Set aside.
- Step 3: In a mixing bowl, combine mozzarella, cheddar, parsley, salt, and pepper.
- Step 4: Using a serrated knife, slice the Hawaiian rolls horizontally in half, keeping them attached.
- Step 5: Place the bottom halves in a greased baking dish.
- Step 6: Sprinkle the cheese mixture evenly over the bottom half of the rolls.
- Step 7: Brush the melted garlic butter over the cheese-filled rolls.
- Step 8: Place the top halves of the rolls on the cheese layer. Optionally, cover with aluminum foil.
- Step 9: Bake in preheated oven for 15-20 minutes, until the cheese is melted and the tops are lightly golden.
- Step 10: Remove from the oven and cool slightly before slicing. Serve warm.
Previous Recipe: Easy & Delicious Bake Nut Rolls with Joyful Crunchy Nuts: A Family Favorite Recipe
Next Recipe: Easy Apple Turnovers: Quick & Flaky Treats for Every Occasion!