Cheesy Party Rolls: Bake in Just 35 Minutes!
Looking for a quick snack? Bake Cheesy Party Rolls in 35 Minutes! These delicious cheesy bites are perfect for gatherings, and I promise they'll disappear fast. Enjoy!

- look into into Cheesy Bliss: Bake Cheesy Party Rolls in 35 Minutes
- Essential Ingredients Guide
- Mastering the Art of Professional Cooking: Your Guide to Flawless Cheesy Party Rolls
- Pro Tips & Secrets for Your Cheesy Party Rolls
- Perfect Presentation to Wow Guests
- Storage & Make-Ahead Tips
- Creative Variations to Keep Them Interesting
- Complete Nutrition Guide for Comfort and Health
- The Fun’s Just Beginning!
- Frequently Asked Questions
- Recipe Card
look into into Cheesy Bliss: Bake Cheesy Party Rolls in 35 Minutes
Have you ever scrambled at the last minute to whip up a snack for unexpected guests? i totally feel you! one time, my friends dropped by for game night, and i was left floundering—nothing in the fridge but some sad-looking cheese and bread.
Well, that night, i discovered the magic of these cheesy party rolls . i whipped 'em up in just 35 minutes, and let me tell you, they vanished quicker than a touchdown celebration! now, every gathering is a “cheesy roll” kind of party.
What’s the Buzz About These Rolls?
These little beauties are not just a modern marvel; they have their roots in comforting home-cooked meals. originating from savory bread cultures across europe, the idea of wrapping cheese in fluffy bread quickly morphed into a party staple here in the u.
S. fast forward to today, and everyone’s loving easy party snacks that come together without the hassle.
Making the cheesy bliss party rolls is as manageable as pie— without the stress of making pie crust! with prep time clocking in at just 15 minutes and cook time at 20 more, you’ll yield about 12 rolls .
Seriously, who doesn’t want a light, irresistible snack that’s done in a flash?
All About the Benefits
So, why should you jump on the cheesy party rolls bandwagon? first off, they’re a treasure trove of health benefits .
You get that burst of gooey, melted cheese—hello, calcium! plus, adding a sprinkle of veggies or spices can boost the nutritional profile.
They’re versatile enough to be tailored into quick appetizer ideas for any occasion, from casual game days to fancy holiday parties.
These rolls aren’t just about filling bellies; they’re crowd-pleasers too! just picture it: your friends gather 'round, and instead of boring chips or store-bought snacks, you lay out warm, finger food that’s begging to be popped into their mouths.
Perfect for gatherings or just a cozy night in!
What’s more, these cheesy bundles offer a comforting vibe that’s hard to beat. i mean, who doesn’t want a fluffy cheese-filled roll after a long day? and they’re so easy to make—even the kids can get involved.
Just think of it as baking with kids : fun and delicious!
Plus, they’re a no-fail roll recipe. Even if baking isn’t exactly your strong suit, the simple cheese dough ensures success every time. You’ll come away feeling like a kitchen superstar, trust me!
Engaging Everyone—Especially You!
Ready to mix things up with a new favorite in your party food recipes arsenal? these savory rolls for gatherings will have everyone asking for your secret.
They’re perfect for any celebration, and you'll want to serve them at your next family get-together or holiday fun. seriously, if you want those smiles and happy bellies, this is your go-to.
And there’s something undeniably satisfying about pulling a tray of warm, poppable cheesy bites from the oven. the savory flavors meld together perfectly; it’s a simple yet delicious experience.
Plus, the dough is forgiving—you can easily experiment with fillings! want to add some sizzling bacon or pop in some jalapeños? go for it!
So what's next?
Let’s Gather the Goods!
Alright, it’s time to fire up those ovens and grab your ingredients so we can jump into making some of the best cheese roll ideas ever.
You won’t regret diving into this cheesy goodness! snack time awaits, and i promise it’ll be a blast!
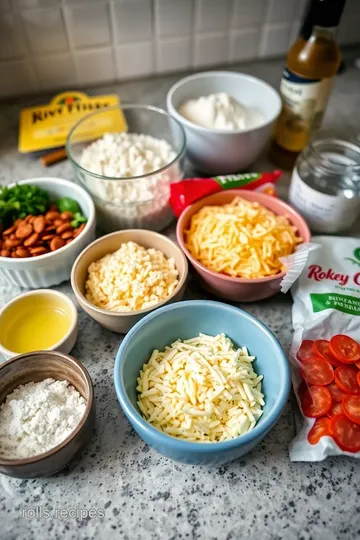
Essential Ingredients Guide
Alright, my kitchen warriors, let’s dive into the essentials of whipping up Cheesy Bliss Party Rolls in a flash! If you’re looking to impress your friends and family without breaking a sweat, buckle up because I'm about to share my hot tips for the must-have ingredients, all prepped to ensure you nail that easy cheese dough !
Premium Core Components
When making any tasty creation, start with premium ingredients . The difference in quality really shines through, especially in those savory rolls for gatherings.
-
For our dough, you'll need 2 cups (240g) of all-purpose flour . Now, what’s really exciting about this simple ingredient is that it provides the perfect backbone for your Cheesy Party Rolls.
-
Add in 1 teaspoon (5g) of instant yeast , 1 teaspoon (5g) of sugar , and 3/4 teaspoon (4g) of salt .
These guys are crucial — yeast makes our rolls fluffy, the sugar gives it a hint of sweetness, and salt? well, it blesses everything with fabulous flavor.
-
Don’t forget a tablespoon (15ml) of olive oil and 3/4 cup (180ml) of warm water (think around 110° f or 43° c ).
Pro tip : measure your water first and then give it a little body check before tossing it in. too hot and you risk killing the yeast — like, no thanks!
When it comes to storage , keep your leftover ingredients in a cool, dry place. flour can last up to a year when sealed, while yeast should be used within 6 months of opening.
For choosing the freshest ingredients, always check the label for the expiration date. Fresh ingredients equal fresh flavors, you know?
Signature Seasoning Blend
Now, seasoning is where the magic happens! For our rolls, a tablespoon (15g) of Italian seasoning is pure gold. If you’re feeling wild and want to switch it up, toss in some garlic powder or a sprinkle of black pepper to wake things up!
Know your cheese, folks! we’re working with 1 1/2 cups (150g) of shredded mozzarella cheese and 1/2 cup (50g) of shredded cheddar cheese .
Cheesy rolls recipe tip: using a mix gives you that gooey stretch plus rich flavor.
Smart Substitutions
Okay, let’s say you’re missing an ingredient, no sweat! Here are some common substitutions:
- All-purpose flour? Use bread flour for an even fluffier result.
- If you’re low on mozzarella , grab some pepper jack for a kick!
- Emergency replacements: No olive oil? Melt some butter instead!
If you need to cater to dietary restrictions, consider using gluten-free flour or dairy-free cheese alternatives. Make it personal and adaptable — it’s all about those cozy vibes.
Kitchen Equipment Essentials
You don’t need a fancy kitchen to whip up these cheesy delights, but having the right tools makes everything smoother. Here's what I swear by:
- Mixing bowl
- Measuring cups and spoons
- Baking sheet lined with parchment paper (trust me on this one!)
- A rolling pin if you want to go all out.
Storage solutions are key! Invest in some airtight containers for your flour and herbs. They'll stay fresh longer, and your fridge will thank you.
Let’s face it, you want to Bake Cheesy Party Rolls in 35 Minutes , and with these tips and tools, you’re set up for culinary success!
Ready to Roll?
Now that you’re armed with the essentials, do you feel that exciting rush? it’s time to transform these components into the quick appetizer ideas that'll wow your guests.
Trust me, once you pull those warm, melty cheesy party rolls from the oven, you’ll be the rockstar of every gathering.
So grab those ingredients, and let’s roll!

Mastering the Art of Professional Cooking: Your Guide to Flawless Cheesy Party Rolls
So, you're itching to be the life of the party with some cheesy bliss party rolls ? well, look no further! today, i’m diving into the professional cooking methods that will have you whipping up these delicious snacks in just 35 minutes .
Seriously!
Essential Prep Steps
Before we roll up our sleeves, let’s chat about the essentials. first up, mise en place . this fancy term just means getting everything ready before you start.
So, grab your ingredients—flour, yeast, cheese, the works—and have them measured out. it keeps things moving smoothly.
Time management is crucial here. Set a timer for each stage. For example, while your dough rises for 10 minutes , clean up the mess you just made. Winning at multitasking!
Organize your station . Keep your rolling pin, baking sheets, and mixing bowls within arm’s reach. Trust me, you’ll thank yourself later when you’re not scrambling around looking for stuff.
And don’t forget safety considerations ! watch out for hot surfaces, and make sure to keep your knives (and fingers!) safe.
You want to enjoy those rolls, not bandage up a kitchen mishap.
Step-by-Step Process
Alright, let’s get into it! Here’s how to bake your cheesy rolls step by step.
-
Prepare the dough : in a bowl, mix 2 cups of all-purpose flour , 1 teaspoon of instant yeast , and the other dry ingredients.
Add 1 tablespoon of olive oil and 3/4 cup warm water (around 110° f) . stir until it forms a dough.
-
Knead it Out : Knead that dough for about 5 minutes until it’s smooth. Cover it with a towel for those 10 minutes of rising time.
-
Make the Filling : While it’s rising, mix 1 1/2 cups of mozzarella with 1/2 cup of cheddar and any herbs you want. The cheese bomb is real!
-
Roll it Out : Preheat that oven to 375° F . Roll your dough into a rectangle, about 1/4 inch thick .
-
Assemble the Rolls : Now, sprinkle your cheese mix all over the dough. Roll it up tightly and cut it into 12 equal pieces .
-
Bake and Serve : Place those rolls on a baking sheet and bake for 15- 20 minutes until they're golden brown and ooey-gooey.
Expert Techniques
Want to take your rolls to the next level? Here are some expert techniques .
-
Keep an eye out for temperature control points . The dough should rise in a warm space, but not too hot. You’re trying to create fluffy goodness, not a dough pancake!
-
Pay attention to timing precision . Rolls need that 15- 20 minutes to bake perfectly. If you go too long, bye-bye gooey bliss.
-
Use visual cues for doneness. Golden brown tops and melting cheese peeking through mean it’s time to feast.
Success Strategies
We all make mistakes, but you can sidestep the common ones if you follow these success strategies .
-
If your rolls aren’t rising, check that your yeast is fresh. Nothing worse than flat rolls!
-
To ensure quality, do a quick taste test with a bit of the filling before rolling. Adjust seasoning if needed.
-
Want to be that host? Make-ahead options are available! You can prepare the dough the night before and let it rise in the fridge. Just shape and bake when it’s party time!
Your friends will adore these savory rolls —trust me, they’ll be the hit of any game day or holiday gathering.
So there you have it! you’re now armed with the best techniques and tips for making homemade rolls in 35 minutes .
Honestly, there’s nothing like the aroma of fluffy cheesy bread fresh out of the oven. stay tuned for more cooking shenanigans! we’ll delve into additional information in the next section, covering everything from roll variations to serving suggestions!

Pro Tips & Secrets for Your Cheesy Party Rolls
Listen up, friends! Baking these Cheesy Party Rolls isn’t just about following the steps; it’s about adding that personal touch. Here’s what I’ve learned from countless oven adventures.
First off, don’t rush the dough . let it rest! this 10-minute rise makes all the difference. you want those rolls to be fluffy and light, not dense and sad.
I mean, who wants that? also, while kneading, if it's too sticky, add a sprinkle of flour bit by bit.
Think of it like a delicate dance with your dough!
When it comes to flavor, you can jazz this up. a sprinkle of garlic powder or a mix of herbs can crank those yummy flavors up to eleven.
And always taste as you go! trust me; seasoning is key.
For a beautiful presentation, try using a sharp knife to cut each roll. clean cuts equal pretty edges. and hey, don’t be shy with your garnishes.
A few sprigs of fresh parsley or a drizzle of olive oil can make these rolls pop!
Perfect Presentation to Wow Guests
Now that you’ve baked the rolls, let’s talk about plating . arranging your rolls can turn an ordinary snack into a feast for the eyes.
Place them on a large platter, circling a bowl of warm marinara sauce in the center. immediate appetite stimulus, right?
For garnishing, consider some colorful sprigs of basil or parsley to add a fresh kick. Plus, who doesn’t love some color combinations on their plate? The bright green from herbs against the golden-brown rolls? Total Instagram gold!
And don’t forget about visual appeal . Keep your serving area clean and clutter-free. A well-prepped table makes everything look gourmet. Trust me, it’s the little things!
Storage & Make-Ahead Tips
So, maybe you wanna make these ahead of time or save some for later? here’s the scoop! storage guidelines are simple: let your rolls cool, then pop them in an airtight container.
They’ll be good for up to 3 days at room temp. for longer storage, toss those babies in the freezer! they’ll last well for about a month .
When you’re ready to devour, no worries! just reheat them at about 350° f ( 175° c) for 10- 15 minutes.
This keeps them warm and cheesy, just like they were fresh outta the oven. seriously, nothing beats a warm cheese roll right before the game!
Creative Variations to Keep Them Interesting
Feeling adventurous? there are so many ways to shake things up with these roll variations ! you can adapt the cheese—try pepper jack for a spicy twist.
Feeling veggie? toss in some sautéed spinach or peppers for a nice crunch.
Got a holiday coming up? Mix in some seasonal cheeses like gouda or brie. The world is your oyster—er, cheese!
You can also adjust the dietary needs. gluten-free flour works like a charm for those who need it. just make sure you find a good one that can still rise like a champ.
Complete Nutrition Guide for Comfort and Health
Now, let’s get real about nutrition. Each cheesy roll packs in about 150 calories . That’s not too shabby for a bite-sized snack that’s so phat with flavor.
Rich in protein from the cheese, these rolls can keep you feeling satisfied between meals without binging. but hey, remember portion control! two to three rolls as snacks are usually spot on.
Just listen to your belly!
And don’t forget: these are family-friendly recipes that kids love. So, make it a fun cooking session and watch them jump with joy when they find out you baked cheesy party rolls in 35 minutes !
The Fun’s Just Beginning!
So there you have it—everything you need to rock your cheesy party rolls ! easy to whip up and bursting with deliciously cheesy flavors .
Whether you're prepping for game day or hosting a holiday gathering, these quick bites are bound to impress.
Bake some today and revel in the smiles of your family and friends! Trust me, once you have these in your recipe repertoire, they’ll become a staple, a go-to for every occasion! Now get out there and bake those rolls; you got this!
Frequently Asked Questions
How can I bake cheesy party rolls in 35 minutes easily?
To bake cheesy party rolls in 35 minutes, prepare the dough and filling ahead of time, and ensure your ingredients are at room temperature. Knead the dough for about 5 minutes, let it rise for 10 minutes, and then quickly roll it out. Assemble and bake them in a preheated oven while keeping track of the time to ensure they are golden brown after 15-20 minutes.
What are some tips for making the best cheesy party rolls?
For the best results, ensure your water is warm (not hot) to properly activate the yeast without killing it. Adding garlic powder or herbs to the dough can enhance flavor. Use a mix of cheeses for a more complex taste, and bake the rolls until they are golden brown for that perfect texture.
Can I freeze baked cheesy party rolls?
Yes, you can freeze baked cheesy party rolls! Allow them to cool completely, then wrap them tightly in plastic wrap and store them in an airtight container or freezer bag. When ready to eat, reheat them in the oven at 350°F (175°C) until warmed through and the cheese is melty again.
What variations can I try in the cheesy filling?
You can customize the cheesy filling by adding ingredients like cooked, crumbled bacon for a savory kick, or sautéed spinach and peppers for a veggie option. Additionally, experimenting with different cheese combinations, like incorporating pepper jack for spice or using a blend of cheddar and gouda, can create delicious variations.
How should I store leftover cheesy party rolls?
Store any leftover cheesy party rolls in an airtight container at room temperature for 1-2 days. For longer storage, refrigerate them where they will last up to a week, or freeze for up to three months. To enjoy later, simply reheat them in the oven or microwave until warmed through.
Are there any nutritional considerations for cheesy party rolls?
Each cheesy party roll contains approximately 150 calories, with 6g of protein and 8g of fat. If you're watching your sodium intake, consider using low-sodium cheese and reducing salt in the dough. Additionally, you can modify the recipe by adding vegetables for added nutrients and fiber while enjoying the gooey goodness!
Cheesy Party Rolls: Bake in Just 35 Minutes! Card

⚖️ Ingredients:
- 2 cups all-purpose flour
- 1 teaspoon instant yeast
- 1 teaspoon sugar
- 3/4 teaspoon salt
- 1 tablespoon olive oil
- 3/4 cup warm water (110°F/43°C)
- 1 1/2 cups shredded mozzarella cheese
- 1/2 cup shredded cheddar cheese
- 1 tablespoon Italian seasoning (optional)
- 1/4 teaspoon black pepper (optional)
🥄 Instructions:
- Step 1: In a mixing bowl, combine flour, yeast, sugar, and salt.
- Step 2: Add olive oil and warm water; stir until a dough forms.
- Step 3: Knead dough on a floured surface for about 5 minutes until smooth.
- Step 4: Cover with a towel or plastic wrap; let rise for 10 minutes.
- Step 5: In a separate bowl, mix mozzarella, cheddar, Italian seasoning, and black pepper.
- Step 6: Preheat oven to 375°F (190°C). Roll out the dough into a rectangle on a floured surface, about 1/4 inch thick.
- Step 7: Sprinkle the cheese mixture evenly over the rolled-out dough.
- Step 8: Roll the dough tightly into a log shape; pinch seams to seal.
- Step 9: Cut the log into 12 equal pieces (about 1-2 inches wide).
- Step 10: Place rolls on a parchment-lined baking sheet, cut side up.
- Step 11: Bake for 15-20 minutes until golden brown and cheese is melted.
- Step 12: Allow to cool for a few minutes before serving warm.
Previous Recipe: How to Bake Chili Cinnamon Rolls: Sweet & Spicy Treats to Savor
Next Recipe: Ultimate Juicy Grill Beef Sliders on Martin's Potato Rolls: 5 Easy Tips!