Crispy Baked Filo Spring Rolls with Savory Filling
Want to impress at your next gathering? Discover my secret to bake filo spring rolls crispy & delicious, blending flaky textures with savory fillings!

- Introducing the Crispy Treat: Bake Filo Spring Rolls Crispy & Delicious
- The Good Stuff: A Quick Peek Into Baked Filo Spring Rolls
- Why You’ll Love These Rolls
- A Hidden Gem in Your Kitchen: Customize Away!
- Essential Ingredients Guide
- Mastering the Professional Cooking Method
- Pro Tips & Secrets for Bake Filo Spring Rolls Crispy & Delicious
- Perfect Presentation for Your Spring Rolls
- Storage & Make-Ahead Secrets
- Creative Variations to Try
- Complete Nutrition Guide
- Expert FAQ Solutions
- Wrap-Up and Enjoy!
- Recipe Card
Introducing the Crispy Treat: Bake Filo Spring Rolls Crispy & Delicious
Oh my gosh! do you remember the first time you bit into a spring roll? that crispy crunch followed by a burst of savory goodness? for me, it was during a summer picnic when i was, like, eight years old.
Aunt mabel used to whip up these magical little rolls, and i couldn't get enough. fast forward to today, i’ve ditched the picnic table but kept my love for spring rolls, especially when they’re baked, not fried.
Honestly, there’s something about baked spring rolls that makes them feel just a bit healthier while maintaining that crunch we all crave.
So, if you’re ready to learn how to bake filo spring rolls crispy & delicious , stick around!
The Good Stuff: A Quick Peek Into Baked Filo Spring Rolls
You might be asking yourself, “where did these crispy delights come from?” well, spring rolls have a long history, originating from various parts of asia.
They were traditionally a way to celebrate the arrival of spring with fresh vegetables, wrapped up in a deliciously crispy shell.
Nowadays, they’re a staple at parties and gatherings, especially for those looking for asian-inspired appetizers that will impress guests.
Now, let’s get down to the nitty-gritty. this recipe isn’t rocket science, but it does take a little finesse. we’re talking about a medium difficulty level here.
With prep time of about 30 minutes and a cook time of 25- 30 minutes, you’ll have about a dozen golden, crispy bites straight from the oven.
And the best part? you’ll make around 12 rolls, perfect for sharing (or not, no judgment here!). cost-wise, you'll find that these rolls won’t break the bank, especially if you go for seasonal veggies.
Why You’ll Love These Rolls
Okay, let’s chat about the benefits because who doesn’t love a good upside? first off, you’re looking at healthy spring rolls that are packed with nutrients.
Fill them with shredded carrots, cabbage, and whatever protein you fancy—be it chicken, tofu, or shrimp. this means they’re not just filling but also loaded with vitamins and good stuff.
Plus, they’re way better than those greasy ones you might find in a takeout box. the flaky filo pastry gives you that light crunch without the heaviness of frying.
Seriously, if you haven’t tried a baked version, it’s a game-changer. they make fantastic party snacks, too! you know how parties can be? everyone’s fighting for room around the hors d'oeuvres table, and you throw down a platter of these golden gems? instant crowd-pleaser.
A Hidden Gem in Your Kitchen: Customize Away!
With a little creativity, you can turn this simple spring roll recipe into something uniquely yours. think spicy with a kick of sriracha, or make ‘em vegetarian with a mix of mushrooms and bell peppers.
The possibilities are endless! plus, if you’re hosting a get-together, they’re great to serve with a variety of flavorful dipping sauces like sweet chili or homemade soy sauce alternatives.
Imagine serving them alongside a cool cucumber salad. refreshing, right?
Before we dive into the ingredient list, remember this: you can keep it simple, but don’t be afraid to throw a twist on these rolls.
A little fun with the fillings makes them even more delightful!
Ready to roll? Here’s what you’ll need to make those crispy finger foods that everyone will rave about!
Essential Ingredients Guide
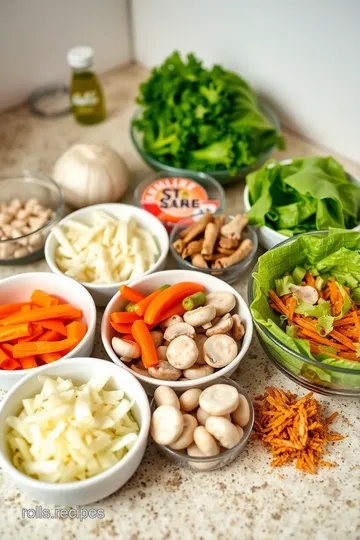
Alright, my fellow foodies, let’s dive into the essentials you’ll need to whip up out-of-this-world baked spring rolls ! nothing beats that crispy crunch and savory goodness, right? before we get our hands dirty, let's chat about the premium core components first.
Premium Core Components
When we’re talking about ingredients, we want the good stuff. Measurements ? Let’s keep it simple:
- Filo Dough : You’ll need about six sheets . That's about 280g in metric.
- Shredded Carrots : Grab a cup, or roughly 150g .
- Cabbage : Another cup of this tasty crunch, that’s another 150g .
Quality Indicators
How do you know you’re buying quality? Look for vibrant colors, especially with veggies. If that cabbage is looking limp or the carrots are dull, just walk away!
Storage Guidelines
Keep your filo dough in the fridge until you're ready to use it. once you open those sheets, cover them with a damp towel to prevent drying out.
Nobody wants sad, cracked dough!
Freshness Tips
Pick the freshest veggies you can find. Look for those with no browning or blemishes. Trust me, a little freshness goes a long way in creating those Crispy Spring Rolls .
Signature Seasoning Blend
Next up, the flavor! A good signature seasoning blend can elevate your spring rolls to another level.
- Essential Spice Combinations : Think about adding a pinch of garlic powder or even some crushed red pepper for a kick.
- Herb Selections : Fresh cilantro or green onions work wonders!
- Flavor Enhancers : A splash of soy sauce adds that umami boost.
Smart Substitutions
Here’s where it gets fun. If you're out of something, don’t stress!
- Common Alternatives : If you only have regular pastry dough, you can still make those homemade spring rolls, but you won’t get the same crispiness.
- Dietary Modifications : Wanna keep it veggie? Swap out chicken for sautéed mushrooms or tofu!
- Emergency Replacements : Running low on soy sauce? Use teriyaki for some sweetness instead.
Kitchen Equipment Essentials
Now that we have our ingredients sorted, let’s talk kitchen equipment . You don’t need a fancy setup, just some must-have tools to get things rolling.
- Must-Have Tools : A basic baking sheet, mixing bowl, and a sharp knife are key players.
- Alternative Equipment Options : No pastry brush? Use a spoon to drizzle butter on the filo layers.
- Preparation Tips : Preheat your oven to 400° F ( 200° C) , get those baking sheets lined, and you’re in business.
- Storage Solutions : Keep your baking sheets organized! Nobody wants to dig through a pile to find the good stuff.
Creating these crispy baked filo spring rolls is all about planning. when you’ve got good quality ingredients and the right equipment, the process becomes pretty straightforward.
Trust me, there’s nothing better than impressing your friends with these asian appetizers .
Are you ready to get your spring roll game on? stay tuned for the instructions section, where i’ll break down exactly how to make these flavors pop and achieve that perfect golden, crispy exterior! believe me, you’re just a few steps away from a party snack that will disappear in no time.
Mastering the Professional Cooking Method
When you decide to create something special in the kitchen, especially something like bake filo spring rolls crispy & delicious , it’s all about the journey from prep to bite.
Trust me, there’s an art to it that makes a world of difference.
Essential Preparation Steps
Let’s kick things off with mise en place . this fancy french term just means having everything ready to rock before you start cooking.
Chop your veggies, measure your ingredients, and have your filo dough out. trust me, this saves so much time and chaos in the kitchen.
Now, onto time management . you’ve got about 30 minutes of prep time and another 25 to 30 minutes to bake those gorgeous spring rolls at 400° f ( 200° c) .
Set a timer for each step. it’s like having your own personal sous-chef reminding you to stay on track.
Next, let’s chat about organization strategies . keep your workspace clean. you don't want to trip over a flour bag while juggling filo dough! have all your tools handy.
This means mixing bowls, a pastry brush, and baking sheets lined with parchment paper.
Oh, and don’t forget about safety considerations . Use sharp knives carefully and avoid cross-contaminating any ingredients. Nobody wants a surprise visit from Mr. Salmonella!
Step-by-Step Process
-
Prepare the filling : start with those shredded carrots, chopped cabbage, and your choice of protein. mix them all in a bowl.
A tablespoon of soy sauce, a little sesame oil, and some garlic and ginger join the party next. give it a good mix, and voilà, your filling is set!
-
Prepare the filo dough : after preheating your oven to 400° f ( 200° c) , roll out your filo dough.
Lay down a sheet, brush it lightly with melted butter, then layer another sheet on top. seriously, don’t skip this buttery goodness; it’s what makes those spring rolls crispy!
-
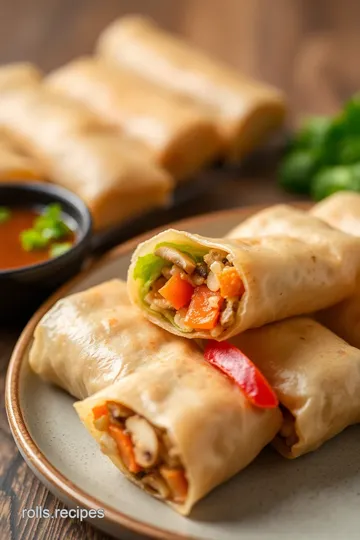
Fill and roll : time to fill ’em up! place your savory filling on one end of the layered filo.
Fold the sides in, then roll it tightly. seal the edge with a bit of butter and place them seam side down on your baking sheet.
-
Bake : give those bites a good spray with more melted butter. this will add flavor and enhance the crispy texture.
Pop them in the oven for 25- 30 minutes , keeping an eye on that golden-brown color. pro tip: when they're done, they should sound a bit hollow when you tap them!
Expert Techniques
If you want your baked spring rolls to truly shine, let’s talk about some professional methods . be cautious about overfilling; that’s a common mistake that’ll lead to messy ruptures.
For quality checkpoints, check your rolls halfway through baking. want to make them even crispier? freeze them for about 10 minutes before baking.
Lastly, if anything goes sideways, don't panic! If your filling oozes out, just tidy up the edges with a fork, and no one will know the difference!
Success Strategies
Avoid common mistakes, like letting the filo dry out. it’s super delicate, so cover unused sheets with a damp towel while you work.
For quality assurance, take a bite of one to ensure your filling is just right. if it's frozen, go for a 5-minute longer cook time to really get that golden texture.
And if you're all about make-ahead options, wrap and freeze them before baking. When guests arrive, pop those bad boys in the oven for hot, crispy snacks in minutes!
Additional Information
Now that you've got the lowdown on making crispy baked filo spring rolls with savory filling , including vegetarian and chicken options, you’re fully equipped for your next gathering.
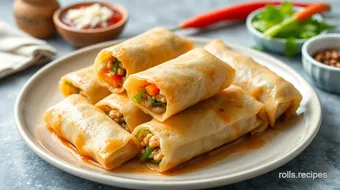
Imagine serving these asian-inspired appetizers with flavorful dipping sauces like sweet chili or soy sauce alternatives! your friends will rave about your cooking skills.
So, are you ready to whip up some homemade spring rolls? Get that kitchen fired up and let that crispy goodness shine!
Pro Tips & Secrets for Bake Filo Spring Rolls Crispy & Delicious
Okay, let’s get real for a second. making baked spring rolls sounds a bit daunting, right? but trust me, it’s totally doable! here are some pro tips that i’ve picked up over the years.
First, let’s talk about cook times. i always keep an eye on my rolls during the last few minutes of baking.
You want that golden brown finish, but if you look away for one second , they can go from perfect to burnt.
No one wants that!
Another secret? save time with your filling. instead of chopping all those veggies by hand, toss them in a food processor.
It gets done in seconds and gives you that savory spring roll filling you crave without taking up half your evening.
Oh, and don’t be shy with flavor! a splash of sesame oil can transform a simple veggie mix into a party on your taste buds!
Perfect Presentation for Your Spring Rolls
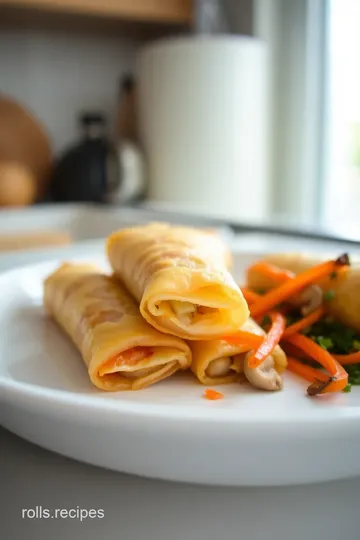
Now, let’s chat about presentation. because, let’s face it, we eat with our eyes first! for plating, stack those crispy spring rolls on a colorful plate.
You can line them up on a diagonal for that fancy restaurant look. for a bit of fun, sprinkle some chopped herbs like cilantro or scallions on top.
It adds color and makes your dish pop.
Wanna spice it up even more? garnish with some sesame seeds or even a drizzle of spicy mayo or homemade soy sauce alternatives.
Seriously, more color means more appetite! it makes your guests go “ooh!” and “ahh!” before they even take a bite.
Storage & Make-Ahead Secrets
If you're making these as part of your meal prep, let me tell you: they do hold up pretty well! just make sure to store them in an airtight container.
They’ll stay fresh in the fridge for about 3-4 days. if you want to keep that crunch, move them to the oven for reheating instead of the microwave.
Just about 10- 15 minutes at 350° f ( 175° c) will rejuvenate that crispy texture.
Thinking of making them ahead? you can prep the filling and roll them up in advance! just cover them with a damp towel while you prepare, to keep the filo from drying out.
Then throw them in the oven when you’re ready to serve. it's honestly the perfect solution for quick appetizers!
Creative Variations to Try
Now, let’s get creative! while i’m a sucker for the classic chicken or veggie filling, don’t hesitate to play around.
You can switch up your proteins – think shrimp for a seafood-inspired twist or even black beans for a vegan option.
Don’t forget to try some different spices or sauces in the filling for unique flavor profiles; maybe a pinch of taco seasoning for a fun fusion?
Love celebrating the seasons? add in some roasted butternut squash in the fall for a cozy touch. or, in the summer, go for lighter options like zucchini or fresh herbs for those garden vibes.
Complete Nutrition Guide
So, here’s the scoop on nutrition. each of these homemade spring rolls clocks in at around 180 calories. you’ve got 6g of protein, which is decent for a snack, but don’t be afraid to load them up with veggies! adding extra fillings not only boosts flavor but also adds fiber and keeps your spring rolls wholesome and healthy.
Keep in mind any dietary restrictions. if you need them gluten-free, just swap out the filo for rice paper – still delicious! plus, they end up as low-fat spring rolls because you're skipping the fryer.
Expert FAQ Solutions
I get a lot of questions about these bad boys, so let’s clear some things up! a common worry? “what if my filo tears?” don’t freak out! just piece it together like a puzzle.
It’ll still taste amazing and no one will notice.
And if the filling oozes out? No biggie! You’re still going to get that awesome crunch on the outside with a flavor-packed center. Just remember to tightly roll those babies up!
Wrap-Up and Enjoy!
So there you have it, folks! these bake filo spring rolls crispy & delicious will be the star of your next gathering or a go-to snack during the week.
With all these tips and tricks under your belt, you’ll become a filo dough ninja in no time. remember, cooking should be fun and creative.
Happy cooking!
Crispy Baked Filo Spring Rolls with Savory Filling Card
⚖️ Ingredients:
- 1 cup (150g) shredded carrots
- 1 cup (150g) chopped cabbage
- 1 cup (150g) cooked and shredded chicken (or tofu for a vegetarian option)
- 2 tablespoons soy sauce (30mL)
- 1 tablespoon sesame oil (15mL)
- 2 cloves garlic, minced
- 1 teaspoon grated ginger (5g)
- Salt and pepper to taste
- 6 sheets filo dough
- 4 tablespoons melted unsalted butter (60g) (or olive oil)
- Cooking spray (optional)
🥄 Instructions:
- Step 1: In a mixing bowl, combine shredded carrots, chopped cabbage, and chicken (or tofu).
- Step 2: Add soy sauce, sesame oil, garlic, ginger, salt, and pepper. Mix well.
- Step 3: Preheat the oven to 400°F (200°C).
- Step 4: Lay out a sheet of filo dough on a clean surface and brush lightly with melted butter.
- Step 5: Layer a second sheet on top, repeating the buttering.
- Step 6: Place 2-3 tablespoons of the filling at one end of the layered filo.
- Step 7: Fold the sides in over the filling and roll tightly from the filled end to the opposite edge.
- Step 8: Seal the edge with a little butter and place seam side down on a baking sheet lined with parchment.
- Step 9: Spray or brush the tops lightly with more melted butter.
- Step 10: Bake for 25-30 minutes or until golden brown and crispy.
Previous Recipe: How to Bake Amazing Chorizo Rolls with Spicy Flavor: An Easy Recipe
Next Recipe: How to Make Amazing Baking Cheese Rolls with Savory Flavor