Bake Garlic Rolls with Buttery Garlic Bliss
Craving the *best* Bake Garlic Rolls with Buttery Garlic Bliss? Try my simple herb-glazed version! So juicy and flavorful, it's perfect for weeknights or holidays. Get my tips inside!

Have you ever had one of those days where a big, warm batch of homemade rolls could save your soul? you know, the type of rolls that make your house smell like heaven and are slathered in a buttery garlic bliss? that's exactly what we’re diving into today with these incredible bake garlic rolls with buttery garlic bliss .
Honestly, this is my go-to recipe when i want to impress friends who think they can't live without store-bought bread.
Spoiler alert: they can’t taste my homemade ones without asking for seconds!
Recipe Overview
These rolls have a bit of history, tracing back to the heart of italian cuisine . italian bread rolls have graced our dinner tables for generations, offering that perfect base for any dish.
Today, they’ve become a staple in homes across america, whether you serve them at a cozy family dinner or big events like thanksgiving.
Now, let’s chat about the nitty-gritty. this recipe is a breeze! it takes about 1 hour and 5 minutes to whip up, with just a 15-minute prep time and a little patience while the dough rises.
You don’t have to be a master baker; these rolls are pretty beginner-friendly! plus, with minimal ingredients that won’t break the bank, you get 12 fluffy, golden brown rolls that are perfect for sharing.
Key Benefits
Now, let's talk about why you need these rolls in your life. first off, they’re not just delicious; they’ve got some health benefits too! garlic is known for boosting the immune system and adding flavorful goodness to your meals, making these rolls a delightful edifice of health and comfort.
And who doesn’t love comfort food recipes that double as a gourmet experience, right?
These rolls are perfect for so many occasions. thinking about a cozy night in? boom! make these rolls. got a family barbecue? these rolls will steal the spotlight.
They’re also ideal for pairing with soup or salad—hard to resist a good bowl of creamy tomato soup with soft garlic rolls! on top of that, compared to similar recipes, these boast a unique twist with a rich garlic butter sauce that takes them to another level.
So, if you’re ready to elevate your baking game and impress your loved ones, grab your apron! we're about to whip up something special that encapsulates the essence of homemade garlic rolls: soft, buttery, and bursting with flavor.
Get your kitchen ready; we’re about to gather some simple, wholesome ingredients to make these rolls that even your picky eaters will love!
Essential Ingredients Guide to Bake Garlic Rolls with Buttery Garlic Bliss
Let’s dive into what makes those bake garlic rolls with buttery garlic bliss so special. these rolls are not just your average dinner addition; they’re comfort food magic .
Understanding the right ingredients truly elevates the whole experience, so let’s break down what you need!
Premium Core Components
Before anything hits that mixing bowl, you gotta know your stuff. Here are the essentials:
Detailed Measurements:
For those who love precision, here’s what you’ll need:
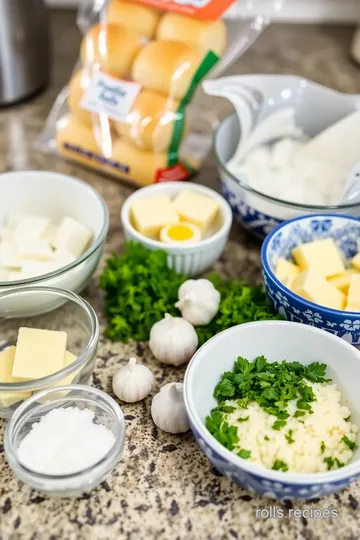
- 4 cups (480 g) of all-purpose flour
- 2 ¼ teaspoons (1 packet) of active dry yeast
- 1 cup (240 mL) of warm water (about 110° F or 43° C )
- 2 tablespoons (25 g) of granulated sugar
- 1 teaspoon (5 g) of salt
- 2 tablespoons (30 mL) of olive oil
Quality indicators:
fresh flour is key — check that your flour isn’t clumpy. and for yeast? make sure it's alive! it should foam up nicely in that warm water.
Also, grab a good olive oil; the flavor really shines through .
Storage Guidelines:
Keep your flour in a cool, dark place. Yeast? Store it in the fridge after opening. Olive oil is best in a dark bottle to avoid oxidation.
Freshness Tips:
When selecting garlic, look for firm bulbs that are free from blemishes. Avoid moldy or sprouting garlic; that stuff’s just sad. Nobody wants sad garlic rolls .
Signature Seasoning Blend
Now, onto the good stuff — seasoning!
Essential Spice Combinations:
The magic really happens in the buttery garlic sauce . You need:
- 4 cloves of minced garlic
- A sprinkle of salt and black pepper
- And don’t forget fresh parsley for that pop of color and flavor.
Herb Selections:
Pairing parsley with the garlic is classic, but feel free to add dried oregano or even a dash of thyme. Herbs can completely change your game!
Flavor enhancers:
consider adding a pinch of red pepper flakes for a kick, or swap in some nutritional yeast for a cheesy flavor .
Seriously, it's a game changer for garlic rolls with cheese.
Smart Substitutions
Not every pantry is stocked to the brim, and that’s okay. Let’s figure out substitutions!
Common Alternatives:
Don’t have all-purpose flour? Bread flour works beautifully for a chewier roll. Out of yeast? Try using baking powder instead, though the result will be different.
Dietary Modifications:
Want to whip up vegan garlic rolls ? Use aquafaba instead of butter and coconut oil. Boom! You’re still in the garlic bliss zone.
Emergency Replacements:
Ran out of fresh garlic? Garlic powder is your friend — just use about 1 teaspoon . It’ll do in a pinch.
Kitchen Equipment Essentials
Before you start, make sure you have the right tools at hand.
Must-Have Tools:
You’ll need:
- A large mixing bowl
- Measuring cups/spoons
- A whisk or wooden spoon (whatever floats your boat)
Alternative Options:
Can’t find a baking sheet? Use any flat surface or even a cast-iron skillet—yes, we’re flexible.
Preparation Tips:
Mentioning flour on the counter can get messy—it’s basically a baking rite of passage. Keep a damp cloth nearby to wipe down spills.
Storage Solutions:
For unused rolls, store in an airtight container for up to 3 days . Or freeze them! Wrap in foil and then plastic wrap to keep them fresh.
And there you have it! with these essential ingredients and tips in hand, you're ready to whip up some mouthwatering bake garlic rolls with buttery garlic bliss .
Grab your apron, and let’s get our bake on! in the next section, i’ll guide you through each step so you can enjoy that fluffy garlic heaven in your home.
Trust me, your taste buds will thank you!
Mastering the Art of Baking: Professional Cooking Method
Let’s talk about a rockstar recipe that deserves to be in your kitchen arsenal: bake garlic rolls with buttery garlic bliss .
Seriously, these rolls are to die for! with their fluffy texture and that heavenly garlic flavor, they’ll be a hit at any dinner table.
To nail this recipe, we gotta get serious about our cooking methods. don’t worry, i’ll keep it casual and fun!
Essential Preparation Steps
First things first: mise en place . this french term just means having everything in its place before you start cooking.
Gather your ingredients, measure them out, and you're already halfway to success. it's like putting on your favorite playlist before a dance party — you’re setting the vibe!
Now, let’s chat about time management. you know you can’t just put one thing in the oven and then zone out.
Keep an eye on your dough while it’s rising. that brings me to organization: clear a workspace and keep your tools handy.
Nothing kills the buzz like running around looking for that measuring spoon you just had!
And hey, let’s not forget about safety. Use a kitchen towel to handle hot pans, and keep your fingers away from those sharp knives! Safety first, kitchen warriors!
Step-by-Step Process
Alright, here comes the fun part! Here’s how you can Bake Garlic Rolls with Buttery Garlic Bliss step-by-step, no stress involved:
-
Activate that yeast : in a small bowl, mix 1 cup of warm water (about 110° f) , 2 tablespoons of sugar , and 2 ¼ teaspoons of yeast .
Let it sit until it’s foamy, around 5- 10 minutes . if it doesn’t foam, your yeast might be a dud—better luck next time!
-
Make the dough : in a bowl, combine 4 cups of all-purpose flour and 1 teaspoon of salt . then add your yeast mixture and 2 tablespoons of olive oil .
Stir until you’ve got a shaggy dough.
-
Knead like a pro : roll that dough onto a floured surface and knead for about 5- 7 minutes until it’s nice and smooth.
You want it to stretch and bounce back when poked.
-
Let it rise : put the dough in a greased bowl, cover it with a towel, and leave it in a warm spot until it doubles in size—this takes about 30 minutes .
-
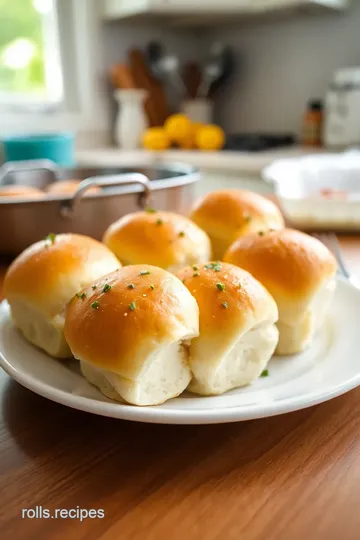
Shape Those Rolls : Punch the air out of the dough, divide it into 12 equal pieces , and roll each into a ball. Place them on a lined baking sheet.
-
Garlic Bliss Time : Mix ½ cup melted butter , 4 minced garlic cloves , 2 tablespoons of parsley , and a pinch of salt and pepper in a bowl.
-
Top It Off : Brush that garlic mixture generously over each roll. More garlic, more love!
-
Bake It : Preheat your oven to 375° F and bake those bad boys for 20- 25 minutes until they’re golden brown and smell amazing.
-
Serve Up the Goodness : Let them cool a bit, brush on any remaining garlic butter, and serve warm. Trust me, you’ll be everyone's favorite chef!
Expert Techniques
So, what’s the secret sauce that’ll make your garlic rolls absolute perfection? Here are some expert tips:
- Don’t Rush the Rise : Allowing your dough to rise properly is crucial for achieving those airy, fluffy rolls. Give it the time it needs!
- Quality Control : Before you take those rolls out of the oven, do the "doneness check"—give one a soft poke. If it springs back, it’s ready!
- Troubleshooting : If your rolls aren’t rising as expected, check the temperature of the environment. If it’s too cold, they’ll just chill out instead of growing!
Success Strategies
Let’s talk about the common mistakes that can ruin your roll party. avoid over-kneading; you want soft and buttery rolls, not tough ones! also, don’t skimp on the garlic; embrace the flavor! another tip? make-ahead options are a lifesaver; you can prep the dough and freeze it for later.
Want to know a secret? These homemade garlic rolls are perfect with soups or alongside salads. They also make amazing leftovers — just pop them back in the oven for a few minutes to warm them up!
Baking these buttery garlic bliss rolls isn’t just about eating; it creates moments! so while your kitchen might get a little messy, the delicious aromas and satisfying experience make it all worth it.
Now, prepare yourself for even more goodness in the Additional Information section coming up! Get ready for some tips on enjoying these flavorful garlic appetizers. Happy baking!

Pro Tips & Secrets to Perfect Bake Garlic Rolls with Buttery Garlic Bliss
Alright, folks! let’s dive into the heart of our bake garlic rolls with buttery garlic bliss . this recipe is all about those scrumptious, fluffy bites that make any meal feel like a fancy dinner, without needing a michelin star in your kitchen.
Here are my favorite pro tips and secrets to nail that bake every time!
First off, make sure your water for activating the yeast is warm, but not too hot. you want it around 110° f.
Too hot, and you’ll send those little yeasties straight to their demise. trust me, i learned the hard way.
Next, when you're kneading, give it a good 5- 7 minutes until that dough is smooth and elastic. it should bounce back when you poke it—like a firm handshake! and don’t rush the rising process—it’s not just some fluffy dough magic; it’s the secret to those soft garlic rolls .
Let it sit in a warm, cozy spot until it doubles in size.
Make it Visually Beautiful: Perfect Presentation Tips
Now let’s talk presentation ! presentation can turn your bread rolls from "meh" to "wow" in seconds. when you shape your dough into rolls, give them a nice, even space on your baking sheet.
You want your homemade garlic rolls looking cozy, but not cramped.
For garnishing, try fresh parsley sprinkled on top right before serving. that splash of green pairs beautifully with the golden brown bread and makes it look gourmet.
If you’re feeling fancy, drizzle a bit of your garlic butter sauce on top before they hit the table for that wow factor.
Just remember— we eat with our eyes first!
Storage & Make-Ahead Tips
Now, if you’re like me, you love a good make-ahead meal! here’s the scoop on storing and saving your buttery garlic bliss .
Once your rolls have cooled, you can keep them in an airtight container at room temperature for about 2-3 days.
If you somehow have leftovers (i mean, really?), toss them in the fridge where they can last up to a week.
Want to freeze them? absolutely! once they’ve fully cooled, pop them in a freezer bag. just thaw them when you're ready to eat and reheat in the oven for about 10- 15 minutes at 350° f.
They’ll taste just as fresh as the day they came out of the oven!
Creative Variations That Wow
Let’s shake things up! the beauty of baking is that you can mix and match to your heart’s content. want to make cheesy garlic bread rolls ? just add a handful of shredded mozzarella into your dough.
Feeling adventurous? try herb-infused garlic rolls by tossing in some dried italian herbs. it adds that extra layer of flavor that’s just to die for.
And if you're a fan of a bit of heat, how about a sprinkle of red pepper flakes in that topping?
Complete Nutrition Guide
You might be thinking, "okay, this sounds divine, but is it good for me?" well, let's break it down. each roll is around 190 calories, with about 9 grams of fat and 4 grams of protein.
They’re not exactly health food, but everything in moderation, right? these garlic dinner rolls are the perfect addition to soups, salads, or as a comforting side dish—think cozy nights in with a bowl of creamy tomato soup!
When portioning, aim for just one or two rolls per serving, which should satisfy your cravings without overdoing it. They’re the ultimate comfort food, but hey, balance is key!
Crafting your bake garlic rolls with buttery garlic bliss is more than just a recipe; it’s a way to connect with family and friends over good food.
These rolls are soft and buttery, perfect for scooping up savory sauces or as a side to your favorite dishes.
So, whether you’re a seasoned pro or just starting with easy bread recipes , these rolls are for you. go ahead, give them a try! you’ll impress your guests and maybe even find a new favorite.
Happy baking!
Frequently Asked Questions
What are the key ingredients in Bake Garlic Rolls with Buttery Garlic Bliss?
The essential ingredients include all-purpose flour, active dry yeast, warm water, granulated sugar, salt, and olive oil for the dough. For the buttery garlic topping, you'll need unsalted butter, minced garlic, fresh parsley, salt, and black pepper. Each of these components contributes to the flavorful and aromatic rolls.
Can I make Bake Garlic Rolls with Buttery Garlic Bliss ahead of time?
Yes, you can prepare the rolls in advance! After shaping the rolls, cover them and place them in the refrigerator for up to 24 hours before baking. Allow them to come to room temperature and rise slightly before baking for the best results.
What should I do if my dough doesn't rise properly?
If your dough doesn't rise, ensure that your yeast is active; check the expiration date and that the water used to activate it was warm, but not hot. If it fails to foam after 10 minutes, you may need to start over with fresh yeast. Also, make sure to place the dough in a warm area for rising; a cold environment can slow the process significantly.
How should I store leftovers of Bake Garlic Rolls with Buttery Garlic Bliss?
Leftover garlic rolls can be stored in an airtight container at room temperature for up to 2 days. For longer storage, wrap them tightly in plastic wrap and freeze them for up to a month. Reheat them in the oven at 350°F (175°C) for about 10-15 minutes before serving to bring back their fresh taste and texture.
Can I make any variations of Bake Garlic Rolls with Buttery Garlic Bliss?
Absolutely! You can add shredded cheese to the rolls for a cheesy version or mix herbs like oregano or thyme into the dough for extra flavor. For a spicy kick, consider adding red pepper flakes to the buttery topping. Experimenting with different additions can create unique flavor profiles that fit your taste!
What are some good serving suggestions for Bake Garlic Rolls with Buttery Garlic Bliss?
These rolls are delightful served warm as a side dish with creamy tomato soup or alongside a fresh garden salad. They also pair well with pasta dishes or can be enjoyed on their own as a standalone treat. A glass of crisp white wine or sparkling water with a splash of lemon makes for a refreshing accompaniment.
Bake Garlic Rolls with Buttery Garlic Bliss Card

⚖️ Ingredients:
- 4 cups all-purpose flour
- 2 ¼ teaspoons active dry yeast
- 1 cup warm water (about 110°F or 43°C)
- 2 tablespoons granulated sugar
- 1 teaspoon salt
- 2 tablespoons olive oil
- ½ cup unsalted butter, melted
- 4 cloves garlic, minced
- 2 tablespoons fresh parsley, chopped
- ½ teaspoon salt
- ¼ teaspoon black pepper
🥄 Instructions:
- Step 1: In a small bowl, combine warm water, sugar, and yeast. Let sit until foamy (about 5-10 minutes).
- Step 2: In a large mixing bowl, whisk together flour and salt. Pour the yeast mixture and olive oil into the flour. Stir until a shaggy dough forms.
- Step 3: Transfer the dough to a floured surface and knead for about 5-7 minutes until smooth and elastic.
- Step 4: Place the dough in a greased bowl, cover with a towel, and let rise in a warm place until doubled in size (about 30 minutes).
- Step 5: Punch the dough down and divide it into 12 equal pieces. Shape each piece into a ball and place on a lined baking sheet.
- Step 6: In a bowl, mix melted butter, minced garlic, parsley, salt, and pepper.
- Step 7: Brush the garlic butter mixture generously over each roll.
- Step 8: Preheat the oven to 375°F (190°C). Bake rolls for 20-25 minutes until golden brown.
- Step 9: Remove from oven, let cool slightly, and serve warm. Brush with any remaining garlic butter.
Previous Recipe: Easy & Flaky Bake Apple Turnovers: Sweet Treats for Cozy Days
Next Recipe: Quick & Delicious Bake Apple Crescents: A Family Favorite Treat