Bake Ploughman's Rolls with Cheesy Filling
Wondering how to bake Ploughman's rolls with cheesy filling? I’ll share my secrets to creating these warm, cheesy bites perfect for any gathering!

- The Cheesy Comfort of Ploughman’s Rolls
- A Little About the Recipe
- Why You'll Love These Rolls
- Time to Gather the Goods
- Essential Ingredients Guide
- Elevate Your Cooking: Mastering Professional Techniques
- Pro Tips & Secrets for Bake Ploughman’s Rolls with Cheesy Filling
- Perfect Presentation: Make ‘Em Pretty!
- Storage & Make-Ahead: Keep ‘Em Fresh!
- Creative Variations: Switch It Up!
- Complete Nutrition Guide: Keeping it Real
- Expert FAQ Solutions: Any Burning Questions?
- Recipe Card
The Cheesy Comfort of Ploughman’s Rolls
Oh my gosh, do you ever get cravings for those warm, cheesy snacks that just make your heart sing? i remember the first time i bit into a ploughman’s roll —the gooey cheese, the slight crunch of the crust, and that fluffy, warm dough.
I was instantly transported to this quaint little pub in england, where the air was rich with the smell of fresh bread and herbs.
Honestly, how can you not feel good about biting into a roll filled with cheddar and mozzarella ? if you haven't experienced this magic yet, let me take you on a cheesy adventure as we dive into how you can bake ploughman’s rolls with cheesy filling right at home!
A Little About the Recipe
So, where do these delicious rolls come from? traditionally a part of the british ploughman’s lunch , which usually features bread, cheese, and pickles, these rolls bring a modern twist.
They’re not just popular across the pond; they’ve found a cozy spot in hearts (and stomachs) here in america, too.
Perfect for picnics or gatherings, these rolls are a hit!
Let’s talk timing. to whip up these little beauties, you’ll need around 1 hour and 5 minutes , with a bit of kneading and dough rising in between.
Depending on your experience level, it’s a medium challenge—don’t worry, i promise you’ll get the hang of it. as for the cost? you can whip up 12 rolls for just a few bucks, so it's an absolute win-win!
Why You'll Love These Rolls
Okay, let’s get to the good stuff! what makes these rolls so special? first off, they’re packed with flavor and ooze cheesy goodness with every bite.
With the blend of cheddar and mozzarella , you get that perfect melt-in-your-mouth experience that’ll impress your family and friends.
Not to forget, these rolls are truly versatile. serve them fresh out of the oven as a snack or at a gathering, and watch everyone flock to them.
They’re perfect for cozy nights in or special occasions like birthdays or holiday parties. i mean, who wouldn’t melt at the sight of freshly baked, herb-infused rolls ?
Plus, they offer some serious comfort food vibes, making them perfect for a lazy sunday or a night you just need to unwind.
And let’s not overlook the nutrition—these rolls can be made with whole ingredients, and you can always sneak in some veggies or spices for an extra health boost.
Time to Gather the Goods
Feeling excited? i know i am! next up, let’s talk ingredients. you’ll want to gather your all-purpose flour , instant yeast, and those cheesy fillings—think grated cheddar and mozzarella , plus a few little extras to pack a punch.
Dough rising techniques are laid out simply, so don't stress! before diving in, i always check my baking sheet preparation to make sure everything is ready to go.
Ahh, the thought of biting into a warm, cheesy roll gives me all the feels! So get ready to roll up your sleeves—it's about to get cheesy in the best way possible.
Ready to make some cheesy magic? Let’s move on to the ingredients section so we can get started on this easy cheese-filled roll recipe !
Essential Ingredients Guide
Cooking is like weaving a tapestry. the right ingredients make everything come together flawlessly. let's break down the essentials you need to create wonderful dishes, like our delightful bake ploughman’s rolls with cheesy filling .
Premium Core Components
When it comes to the most loved cheesy bread rolls , the foundation is crucial. Here’s what you'll want to have on hand:
- Measurements Matter : Aim for 3 ½ cups (440g) of all-purpose flour , and a packet of instant yeast (that's about 2 ¼ tsp or 7g ). If you're more of a metric whiz, you can easily convert. Having a scale loved by bakers is a game changer!
- Quality Indicators : Always check your yeast! Fresh yeast will bubble when mixed with warm water (aim for 110° F / 43° C ). Dull or inactive yeast leads to sad, flat rolls.
- Storage Guidelines : Keep flour sealed in a cool, dry place. Yeast? Store it in the fridge! This way, they all last ages and you’ll be ready for a baking spree anytime.
- Freshness Tips : Pick herbs that smell amazing. If they look wilted, they're past their prime. Fresh ingredients equal vibrant flavors!
Signature Seasoning Blend
Ah, the magic of seasoning! It’s really what brings your savory cheese rolls to life.
- Essential Spice Combinations : A pinch of garlic powder and dried thyme can elevate your cheesy filling from good to spectacular. Imagine biting into a warm roll oozing with melted goodness and surprise!
- Herb Selections : Fresh herbs like chives or parsley can turn an ordinary dough into herb-infused rolls. You don't have to stick to the script; mix it up!
- Flavor Enhancers : Adding Dijon mustard in your cheese mix adds a zesty kick . Pro tip: It wakes up the flavors just like a morning cup of coffee!
- Regional Variations : Feeling adventurous? Why not give a nod to traditional British recipes by swapping in sharp cheddar or crumble blue cheese ?
Smart Substitutions
We’ve all been there—you’re ready to bake, but a crucial ingredient is missing. No biggie!
- Common Alternatives : No white flour ? No problem! Whole wheat flour can be your friend. It’ll change the texture but still deliver a killer crust.
- Dietary Modifications : If you're gluten-free, there are great all-purpose gluten-free flour blends out there. Just make sure to read the instructions, as they may vary.
- Emergency Replacements : Out of butter? You can totally use coconut oil, and it might just give your rolls a delicious twist !
- Seasonal Options : Try adding pumpkin puree in the fall for a fun color and flavor vibe throughout your rolls.
Kitchen Equipment Essentials
To whip up delightful homemade bread , you've got to have the right tools!
- Must-Have Tools : Basic stuff is key— a decent mixing bowl, a wooden spoon , and your trusty baking sheets are non-negotiables. Consider investing in a kitchen thermometer to nail that yeast activation.
- Alternative Equipment Options : Don’t fret if you don’t have a dough whisk . A fork can do the trick, too!
- Preparation Tips : Always line your baking sheet with parchment paper. It’s a real lifesaver for sticking rolls!
- Storage Solutions : Keep those rolls soft by wrapping them up in a kitchen towel or tossing them in an airtight container after they cool down a bit.
So, now that you know what to have on hand, we’re ready to dive into making these easy cheese-filled rolls .
Just picture this: warm, melty rolls bursting with flavor, perfect for picnics or chillin’ at home with friends. let’s get into the nitty-gritty of how to bake ploughman's rolls with that cheesy filling that’s sure to become a favorite!
Elevate Your Cooking: Mastering Professional Techniques
Cooking like a pro isn’t just for chefs in tall hats. with the right professional cooking methods , anyone can whip up restaurant-quality meals at home.
Let’s dive into some essential prep steps before we jump into the cooking process. trust me, these tips will help you bake ploughman's rolls with cheesy filling like a boss!
Essential Preparation Steps
Before you even think about turning on the oven, you gotta get everything ready. this is called mise en place , which means “everything in its place” in french.
It sounds fancy, but it’s really just about having all your ingredients prepped and measured out. so, if you're gonna make those cheesy bread rolls , measure out your flour, cheese, and everything else beforehand.
Less stress, more cooking!
Time management is crucial. for instance, while your dough is rising, you can clean up the counter or prep your filling.
Efficient use of time prevents chaos in your kitchen, trust me on that one.
Don’t forget about organization strategies . Keep your workspace tidy, use bowls to separate ingredients, and stay focused. It makes a world of difference when it’s time to cook.
And safety should always come first. watch your hands around sharp knives. proper food safety is key, especially when dealing with raw ingredients.
Oh, and close the oven when you're not peeking—heat escape is no joke!
Step-by-Step Process
Now, let’s break down the cooking into clear, numbered instructions. Here’s how to perfect your baking technique.
-
Mix the dough: first, mix 1 ¼ cups (300ml) warm water (around 110° f / 43° c ) with yeast and let it foam for 5 minutes .
Don't skip this; it’s the yeast’s time to shine!
-
Add Ingredients: Gradually add in your flour and melted butter. Don’t rush it; this is where the flavor starts.
-
Form the Rolls: After kneading for about 8- 10 minutes , your dough should feel smooth and elastic. It's all about the touch .
-
Rising Factor: Let that dough rise for about 30 minutes until it’s doubled in size. Be patient; good things come to those who wait!
-
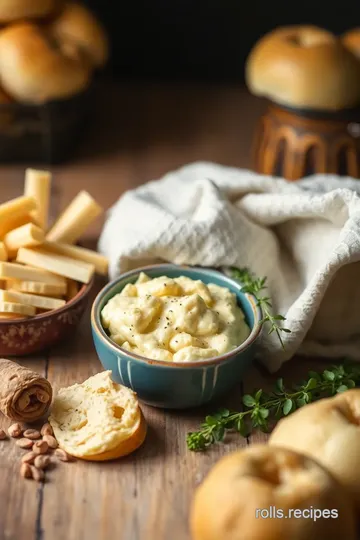
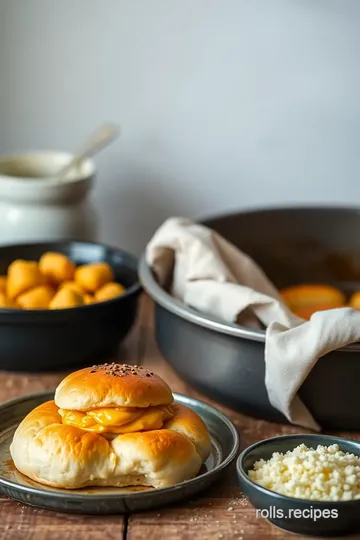
Time to Stuff: Prepare your cheesy filling (think cheddar and mozzarella ) while the dough rests. Mixing in 1 tsp Dijon mustard gives it a nice kick!
-
Proof & bake: shape your rolls, let them rest for another 15 minutes , and then throw them in the oven at 400° f ( 200° c) for 20 minutes until they're golden.
Visual cues for doneness are super important—look for that golden brown on top!
Expert Techniques
Okay, let’s talk expert methods . here are some important points to keep in mind. always check your dough during the rising process.
If it’s not rising, your yeast might be dead. test it by checking the temperature of your water—too hot or too cold, and you might have less than fab rolls.
During baking, look for those quality checkpoints —a hollow sound when you tap the bottoms indicates they’re done.
And hey, troubleshooting tips : If your dough isn’t rising, don't panic! It could be the yeast or the water temperature. Be ready to remix and try again.
Success Strategies
Want to avoid common mistakes? Here are my go-to tips. Don’t rush your rising time. Hurrying will lead to dense rolls, and we don’t want that!
For quality assurance , taste your filling before sealing it up. Like, if it’s not cheesy enough, just add more cheese! Who doesn’t want more melty goodness?
And if you're planning ahead, make-ahead options are easy with these rolls. You can even freeze them after baking. Great for those quick savory snacks when the munchies hit unexpectedly!
Wrap Up
There you have it, a complete guide to mastering the art of professional cooking methods, all wrapped around those delightful bake ploughman's rolls with cheesy filling.
Cooking isn't just about technique; it's about having fun and enjoying every melt-in-your-mouth bite. so grab your ingredients, channel your inner chef, and get baking!
Coming up next, we’ll explore some additional information to take your baking game to the next level!
Pro Tips & Secrets for Bake Ploughman’s Rolls with Cheesy Filling
Oh my gosh, if you’re diving into making these cheesy bread rolls , i've got a few pro tips that'll take your baking game from good to totally stellar.
Let’s chat about what i learned while crafting these fluffy delights.
First off, dough rising techniques are key! you want that magical, fluffy texture? after mixing your ingredients, let the dough hang out in a warm spot for about 30 minutes .
I like to pop it in my slightly warm oven (off, of course). patience pays off, trust me.
And speaking of flavor, don’t skimp on adding spices! a pinch of garlic powder and dried thyme can elevate the taste and have your friends thinking you're a kitchen wizard.
Feeling adventurous? toss in some herb-infused oil for a gourmet twist. seriously, it’s like sprinkling a little chef magic on your rolls!
Perfect Presentation: Make ‘Em Pretty!
How do you make these little rolls wow at a gathering? well, presentation is where it's at! when you're ready to plate, consider the color combinations.
Place your bake ploughman’s rolls next to a vibrant garden salad or a colorful charcuterie board. it’s all about that visual appeal, right?
For garnish, fresh herbs add a lovely touch. a sprinkle of chopped parsley or chives not only looks great but gives that fresh flavor burst.
If you want to go all out, brush your rolls with some melted butter before baking for a glossy finish.
Just a heads-up: it’ll make them smell even more irresistible!
Storage & Make-Ahead: Keep ‘Em Fresh!
If you’ve got extras (which i seriously doubt, but just in case), here’s how to store them. let the rolls cool down completely, then throw them in an airtight container .
They’ll hang out nicely in the fridge for about 3-4 days , but trust me, they’re best enjoyed fresh.
Now, if you're prepping for a picnic, you can make them a day ahead. just warm them up when you get there.
They're perfect as warm cheese snacks or even as part of a ploughman’s lunch recipe . serve 'em alongside your favorite chutney and watch them disappear!
Creative Variations: Switch It Up!
One of the best parts? you can get creative! don’t feel boxed into just cheddar and mozzarella; mix it up with other cheeses.
Think about adding some blue cheese for a bite, or maybe some leftover rotisserie chicken for a hearty filling. if you’re feeling seasonal, throw in some fresh spinach or artichokes in the mix.
And hey, if you're trying to eat a bit healthier, you can sub in whole wheat flour or even swap out traditional cheeses for something like lower-fat options.
This is your world, so add in those ingredients that make your taste buds sing!
Complete Nutrition Guide: Keeping it Real
Let’s get down to the nitty-gritty - what you’re actually munching on. these rolls are an amazing source of comfort food, and they pack a decent punch with about 210 calories each, thanks to the mix of cheddar cheese recipes and dough.
Not to mention, these rolls offer tons of health benefits from the whole grain choices.
If you're counting portions, these babies yield 12 rolls , making them a great option for snacks for gatherings or just fun weeknight meals.
And remember, balance is everything. pair them with a protein-rich salad, and you've got yourself a wholesome meal.
Expert FAQ Solutions: Any Burning Questions?
Here’s the thing - i know you’ll have questions! one of the most common ones i hear is, “what if my dough doesn't rise?” well, check your yeast! it should be fresh and bubbly when activated; if not, that could be your problem.
Oh, and if they come out a bit dense – don’t worry! you can give 'em a light knead and let them rise a bit longer next time.
Also, if your rolls don’t turn out perfectly round, own it. They’re homemade – not store-bought! And let’s be real, food made with love always tastes better.
So, there you have it! with these tips, tricks, and creative ideas, you’re all set to bake ploughman's rolls with cheesy filling like a pro.
Remember, cooking should be fun; don’t stress if things don’t go perfectly. embrace the process and enjoy every cheesy bite! whether it’s for a picnic, a cozy weeknight dinner, or just a snack while binge-watching your favorite show, these rolls are your ticket to cheesy bliss.
Get baking, and let your kitchen become a haven of mouthwatering aromas and smiles!

Bake Ploughman's Rolls with Cheesy Filling Card

⚖️ Ingredients:
- 3 ½ cups (440g) all-purpose flour
- 1 packet (2 ¼ tsp or 7g) instant yeast
- 1 tsp (5g) sugar
- 1 tsp (6g) salt
- 1 ¼ cups (300ml) warm water (about 110°F / 43°C)
- 2 tbsp (28g) unsalted butter, melted
- 1 cup (120g) grated cheddar cheese
- ½ cup (60g) grated mozzarella cheese
- 1 tsp (5g) Dijon mustard
- 1 tbsp (15ml) milk
- ¼ tsp (1g) dried thyme
- ¼ tsp (1g) garlic powder
- Salt and pepper to taste
🥄 Instructions:
- Step 1: In a large mixing bowl, combine warm water, sugar, and yeast. Let sit for 5 minutes until foamy.
- Step 2: Add melted butter, salt, and flour gradually while mixing until a dough forms.
- Step 3: Knead the dough on a floured surface for about 8-10 minutes until smooth and elastic.
- Step 4: Place the dough in a greased bowl, cover with a towel, and let rise in a warm place for about 30 minutes or until doubled in size.
- Step 5: In a bowl, mix together the grated cheeses, mustard, milk, thyme, garlic powder, and season with salt and pepper.
- Step 6: Preheat the oven to 400°F (200°C) and line a baking sheet with parchment paper.
- Step 7: Punch down the risen dough and divide it into 12 equal pieces.
- Step 8: Flatten each piece into a circle, add a spoonful of the cheese filling, and fold the edges over to seal.
- Step 9: Place shaped rolls on the prepared baking sheet and cover with a towel. Let rise for an additional 15 minutes.
- Step 10: Bake in preheated oven for 20 minutes, or until golden brown on top and cooked through.
- Step 11: Allow rolls to cool slightly before serving.
Previous Recipe: How to Bake Chorizo Sausage Rolls with Apples: 5 Delicious Secrets
Next Recipe: Easy Griddle Turkey Burgers with Zesty Guacamole: A Flavorful Twist