Baked Chickpea Nuggets: Tasty & Healthy
Craving a healthy snack? Try my irresistible Baked Chickpea Nuggets: Tasty & Healthy! They are crispy, protein-packed, and perfect for dipping. Let's dive in!

- A Tasty Twist on Nuggets: My Baked Chickpea Nuggets Journey
- From the Roots to the Rave
- Why You’ll Love Them
- The Ingredients Rundown
- Wrapping It Up
- Essential Ingredients Guide to Baked Chickpea Nuggets: Tasty & Healthy
- Cooking Up a Storm: Professional Cooking Method
- Pro Tips & Secrets
- Perfect Presentation
- Storage & Make-Ahead
- Creative Variations
- Complete Nutrition Guide
- Wrapping It Up
- Frequently Asked Questions
- Recipe Card
A Tasty Twist on Nuggets: My Baked Chickpea Nuggets Journey
So, i've got a fun little story for you. a while back, i was trying to eat healthier but was seriously missing out on my favorite comfort foods, especially chicken nuggets.
You know, the crispy, golden ones that we just can’t resist? i thought, “why not make a healthier version?” that’s when i stumbled upon the world of baked chickpea nuggets: tasty & healthy .
Let me tell ya, these little guys have been a game changer in my kitchen!
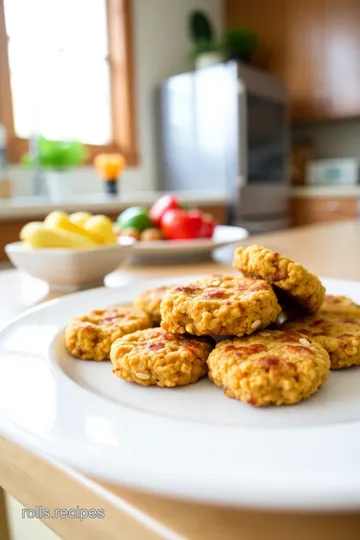
Imagine biting into a nugget that's crispy on the outside and soft on the inside, but without all the guilt! seriously, chickpea recipes are the way to go.
They’re not just healthy snacks but also a whole lot of fun to make. trust me, once you whip up a batch, you’ll be hooked.
Can you even believe these are actually vegan appetizers ? oh my gosh, let’s dive into it!
From the Roots to the Rave
The idea behind these nuggets isn’t anything new. they originate from the mediterranean, where legume-based dishes like falafel set the bar high.
Over time, these chickpea nuggets have grown in popularity here in the u.s. as folks lean into healthier eating trends.
And guess what? they're so easy to whip up! prepping takes only 15 minutes, and after a quick chill in the fridge, they bake for just 20.
Totally doable, am i right? and they yield about 12 nuggets, which is perfect for a family snack or a dinner party.
Now, cost-wise, let’s chat. Chickpeas are super inexpensive. A can will set you back just a couple of bucks. Plus, the rest of the ingredients are pantry staples! This recipe is not just an amazing alternative nugget recipe; it's also budget-friendly!
Why You’ll Love Them
Let’s get into the nitty-gritty of why these spiced chickpea nuggets should be on your menu. first off, they pack a protein punch.
Chickpeas are surprisingly protein-rich snacks , making them ideal for anyone looking to balance their meals. they also boast lots of fiber—hello, wholesome snacks! seriously, these are great way to introduce healthy meal prep to your week.
These nuggets are perfect for quick bites, but also for special occasions! they are a hit at parties and make for great kid-friendly meals, too.
How easy it is to impress your friends with a plate of these homemade finger foods instead of regular old chips and salsa?
And don't forget, you can jazz them up with your favorite dipping sauce ideas . i love serving them with homemade guacamole or a zesty yogurt dip.
It’s literally the best combination; you’ll be asking for seconds— or thirds!
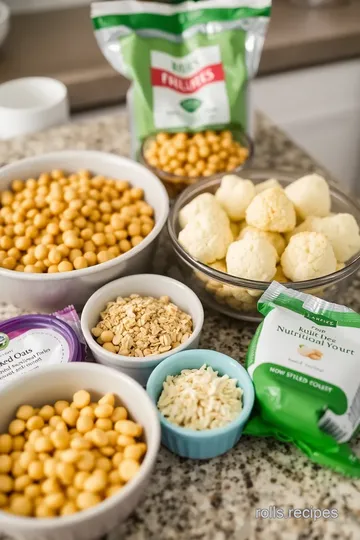
The Ingredients Rundown
Ready to make some magic? You’ll need:
- Chickpeas : The star of the show.
- Breadcrumbs : For that crunch.
- Onions and garlic : To spice it up.
- Tahini and olive oil : Creaminess is key!
- Spices : Cumin and paprika do wonders.
You can easily swap out ingredients or add in extras! How about throwing in some veggies to up the nutrition game? Carrots or spinach would fit right in!
Wrapping It Up
So, if you’re looking for quick and easy meals that don’t skimp on flavor, baked chickpea nuggets are calling your name! whether as a main or a snack-on-the-go option, they are as delightful as they are nutritious.
Once you get the hang of making these, the possibilities are endless! seriously, give these little nuggets a try, and you just might become as obsessed as i am.
Next up, let’s gather our ingredients and get this show on the road! You'll be smacking your lips in no time!
Essential Ingredients Guide to Baked Chickpea Nuggets: Tasty & Healthy
Let’s get into the nitty-gritty of what makes these baked chickpea nuggets: tasty & healthy so darn irresistible! first off, we’re diving into the essential ingredients you can’t skip.
Seriously, the quality of your ingredients can make or break your meal.
Premium Core Components
Alright, if you’re wondering about measurements, here are the deets you need:
- For the nuggets, you'll use 1 can (15 oz) chickpeas, which is about 425 g.
- You'll need 1/2 cup (60 g) of breadcrumbs. Feel free to grab whole wheat or gluten-free, totally your call.
- 1/4 cup (25 g) finely chopped onion, and pop in 2 cloves of minced garlic for that aromatic magic.
- 2 tablespoons (30 g) tahini and 1 tablespoon (15 ml) olive oil seal the deal.
- Spice it up with 1 teaspoon ground cumin, 1 teaspoon paprika, and a good sprinkle of salt and black pepper. Don’t forget some fresh parsley if you’re feeling fancy!
Quality indicators ? look for firm, bright chickpeas without any rough edges. and always check the dates on your ingredients! storage guidelines are straightforward: keep your chickpeas in a cool, dry place and use them by the expiration date.
Signature Seasoning Blend
Now for that killer flavor! the essential spice combinations in this recipe are total game-changers. the herb selections like cumin and paprika bring that warm vibe, while fresh parsley gives it a pop! want to make them tasty? sprinkle in some nutritional yeast for added flavor and a hint of cheesy goodness.
Oh, and speaking of flavor enhancers, you can toss in some chili powder for a kick if you’re feeling bold.
Depending on where you’re from, you might find local spices to switch things up. this is where the fun of regional variations comes in, right?
Smart Substitutions
Sometimes, life happens and you don’t have what you need on hand. no biggie! for common alternatives, if you can't find chickpeas, white beans are totally a solid substitute.
If you're dairy-free, swap out greek yogurt for some coconut yogurt in your dipping sauce. plus, feel free to switch the tahini with sunflower seed butter if you’ve got nut allergies.
Emergency replacements ? rely on whatever legumes you have lying around. and there’s nothing wrong with getting seasonal. as summer rolls around, toss in some zucchini or shredded carrots into your nuggets for a fresh twist.
Kitchen Equipment Essentials
Let’s talk tools! You don’t need a whole arsenal, just the basics:
- A baking sheet
- Mixing bowls
- A fork or potato masher for mashing those chickpeas
- Measuring cups and spoons
If you want that extra smooth texture, go ahead and use a food processor . but honestly, a fork does the trick just fine.
For storage? grab yourself some airtight containers—your leftovers (if any!) will thank you.
Wrap-Up
Now that we’ve got all these amazing ingredients and tips laid out, it’s time to get cooking! you’ll be on your way to whipping up those baked chickpea nuggets: tasty & healthy in no time.
The best part? they’re a perfect plant-based option for kid-friendly meals and snack-on-the-go options.
So roll up those sleeves, channel your inner chef, and let's dive into the juicy part—those easy dinner ideas that’ll make everyone in your family smile! you’ll be stunned by the veggie-packed goodness and crispy vibe of these bites.
Get ready to salivate as you prepare your new favorite wholesome snack!
Cooking Up a Storm: Professional Cooking Method
When it comes to cooking, especially in the professional realm, having a solid game plan can make all the difference.
Whether you're whipping up baked chickpea nuggets: tasty & healthy for a cozy family dinner or prepping for a potluck, starting with a good foundation is key.
Let’s dive into the essential preparation steps that will set you up for success in the kitchen.
Essential Preparation Steps
Mise en place. say it with me: “meez ahn plahss.” it’s a fancy way of saying, “everything in its place.
” before you start cooking, gather all your ingredients. this is super helpful. you won’t be fumbling around searching for spices while your pan burns.
Take a moment to chop, measure, and organize. trust me, it saves time and keeps the stress levels down.
Speaking of time, let’s chat time management . allocate time for each task. think about how long you’ll need to prep those chickpeas, chop those veggies, and mix it all up.
With the baked chickpea nuggets, give yourself about 15 minutes for prep and another 30 minutes to chill the mix .
Keep a timer handy, and you'll be golden!
Now, organization strategies come in handy here. use bowls for different ingredients. keep your workspace tidy! you’ll be amazed at how much easier it is to find things.
Plus, no one wants to trip over a cluttered kitchen, right?
And let’s not forget the safety considerations . always wash your hands before and after handling food. keep that cutting board clean, and watch out for those sharp knives.
No one needs any extra drama while whipping up a quick meal.
Step-by-Step Process
Now, onto the fun part! Let's break down the step-by-step process for our nugget creation.
-
Preheat the oven to 400° F ( 200° C) . This is key for crispiness!
-
Combine all ingredients in a mixing bowl: the chickpeas, breadcrumbs, onion, garlic, tahini, olive oil, spices, and salt. Oooh, can you smell that?
-
Mash it all together with a fork or potato masher. Just crush until it’s a bit chunky—you want texture here!
-
Chill it in the fridge for at least 30 minutes . This helps firm up the mixture. Don’t skip this step!
-
Scoop and shape the nuggets. I like using my hands—feels more personal!
-
Place them on a baking sheet, giving them room to breathe. You don’t want them sticking together.
-
Bake for 15- 20 minutes , flipping halfway through. They should be golden and crispy.
-
While they bake, mix up a quick dipping sauce with yogurt, lemon juice, salt, and pepper—easy peasy!
Expert Techniques
Here’s where it gets really interesting. Want to take your chickpea nuggets to the next level? Here are a few professional methods.
Quality checkpoints are a must! look for that perfect golden-brown color we crave. if you like ‘em extra crispy, spray a bit of oil on the nuggets before baking.
And here’s a little troubleshooting tip: if the mix feels too wet, add a splash more breadcrumbs!
When it comes to timing precision , stick to the 15-20 minute baking window . You want them crispy but not burnt—nobody likes a charred nugget.
Success Strategies
Okay, let’s talk about common mistakes to avoid. Ever forget to check the oven? Set an alarm if you have to! Nobody wants a kitchen fiasco.
Another tip I swear by is quality assurance . Taste as you go! If the mixture feels bland before you bake, add more spices. Your taste buds know what they want.
For make-ahead options, these nuggets freeze beautifully! Bake up a double batch, freeze them, and whenever hunger strikes, pop ‘em in the oven. Voila— homemade finger foods ready in no time!
These baked chickpea nuggets are a fantastic introduction to using legumes in your meals. whether you’re into health-conscious cooking or need a kid-friendly meal, you can’t go wrong.
Keep your cooking simple and joyful!
Now, as we wrap this up, stay tuned for some Additional Information to keep your kitchen game strong!

Pro Tips & Secrets
Alright, friends, let's dive into some insider tips that will have you nailing these baked chickpea nuggets: tasty & healthy in no time.
First off, don't skip the chilling step. trust me, letting the mixture sit for 30 minutes in the fridge really helps these nuggets hold their shape.
You don’t want a chickpea disaster in the oven, right?
Also, if you want to kick up that flavor a notch, toss in some nutritional yeast seasoning . it gives these babies a cheesy kick without any dairy! and hey, if you're in a rush for easy dinner ideas , feel free to skip the chilling altogether—just add a splash more breadcrumbs to firm things up.
When it comes to presentation, don’t just plop them on a plate. aim for something a bit more instagram-ready! put a layer of colorful greens at the bottom and arrange your nuggets on top.
It’s all about that visual appeal, folks!
Perfect Presentation
Let's talk plating techniques. you know how restaurants make everything look so fancy? here’s your chance to shine. for a pop of color, sprinkle some fresh parsley or even a few little cherry tomatoes around your plated nuggets.
While we’re on the topic, have you ever tried garnishing with slices of lemon? it adds a zesty touch and invites people to enhance their nuggets with a hint of citrus.
To keep the colors vibrant, pair your golden nuggets with a bright green dipping sauce —think a yogurt dip with herbs.
The key to amazing food is not just taste but also how it looks. Visual appeal can make even the most basic dish look fancy!
Storage & Make-Ahead
Now, let’s chat about the best ways to store these delicious nuggets. if you’re planning to meal prep, these homemade nugget recipes are perfect.
They can be stored in an airtight container in the fridge for about 3-4 days .
Thinking of whipping up a batch ahead of time? you can freeze them! place uncooked nuggets on a baking sheet, freeze until solid, and then pop them into a labeled freezer bag.
You can bake them straight from the freezer, just give them a few extra minutes in the oven.
When it comes to reheating, i recommend using the oven to keep them crispy. just pop them in at 375° f for about 10- 12 minutes .
Don’t microwave unless you want sad, mushy nuggets. yikes!
Creative Variations
Feeling adventurous? There are so many ways to twist up this recipe. If you're hitting the Mediterranean vibe , add in some chopped olives or feta for a delightful spin.
For those watching their carbs, try swapping out breadcrumbs for some nutritious quinoa. And for the kiddos who might side-eye your healthy snacks, hidden veggies like shredded carrots or zucchini are a great way to sneak in some extra nutrition!
Whatever you decide, the options are endless. This recipe is super adaptable, making it ideal for family-friendly recipes .
Complete Nutrition Guide
Let’s break down why these nuggets are a great choice. each serving packs in 8 grams of protein and a whopping 5 grams of fiber .
Talk about a protein-rich snack ! plus, chickpeas are filled with vitamins and minerals that are essential for a balanced diet.
If you’re focusing on health-conscious cooking, know that these nuggets are a great source of iron and folate. adjust your portion sizes based on how hungry you are—like, no judgment if you want to eat half the batch in one go.
Plus, these are gluten-free if you choose the right breadcrumbs, making them a fantastic addition to your spread when you have guests with dietary restrictions.
Wrapping It Up
So there you have it, friends! baked chickpea nuggets: tasty & healthy are not just another recipe; they’re a way to bring everyone together for some delicious, healthier snacking .
Whether you’re enjoying them with friends or just need a quick bite on the go, these nuggets deliver on flavor, nutrition, and a ton of versatility.
Now, what are you waiting for? crack open those cans of chickpeas and get to baking! let’s make a scrumptious meal the whole family can enjoy, while sneaking in those healthy vibes.
Trust me, everyone will be asking for seconds!
Frequently Asked Questions
What makes Baked Chickpea Nuggets: Tasty & Healthy a good snack option?
Baked Chickpea Nuggets are a nutritious alternative to traditional nuggets, as they are high in protein and fiber, while being lower in fat. They provide essential nutrients, making them a satisfying snack or meal addition, especially for those following a plant-based diet.
Can I add extra ingredients to Baked Chickpea Nuggets for more flavor?
Absolutely! You can experiment with additional spices such as chili powder, or mix in chopped veggies like shredded carrots or spinach for added nutrition. Just be mindful that overloading the mixture might affect its consistency.
How can I store leftover Baked Chickpea Nuggets: Tasty & Healthy?
Store leftover nuggets in an airtight container in the refrigerator for up to 3 days. For longer storage, you can freeze them in a single layer on a baking sheet before transferring to a freezer bag, and they will last for up to 2 months.
What are some good dipping sauce options for my nuggets?
A simple yogurt and lemon dip works well, but you can also try hummus, guacamole, or any of your favorite sauces like sweet chili or marinara. Try mixing the yogurt with herbs to create a delicious herb dip!
Can I make these nuggets gluten-free?
Yes! Simply use gluten-free breadcrumbs instead of regular ones. Additionally, ensure that all other ingredients you use are labeled gluten-free to maintain the recipe's gluten-free integrity.
What tips do you have for achieving crispy Baked Chickpea Nuggets?
To achieve a crispy texture, lightly spray your nuggets with olive oil before baking. You can also increase their crispiness by flipping them halfway through the baking time and ensuring they are spaced apart on the baking sheet to allow air circulation.
Baked Chickpea Nuggets: Tasty & Healthy Card

⚖️ Ingredients:
- 1 can (15 oz) chickpeas, drained and rinsed (425 g)
- 1/2 cup (60 g) breadcrumbs (whole wheat or gluten-free, as necessary)
- 1/4 cup (25 g) finely chopped onion
- 2 cloves garlic, minced
- 2 tablespoons (30 g) tahini
- 1 tablespoon (15 ml) olive oil
- 1 teaspoon ground cumin
- 1 teaspoon paprika
- 1/2 teaspoon salt
- Black pepper, to taste
- 1 tablespoon fresh parsley, chopped (optional)
- 1/2 cup (120 g) plain Greek yogurt or dairy-free alternative
- 1 tablespoon (15 ml) lemon juice
- Salt and pepper to taste
🥄 Instructions:
- Step 1: Preheat the oven to 400°F (200°C). Line a baking sheet with parchment paper if using.
- Step 2: Combine chickpeas, breadcrumbs, onion, garlic, tahini, olive oil, cumin, paprika, salt, and pepper in a mixing bowl.
- Step 3: Mash the mixture with a fork or potato masher until slightly chunky, or use a food processor for a smoother texture.
- Step 4: Chill the mixture in the refrigerator for at least 30 minutes to help it firm up.
- Step 5: Scoop out the mixture with a tablespoon and form into nugget shapes.
- Step 6: Place the nuggets on the prepared baking sheet, ensuring they are not touching.
- Step 7: Bake in the preheated oven for 15-20 minutes, or until golden brown and crispy, flipping halfway through.
- Step 8: Prepare the dipping sauce by mixing yogurt, lemon juice, salt, and pepper in a small bowl.
- Step 9: Serve warm with the dipping sauce on the side.
Previous Recipe: Best Easy Tropical Pineapple Rolls: Bake for Joyful Gatherings
Next Recipe: How to Make Fluffy Dinner Rolls - Bubba's Special Recipe: The Ultimate Family Favorite