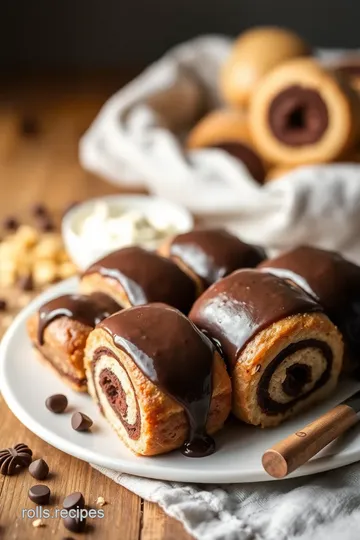
Decadent Chocolate Rolls with Rich Espresso Glaze
Craving something sweet? Make my rich Bake Chocolate Rolls with Espresso Glaze for a cozy treat that pairs perfectly with your morning coffee! You'll love the fluffy texture.

- Decadent Chocolate Rolls with Rich Espresso Glaze
- The Essential Ingredients Guide: Your Ticket to Baking Bliss
- Unlocking the Secrets of Professional Cooking: A Guide to Crafting Warm Chocolate Rolls with Espresso Glaze
- Pro Tips & Secrets for Baking Chocolate Rolls with Espresso Glaze
- Perfect Presentation to Impress
- Storage & Make-Ahead Tips
- Creative Variations to Spice Things Up
- Complete Nutrition Guide
- Expert FAQ Solutions
- Recipe Card
Decadent Chocolate Rolls with Rich Espresso Glaze
You know that feeling when you’re curled up on the couch, minding your own business, and suddenly a sweet craving kicks in? i was there last weekend, and let me tell you, chocolate called my name! i thought, “why not bake chocolate rolls with espresso glaze?” just the thought of those warm, fluffy rolls drenched in rich espresso goodness made my heart race.
So, i rolled up my sleeves and got to it! trust me, these sweet rolls are not just a treat; they're an indulgent hug on a plate.
A Little Yum History
Sweet rolls have been around for ages, but the combination of chocolate and espresso is a more modern twist. while traditional cinnamon rolls have snagged the spotlight for brunch, chocolate rolls are quietly making their way into homes all across america.
Seriously, folks can’t get enough of these easy chocolate pastries ! they’re not just for breakfast—these treats double as delicious afternoon snacks or even dessert for coffee lovers.
Plus, when you’ve whipped up homemade chocolate rolls , you’ll feel like a baking superstar!
Baking Time and Costs, Oh My!
Here’s the scoop: making these rolls takes about 1 hour and 45 minutes from start to finish, including prep and baking time.
Now don’t freak out just yet. that 1 hour is mainly resting and proofing the dough to let it do its magic.
The actual hands-on time? just 20 minutes ! and guess what? with this recipe, you’ll get 12 fluffy chocolate rolls for a modest price.
All you need is some flour, sugar, chocolate chips, and a few other staples. it’s a small price to pay for such rich desserts , right?
Why You’ll Love Them
Let’s talk health—well, sorta. while these rolls aren’t healthy in the green juice kind of way, they do have their perks.
You’ve got your flavorful chocolate filling that brings happiness in every bite. plus, depending on how you customize your rolls, you can add nuts or even dried fruit to mix things up.
They’re perfect for special occasions , too, like a cozy brunch or a celebratory gathering. imagine pulling these out and everyone's faces lighting up!
And if you're on the hunt for unique dessert ideas, look no further. these rolls are not your average baked goods—they’re bakery-style chocolate rolls packed with flavor and topped with a luscious espresso glaze .
Honestly, who could resist that?
Coffee and Chocolate, A Match Made in Heaven
One bite of these rolls and you'll understand why i rave about them. the combination of chocolate and espresso creates a dreamy pairing that coffee lovers will want on repeat.
I’ve seriously considered making these for every sunday brunch. plus, they make an indulgent afternoon snack or a decadent treat for unexpected guests.
Once you’ve tasted these fluffy delights, it’s hard to go back to regular ol’ rolls.
Now that i’ve shared my heart's desire inspired by a little chocolate craving, let’s get into the nitty-gritty of how to create these exquisite rolls.
You’ll want your home baking essentials at the ready, from your mixing bowls to that trusty rolling pin. trust me, your kitchen is about to smell amazing.
Ingredients for Your Perfect Bake
Before diving into the recipe, let’s gather what you need. your home is about to become the ultimate baking hub.
Ready? grab your flour, sugar, eggs, and all those yummy ingredients, and let’s create some magic! plus, i’ve got some baking tips for beginners if you’re new to this whole thing.
🌟
With a warm kitchen and your ingredients all laid out, i promise you’re going to want to bake chocolate rolls with espresso glaze again and again.
So get that oven preheated; we’re turning chocolate dreams into reality!
The Essential Ingredients Guide: Your Ticket to Baking Bliss
Alright, friends, buckle up because we’re diving into the glorious world of baking essentials! understanding your ingredients is key. it’s not just about throwing stuff into a bowl and hoping for the best.
Nope! it’s about nailing those premium core components first. this guide is gonna set you up for success.
Premium Core Components
First up, let’s talk measurements . whether you’re in the us or anywhere else, having precise amounts makes all the difference.
For flour, you’ll want to use 4 cups (500g) for those delightful chocolate rolls. ask any baker, and they’ll tell you that exact measurements can make or break your dough consistency.
Now, how do you know you’ve got top-notch ingredients? look for quality indicators ! when selecting flour, check that it’s smooth and free of lumps.
And for your chocolate, go for brands like ghirardelli or guittard for that rich flavor.
Storage is key. keep your flour in an airtight container—this keeps it fresh for months. most of your spices, like cinnamon, should be stored in a cool, dark place.
And speaking of freshness, always check the expiration date. freshness tips include using eggs that are relatively new and keeping an eye on your yeast.
It should still be active, so check for bubbles when you mix it with warm water!
Signature Seasoning Blend
When it comes to baking chocolate treats, don’t skip the signature seasoning ! combining spices like cinnamon or nutmeg can elevate your chocolate rolls to a whole new level.
A simple cinnamon chocolate roll adds such warmth and depth.
What about herbs ? i know, herbs in desserts might sound wild, but think about a pinch of rosemary in your chocolate glaze! the flavor enhancers and aromatics will surprise you.
And don’t forget those regional variations; swap semi-sweet chocolate for a rich dark chocolate for a more intense flavor.
Smart Substitutions
Guess what? baking doesn’t always have to be rigid! if you run out of chocolate chips, you can use chopped chocolate bars.
If you’re in a pinch, sometimes a quick swap is all you need.
Let’s chat dietary modifications too. going vegan? no problem! use almond or oat milk instead of regular milk and swap in vegan butter.
Not only can you enjoy those homemade chocolate rolls, but you can also cater to your friends’ diets!
And if you can’t find dried fruit like cherries for your rolls? Fresh berries work too! Seasonal options can really make your rolls pop.
Kitchen Equipment Essentials
Now, let’s touch on kitchen equipment . you don’t need a fancy arsenal to whip up delicious rolls. basic tools like mixing bowls, a whisk, and a rolling pin are your best pals.
If you don’t have a pastry brush for the glaze, an old spoon works just fine.
When it comes to preparation, keeping your workspace clean and organized will make your baking sessions way more enjoyable. and for storage solutions, using labeled containers for flour, sugar, and other essentials can save you from rummaging around later on.
Alright, now that you’re equipped with all the essentials, it’s time for the fun part: actually baking ! pull out that dough and roll it into shape.
You’ll soon be indulging in decadent chocolate rolls with a rich espresso glaze that will shake up your brunch game! these rolls are fluffy with that flavorful chocolate filling that makes them irresistible.
Plus, the glaze? it’s pure caffeinated magic.
So, roll up your sleeves, and let’s get baking those sweet rolls ! And remember to keep it fun and relaxed—after all, cooking is about enjoying the process!
Unlocking the Secrets of Professional Cooking: A Guide to Crafting Warm Chocolate Rolls with Espresso Glaze
There's something magical about the aroma of fresh pastry wafting through your kitchen. you know what i mean—those fluffy chocolate rolls just waiting to be drizzled with a rich espresso glaze? oh my gosh, can you say heavenly ? today, i’m diving into the professional cooking methods you need to nail this experience.
Essential Preparation Steps
Before you turn on that oven, let’s talk about mise en place . it’s a fancy way of saying “everything in its place.
” gather all your ingredients: flour, sugar, eggs—basically, all the goodies from our chocolate roll recipe. trust me, it saves time and keeps you sane when all the action kicks off.
Then, think about time management . you’ve got prep time of around 20 minutes , and then you’re looking at an hour of proofing .
So while the dough is resting, maybe tackle that coffee pot!
Organization is key , my friends. Use clear containers or bowls for ingredients. Ready to roll? Get everything laid out, and don’t forget a clean space to work on!
Lastly, safety first ! Be cautious with heat—when you’re melting butter or baking, keep an eye out for spills. It's no fun to slip on butter.
Step-by-Step Process
Time to get into the nitty-gritty. Follow these clear, numbered instructions for success:
-
Prepare the dough : mix warm milk, sugar, and yeast. let it sit for about 5 minutes until frothy.
Then dump in flour, salt, melted butter, and eggs. get your hands in there and knead that dough for about 5- 7 minutes until it's smooth.
-
First Rise : Place your dough in a greased bowl, cover it up, and let it rise for about 1 hour until it doubles in size.
-
Make the Filling : Combine those semi-sweet chocolate chips, brown sugar, cocoa powder, and, if you’re feeling zesty, add cinnamon. This is a game-changer, trust me!
-
Assemble the Rolls : Roll out your dough into a rectangle, slather on that luscious filling, and roll it up tightly. Slice into 12 pieces .
-
Second Rise : Pop those rolls in a dish, cover ‘em again, and let them puff up for about 30 minutes .
-
Bake : Preheat your oven to 350° F ( 175° C) and slide the rolls in for 20- 25 minutes until they look all golden and scrumptious.
-
Make the Glaze : Mix powdered sugar, brewed espresso, vanilla, and a splash of milk until you find the consistency you love.
-
Glaze the Rolls : Once out of the oven, drizzle that glaze over those warm, fluffy bites of decadent goodness !
Expert Techniques
Remember, it’s all in the details folks! when baking chocolate treats like these rolls, temperature control is everything. ensure your milk is about 110° f ( 43° c) when you mix your yeast; too hot, and you’ve got a dead yeast party, and no one wants that.
Quality checkpoints matter too. For the chocolate filling, always opt for high-quality chocolate. It escalates your rolls to bakery-style.
If you're facing any hiccups, don't fret! If your dough doesn't rise, maybe your yeast was old. No biggie! You can always restart.
Success Strategies
Let’s chat about the common mistakes to avoid :
-
Over-kneading the dough? It could make it tough. Just knead until smooth, and you’re golden.
-
Not letting your dough rise long enough? Don’t rush it! A good rise is crucial for those fluffy chocolate rolls.
To guarantee the best results, trust your quality assurance tips . Ensure every ingredient is fresh and follow those rising times.
Want to make them ahead? you totally can! bake them ahead, let them cool completely, and wrap them tight. when you’re ready, just pop them back in the oven to warm before glazing.
Now, if you’re a coffee lover, these rolls topped with espresso glaze are your perfect afternoon snack or decadent brunch idea.
With these professional cooking methods and personal insights, you’re all set to Bake Chocolate Rolls with Espresso Glaze that will wow family and friends alike.
Additional Information
Feeling inspired? Stay tuned. There’s a whole world of baking tips, variations, and more unique dessert ideas to explore! The kitchen is your oyster, and I can’t wait to see what you whip up next!
Pro Tips & Secrets for Baking Chocolate Rolls with Espresso Glaze
Hey, fellow food lovers! let’s dive into some pro tips that'll make your bake chocolate rolls with espresso glaze not just good but downright spectacular.
First things first, let the yeast bloom . if you see bubbly goodness in your milk-sugar-yeast mix, you’re golden! this is your secret weapon for those fluffy chocolate rolls .
Time-saving techniques? use a food processor for mixing the dough. just toss the ingredients in, pulse a few times, and then knead for a bit! it’s a total game changer when you don’t have time to spend an hour in the kitchen.
Now, for those flavor enhancement tips – i swear by high-quality chocolate. it's like choosing between a regular cup of joe and an artisanal brew.
If you want a little kick, consider adding a pinch of salt to the chocolate filling. it'll elevate the flavor like you wouldn’t believe! and don’t skimp on that glaze; it’s basically the cherry on top.
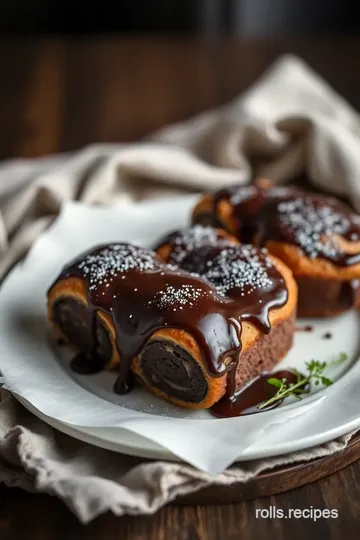
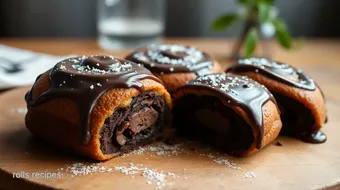
Finally, let’s talk presentation . these rolls are pretty and all, but a drizzle of the espresso glaze and a sprinkle of powdered sugar really make them shine.
You want those warm chocolate desserts to pop on the plate, right?
Perfect Presentation to Impress
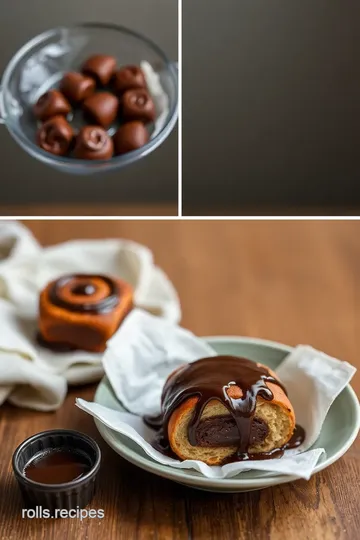
Alright, now you’ve made these glorious rolls, let’s chat about plating techniques . for that café vibe, try arranging the rolls in a circle on a platter and drizzle the glaze over the top.
You could also slice one of the rolls to show off that fluffy chocolate filling inside. voila, bakery-style chocolate rolls right at your dining table!
When it comes to garnish ideas , fresh mint leaves add a pop of color and freshness. and for that son-of-a-gun wow factor? toss in some fresh berries.
The contrast of red, green, and brown is visually stunning. color combinations can really crank up the visual appeal – making these rolls irresistible.
Storage & Make-Ahead Tips
Let’s talk storage . you can keep those bad boys in an airtight container at room temperature for up to three days.
But if you're like me and can't resist them past day one, good luck! if you want to make them ahead of time, roll out the dough, assemble the rolls, and then freeze them before the second rise.
When you're ready to bake, just let them thaw and rise, then pop ‘em in the oven. it’s perfect for those impromptu brunch plans!
Reheating instructions? just pop them back in the oven at 350° f for 10 minutes. you want them warm and cozy, not dried out.
And trust me, warm chocolate rolls are a thing of beauty.
Creative Variations to Spice Things Up
Now for the fun part – creative variations ! feel like mixing it up? you can get nutty by adding some chopped hazelnuts to the filling or switch it up with dried fruit.
I love the idea of cinnamon chocolate rolls for a warm, spiced twist. if you’re in the mood for something lighter, try swapping out the chocolate chips for dried cherries or cranberries.
Honestly, the combinations are endless!
If you’re a plant-based eater, you can easily make vegan chocolate rolls . Use plant-based milk instead of whole milk, and swap in coconut oil for butter. They’ll be just as delicious!
Complete Nutrition Guide
For those who are mindful of their nutrition , i got you! each roll is around 250 calories with 10g of fat and 4g of protein.
They’re indulgent but here’s the beautiful part: enjoy one roll and you get the moment of bliss, but if you want, you can balance it out with some fresh fruit on the side.
After all, desserts for coffee lovers are soul food, and enjoying them in moderation is key!
Expert FAQ Solutions
Lastly, i’m sure you’ve got questions. if your rolls don’t rise properly, it could be that your yeast wasn't active enough.
Always check that bubbly yeast goodness! if you’re worried about consistency in the glaze, just whip it up again with a touch more milk.
And if you really want to impress, why not put a sprinkle of espresso powder on top right before serving?
So there you have it! a treasure trove of tips, tricks, and tasty variations to help you bake the best chocolate rolls with espresso glaze ever.
These little delights are perfect for brunch, afternoon snacking, or dessert after dinner. don't be shy – dive into your baking adventure! just remember, the most important ingredient is a sprinkle of love and a dash of joy.
Happy baking!
Decadent Chocolate Rolls with Rich Espresso Glaze Card
⚖️ Ingredients:
- 4 cups (500g) all-purpose flour
- 1/4 cup (50g) granulated sugar
- 1 packet (2 1/4 teaspoons) active dry yeast
- 1/2 teaspoon salt
- 1 cup (240ml) whole milk, warmed to about 110°F (43°C)
- 1/3 cup (75g) unsalted butter, melted
- 2 large eggs, at room temperature
- 1 cup (200g) semi-sweet chocolate chips
- 1/4 cup (50g) brown sugar
- 2 tablespoons unsweetened cocoa powder
- 1 teaspoon cinnamon (optional)
- 1 cup (120g) powdered sugar
- 2 tablespoons brewed espresso or strong coffee
- 1/2 teaspoon vanilla extract
- 1-2 tablespoons milk (as needed for consistency)
🥄 Instructions:
- Step 1: In a bowl, mix warm milk, sugar, and yeast. Let sit until frothy (about 5 minutes).
- Step 2: In a large bowl, combine flour and salt.
- Step 3: Add melted butter, eggs, and yeast mixture to dry ingredients. Mix until combined.
- Step 4: Knead dough on a floured surface until smooth (about 5-7 minutes).
- Step 5: Place dough in a greased bowl. Cover with plastic wrap or a towel. Let rise in a warm place until doubled (about 1 hour).
- Step 6: In a bowl, mix chocolate chips, brown sugar, cocoa powder, and cinnamon (if using).
- Step 7: Roll dough into a rectangle on a floured surface. Spread the filling evenly over the dough.
- Step 8: Roll up tightly, pinching edges to seal, then slice into 12 pieces.
- Step 9: Place rolls in a greased baking dish, cover, and let rise again until doubled (about 30 minutes).
- Step 10: Preheat oven to 350°F (175°C). Bake rolls for 20-25 minutes until golden brown.
- Step 11: In a bowl, whisk together powdered sugar, espresso, vanilla, and milk until smooth. Adjust consistency if needed.
- Step 12: Drizzle the espresso glaze over warm rolls and serve.
Previous Recipe: How to Make Bake Bacon Cheeseburger Rolls | Easy Appetizer Delight
Next Recipe: How to Bake Mini Sausage Rolls - Quick & Tasty for Any Gathering!