Heavenly Colonial Bread Dinner Rolls
Craving the best Colonial Bread Dinner Rolls: Best 12 Comfort Food Recipes? Try my simple homemade version that’s soft and buttery! Perfect for family meals!

- Stepping Back in Time: The Allure of Colonial Bread Dinner Rolls
- The Rich History Behind These Rolls
- Benefits Galore!
- Rolls vs. Other Comfort Foods
- Essential Ingredients Guide
- The Professional Cooking Method: Mastering the Art of Dinner Rolls
- Pro Tips & Secrets for Heavenly Colonial Bread Dinner Rolls
- Perfect Presentation for Comfort Food Rolls
- Storage & Make-Ahead for Family-Friendly Recipes
- Creative Variations to Try
- Complete Nutrition Guide for the Perfect Rolls
- Frequently Asked Questions
- Recipe Card
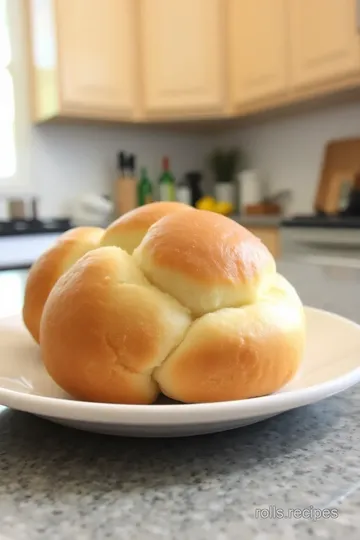
Stepping Back in Time: The Allure of Colonial Bread Dinner Rolls
Ever felt that cozy nostalgia when biting into a warm roll right out of the oven? i sure have. one chilly evening, my family gathered around the table, and i made my first batch of colonial bread dinner rolls .
The minute those beauties hit the dining table, it was like i transported everyone back to simpler times. the sweet buttery aroma filled the air, and let me tell you, those fluffy rolls vanished faster than my mom's famous chocolate chip cookies! this experience made me realize just how special these rolls are as a comfort food.
You know, that kind of food that hugs you from the inside, making the world feel a little brighter.
The Rich History Behind These Rolls
So, where do these colonial bread recipes come from? well, way back when, during the colonial days, bread was a staple on every table.
It wasn’t just food; it was a tradition. every family had a unique recipe they cherished. fast forward to today, and these easy dinner rolls are still a hit on our dinner tables.
The charm of homemade bread has made a comeback, especially since more folks are experimenting with baking bread at home .
Now, let’s break it down. making these heavenly colonial bread dinner rolls takes roughly 1 hour and 35 minutes .
It’s a medium-level recipe, not too difficult, but definitely gives you that sense of accomplishment. plus, the cost is pretty approachable; you'll likely have most of the ingredients lying around.
Each recipe yields about 12 fluffy rolls, perfect for your family meals or even a gathering.
Benefits Galore!
Can we take a moment to appreciate why these rolls are so great? first off, they pack a delightful combination of taste and nutrition .
Made from all-purpose flour, butter, and a touch of sugar, they strike a balance between soft and flavor-packed. not to mention how healthier roll alternatives can be made by using whole grain flour or incorporating ingredients like oats for fiber.
Whether it’s a holiday feast or just a cozy sunday dinner, these rolls fit right in as perfect bread pairs with stews or soups.
Imagine tearing into a roll, slathering it with homemade jams or butter — pure bliss! and let’s not forget, they’re fantastic for baking with kids ; it’s an awesome way to bond over flour, yeast, and a little bit of messy fun.
Rolls vs. Other Comfort Foods
What sets these comfort food rolls apart from others? one word: texture. brioche-style rolls are great, don’t get me wrong, but these colonial rolls have that rustic coziness down pat.
Plus, they’re way easier than you might think! you don't need to be a baking pro to whip up these fluffy rolls recipe .
And if you want to switch things up, you can infuse them with herbs or cheese for a twist. best part? they freeze well, so you can batch-cook and have them ready for whenever that bread craving hits.
Now that we've whetted our appetite for colonial bread dinner rolls , let’s dive into what you need to get started.
Are you ready? grab your apron, and let’s get that dough rising!
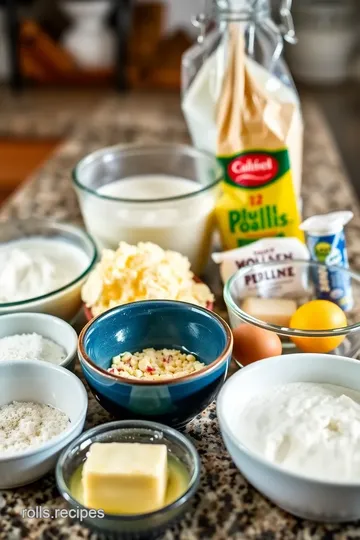
Essential Ingredients Guide
When it comes to cooking, having the right ingredients is a game-changer. so, let’s break down some essential ingredients you’ll want in your kitchen, especially when you’re whipping up dishes like colonial bread dinner rolls: best 12 comfort food recipes .
This guide is all about making sure you have what you need to create delicious homemade dinner rolls and more.
Premium Core Components
First off, let’s talk measurements. For most home cooks, sticking with accurate measurements is key. Here’s a handy breakdown:
- Flour: 4 cups (480g) of all-purpose flour is usually spot on for rolls.
- Milk: 1 cup (240ml) warmed to about 110° F ( 43° C) — not too hot, or you'll kill the yeast!
- Yeast: One packet typically contains 2 ¼ teaspoons (7g) .
Now, when you're shopping, keep an eye out for quality indicators. for flour, look for a fine texture and a high protein count for fluffy rolls.
Fresh yeast should be soft and crumbly, while milk should be fresh and not past its sell-by date.
Storage guidelines? keep flour in a cool, dry place, and your yeast in the fridge for better shelf life. and always check for freshness—if your yeast doesn’t activate when you add it to warm milk, toss it out.
Signature Seasoning Blend
Oh, the magic of spices! They take your cooking to a whole new level. For those Heavenly Colonial Bread Dinner Rolls , you’ll want generic staples like salt, but you can easily get fancy with:
- Essential spice combinations: Think about adding nutmeg or cinnamon for a sweet twist.
- Herb selections: Rosemary or thyme can transform your rolls into herb-infused delights.
- Flavor enhancers: A pinch of garlic powder brings a savory kick.
And don't forget how flavors vary by region! In some places, people toss in cheddar cheese for a savory spin, making them the ultimate cheese dinner rolls .
Smart Substitutions
We all know cooking doesn’t always go as planned, right? No worries—here are some handy substitutions:
- Common alternatives: If you’re out of all-purpose flour, you can swap in whole wheat flour or bread flour.
- Dietary modifications: Dairy-free? Almond or oat milk can keep those rolls creamy without the cow’s milk!
- Emergency replacements: Running low on sugar? Honey or maple syrup works in a pinch.
Seasonality matters too! Fresh herbs can make your rolls sing during different times of the year.
Kitchen Equipment Essentials
Now, let's talk tools. You don’t need a fancy chef's setup, but certain basics are essential:
- Must-have tools: A large mixing bowl , whisk, wooden spoon, measuring cups, and a baking sheet should do the trick.
- Alternative options: Don’t stress if you don’t have a whisk—use a fork instead!
- Preparation tips: A clean kitchen towel is perfect for covering your dough while it rises.
And oh boy, those warm dinner rolls right out of the oven?
Wrapping It All Up
The beauty of creating your homemade dinner rolls lies in having quality ingredients, knowing your substitutions, and using the right equipment.
Trust me, these comfort food rolls are going to be the stars of your dinner table. whether you’re prepping them as a side dish for family meals or enjoying them as a comforting snack with homemade jams, there’s nothing quite like a soft bread recipe that brings warmth and love to the table.
With your ingredients and tools ready, we’re almost set to jump into those step-by-step instructions for making your colonial bread dinner rolls .
I can’t wait to share how to knead, shape, and bake these beauties. it’s gonna be a fun ride!
The Professional Cooking Method: Mastering the Art of Dinner Rolls
Let’s dive into the heart of cooking with a focus on that all-important foundation: colonial bread dinner rolls: best 12 comfort food recipes .
We're not just talking about a side dish; we’re talking about the warm, fluffy goodness that makes meals feel complete.
So, strap in as we tackle everything from essentials to expert techniques.
Essential Preparation Steps
Alright, let’s get started. first on the list is mise en place . this fancy french term just means “everything in its place.
” before you even think about mixing flour, gather all your ingredients—four cups of that all-purpose flour, warm milk, sugar, and the rest.
Trust me, it makes your life so much easier .
Now, let's chat about time management . if you're like me, getting distracted is super easy. set a timer for your dough rising—about an hour should do it.
Use the time for a quick clean-up or snack break. just don’t get sidetracked by that new netflix show!
Organization is key. make sure your workspace is uncluttered. trust me, there’s nothing worse than scrambling for the whisk when you’re elbow-deep in dough.
And don’t forget the safety considerations. always keep that kitchen area clean to avoid any kitchen mishaps. you’ll thank yourself later.
Step-by-Step Process
Here’s where the magic happens! We’ll keep it simple and clear with numbered instructions.
-
Prepare the Yeast: Combine 1 cup of warm milk and sugar. Let that frothy yeast sit for about 5- 10 minutes . Your kitchen will start to smell amazing!
-
Mix the Dough: Whisk in the melted butter, egg, and salt. Then slowly add in flour until a dough forms.
-
Knead the Dough: Transfer that dough to a floured surface. Give it 8- 10 minutes of kneading until it's smooth. You want it to spring back when poked—this means business!
-
First rise: place your lovely dough in a greased bowl and let it rise in a warm spot until it doubles in size.
A warm spot can be a cozy corner of your kitchen or your oven with the light on.
-
Shape Rolls: Punch that risen dough down. Seriously, it’s super satisfying. Divide it into 12 equal pieces and create tight balls.
-
Second Rise: Let those rolls rise for 30 minutes until puffy.
-
Preheat Oven: Set your oven to 375° F ( 190° C) .
-
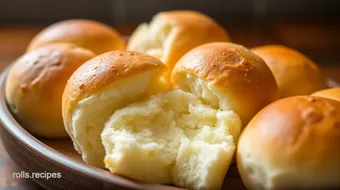
Bake: Bake them for 15- 20 minutes till golden brown, brushing with melted butter right when they come out.
-
Serve: Let them cool slightly and serve warm. Seriously, you're gonna want to dive in right away.
Expert Techniques
Now that you’ve got the basics down, let’s amp things up. the secret to professional-quality rolls? temperature control and timing precision.
Make sure your oven is fully preheated. this can make or break your rolls.
As for visual cues, look for that golden brown color. The rolls should feel light and fluffy when you pick them up, wanting to leap right onto your dinner plate!
And hey, baking can be a bit tricky at times. mistakes happen! if your dough isn’t rising, it might be due to the yeast.
Make sure you’re using fresh yeast and not expired. if your rolls are too dense, next time try adding a touch more yeast.
Always keep a notebook handy for those vital lesson-learned moments.
Success Strategies
Let’s wrap it up with some success strategies. First off, avoid common mistakes. Don’t rush the rising times; this is critical to fluffy, mouth-watering comfort food rolls .
When it comes to quality assurance, poke a roll gently—it should feel airy and springy to the touch.
And for those of you who love meal-prepping, these rolls are your friend! You can shape them, place them in the fridge overnight, and bake them fresh in the morning.
In case you're wondering how to switch things up, try making herb-infused rolls or add cheddar for that cheesy goodness.
So, as we gather warmth from those fluffy old-school rolls, let’s roll into the last part: additional information on your favorite comfort meals recipe .
Because let's be real, what's better than warm dinner rolls paired with stews, creamy soups, or even just classic butter?
Happy baking, friends!
Pro Tips & Secrets for Heavenly Colonial Bread Dinner Rolls
Let’s dive into some pro tips and secrets for making your Heavenly Colonial Bread Dinner Rolls the best they can be. Seriously, these rolls deserve nothing less than your baking expertise!
First off, to get that perfect rise, you want to proof your yeast correctly. mix your warm milk with sugar, then sprinkle in the yeast.
Let it sit for about 5- 10 minutes until it’s frothy. this tells you that your yeast is alive and ready to party! if it doesn’t froth, toss it out.
Seriously, don’t risk it!
For a time-saving hack, you can do your dough rising in the oven (with the light on, not the heat!).
It creates a nice, warm environment. just don’t forget to check after an hour. you want puffy rolls, not a loaf explosion!
Got a flavor idea? try adding a bit of garlic powder or some dried herbs like rosemary. it makes a great twist and adds depth to your easy dinner rolls .
You could even toss in some cheese if you’re feeling adventurous. cheese dinner rolls, anyone?
For presentation, brush those rolls with melted butter right when they come out. it gives them a beautiful shine and a buttery finish.
Maybe sprinkle some herbs on top for that pro chef look. you’re not just making rolls; you’re crafting an experience!
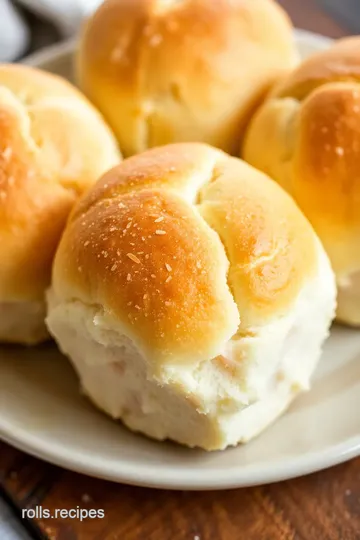
Perfect Presentation for Comfort Food Rolls
Now, let’s talk perfect presentation . this is where you can really impress your friends and family. first things first, when you plate these bad boys, don't just throw them on a plate.
Arrange them in a circle, kind of like a flower. it’s inviting and looks gorgeous!
Garnishing is key. chopped fresh herbs like parsley or a sprinkle of flaky sea salt can take your rolls to the next level.
Trust me, it makes them pop visually. a colorful salad or some fresh jam on the side can create that whole family meal vibe.
You know, the kind of spread that makes everyone gather around!
Pairing is essential too. These rolls are fantastic with stews or rich soups. Imagine dunking your fluffy rolls in a hearty vegetable soup. Yum!
Storage & Make-Ahead for Family-Friendly Recipes
Let’s talk storage and make-ahead tips. if you find yourself with leftover rolls (which i doubt, but just in case), store them in an airtight container at room temperature.
They should stay fresh for up to 3 days . for longer storage, you can freeze ‘em, wrapped in plastic wrap and then in aluminum foil.
They’ll keep well for about 2 months .
For reheating, just pop them in the oven at 350° f ( 175° c) for about 10 minutes . they’ll come out warm and soft, almost like they were just baked.
You can also microwave them for about 10-15 seconds , but just don't overdo it or they might get tough!
Creative Variations to Try
Now, let’s shake things up with some creative variations . once you’ve mastered the basics, feel free to play around. love fall flavors? try adding some pumpkin puree to the dough for a seasonal twist.
You could even sub out some of the sugar for brown sugar for a richer taste.
Going dairy-free? just swap the milk for almond milk and use coconut oil instead of butter. easy peasy! you can really make these homemade dinner rolls your own by adjusting the ingredients to cater to your dietary needs.
And oh, let’s not forget about regional variations! If you’re in the mood for a classic Southern vibe, try making brioche-style rolls . They’re buttery and sweet—perfect for breakfast or brunch.
Complete Nutrition Guide for the Perfect Rolls
Finally, let’s break down the nutrition for these rolls. each roll packs about 180 calories and includes about 4 grams of protein .
If you’re careful with your portions and pair them up with nutritious sides, you can enjoy these delicious rolls without any guilt.
In sum, if you want to make your gatherings unforgettable, baking these colonial bread dinner rolls: best 12 comfort food recipes is a solid choice.
Sharing these with friends or family is what life’s about. so roll up your sleeves, get baking, and enjoy those warm, buttery rolls together.
Trust me; there’s nothing better than comfort meals recipe straight from the oven. happy baking!
Frequently Asked Questions
What makes Colonial Bread Dinner Rolls: Best 12 Comfort Food Recipes different from other bread rolls?
The significant difference lies in their soft, pillowy texture and the subtle hint of sweetness. These rolls are inspired by colonial kitchens, reflecting a traditional method that results in a comforting taste that pairs beautifully with various dishes.
Can I make these dinner rolls ahead of time?
Yes, you can prepare the dough the night before and let it rise in the refrigerator. In the morning, take it out, shape the rolls, allow a final rise, and then bake. This saves time and still ensures a fresh out-of-the-oven experience.
What are some variations I can try with Colonial Bread Dinner Rolls?
You can customize these rolls by adding herbs like rosemary or garlic powder for a savory flavor or incorporating shredded cheese for cheesy rolls. Another option is to substitute honey for sugar to enhance their sweetness.
How should I store leftover Colonial Bread Dinner Rolls?
Store any leftover rolls in an airtight container at room temperature for up to 2 days. For longer storage, wrap them tightly in plastic wrap and freeze for up to 3 months. Reheat them in a preheated oven for a few minutes to restore their softness.
Can I use gluten-free flour to make these dinner rolls?
Yes, you can use a gluten-free all-purpose flour blend that includes xanthan gum. However, the texture may vary slightly, and you may need to adjust the liquid amounts depending on the blend you're using. Always follow the mix instructions as a guide.
What is the nutritional information for Colonial Bread Dinner Rolls?
Each roll contains approximately 180 calories, with around 4g of protein, 7g of fat, 24g of carbohydrates, and 1g of fiber. Keep in mind that these values are estimates and can vary based on specific ingredient brands or measurements.
Heavenly Colonial Bread Dinner Rolls Card
⚖️ Ingredients:
- 4 cups all-purpose flour
- 1 packet active dry yeast
- 1 cup warm milk (110°F/43°C)
- ¼ cup granulated sugar
- ½ cup unsalted butter, melted
- 1 large egg
- 1 teaspoon salt
- 2 tablespoons unsalted butter, melted (for brushing)
🥄 Instructions:
- Step 1: In a large mixing bowl, combine warm milk and granulated sugar. Sprinkle the yeast on top and let it sit for 5-10 minutes until frothy.
- Step 2: Add melted butter, egg, and salt to the yeast mixture. Whisk until blended. Gradually add flour, mixing until a dough forms.
- Step 3: Transfer dough to a floured surface. Knead for 8-10 minutes until smooth and elastic.
- Step 4: Place dough in a greased bowl, cover with a damp towel or plastic wrap, and let rise in a warm place until doubled in size (about 1 hour).
- Step 5: Punch down the risen dough. Divide into 12 equal pieces. Shape each piece into a tight ball and place on a baking sheet lined with parchment (or greased).
- Step 6: Cover again and let rise for 30 minutes until puffy.
- Step 7: Preheat oven to 375°F (190°C).
- Step 8: Bake rolls for 15-20 minutes or until golden brown. Brush with melted butter immediately upon taking them out.
- Step 9: Let cool slightly and serve warm.
Previous Recipe: Heavenly Whole Wheat Ciabatta Rolls: 5 Simple Steps to Joyful Baking
Next Recipe: Volcano Roll: 5 Best Tips for Perfect Flavorful Sushi