Bake Brown Butter Cinnamon Rolls: Irresistible
Craving that warm, nutty aroma? Try my grandma's Bake Brown Butter Cinnamon Rolls: Irresistible! These fluffy rolls are perfect for family brunches!

- Introduction to Bake Brown Butter Cinnamon Rolls: Irresistible
- Recipe Overview: A Journey Through Time and Taste
- Key Benefits of These Irresistible Rolls
- Essential Ingredients Guide
- Get Ready to look into into Professional Cooking!
- Pro Tips & Secrets for Baking Bliss
- Perfect Presentation That Wows
- Storage & Make-Ahead Magic
- Creative Variations to Spice Things Up
- Complete Nutrition Guide
- Expert FAQ Solutions
- In Conclusion
- Recipe Card
Introduction to Bake Brown Butter Cinnamon Rolls: Irresistible
Oh my gosh, let me take you back to that one sunday morning! you know the kind when the sun is just peeking through the curtains, and that glorious aroma of freshly baked cinnamon rolls fills the air? yeah, that one! i had a lightbulb moment when i decided to whip up some bake brown butter cinnamon rolls: irresistible .
Let me tell you, it was a game changer! as soon as those fluffy cinnamon rolls hit the table, my family practically dove in, and i couldn’t help but feel like a baking rockstar.
You ever wondered how something so simple like dough can create magic? the connection we have with homemade cinnamon rolls runs deep—it’s comfort food at its finest.
Plus, let’s not forget the nutty brown butter flavor that takes this classic recipe to the next level! so, if you’re ready to roll (pun totally intended), this recipe is here to please.
Recipe Overview: A Journey Through Time and Taste
Let’s chat history for a sec! the whole idea of cinnamon rolls as we know them traces back to europe, where they’ve had more than a few variations over the years.
And now, these sweet breakfast rolls have cozied themselves right into american kitchens, especially during brunch gatherings or family celebrations.
There’s no doubt they’ve secured a top spot in brunch recipes everywhere.
Now, about the recipe itself. it falls into the medium difficulty range because of the dough handling and that special browning butter step you’ll need to master.
But hang tight—once you get it, you'll cherish that bubbly rising dough like you found a secret tucked away in your kitchen.
Time-wise, you’ll want to budget about 1 hour and 50 minutes for prep and rising. it’s like a mini adventure, with each phase giving you a little more anticipation for those glorious rolls to come.
The whole shebang can yield about 12 rolls , great for sharing (or not…no judgment here!).
Key Benefits of These Irresistible Rolls
Let’s talk health for a sec because who said comfort food can’t be a bit nutritious? they’re not just simple hearty breakfast ideas ; these rolls pack a punch.
Think whole milk and eggs providing good fats and proteins. plus, you can always add in some walnuts or pecans for a crunchy twist!
The unique selling points here are many—first off, that brown butter brings a nutty depth like you wouldn’t believe. no other cinnamon rolls recipe can touch this level of flavor.
Plus, you can effortlessly serve these beauties on special occasions, like holiday mornings or birthday brunches. trust me, folks will be talking about them for weeks!
Another advantage is this recipe’s versatility. you can switch up the fillings with everything from dried fruits to chocolate chips, catering to various tastes.
Consider it your blank canvas for cinnamon roll variations !
So are you ready to get in the kitchen and turn some simple ingredients into a bakery-style masterpiece? stay tuned because next up, i'll share the glorious ingredients that will make your bake brown butter cinnamon rolls: irresistible dreams come true.
Let’s make magic happen!

Sure thing! let's dive right in and whip up an engaging essential ingredients guide that ties into our bake brown butter cinnamon rolls: irresistible recipe.
I can't wait to share some personal insights with you!
Essential Ingredients Guide
When it comes to baking, especially with homemade cinnamon rolls , knowing your go-to ingredients is absolutely key. so, let’s break this down like we’re chatting over coffee.
Here are the basics you’ll need to crown your kitchen with those fluffy, irresistible rolls.
Premium Core Components
Let’s talk dough . for the best outcomes, start with 4 cups all-purpose flour (500g) . when measuring, don’t just scoop it up out of the bag.
Lightly spoon it into your measuring cup and level it off. this gives you the right texture you need.
Also, hold onto that 1/4 cup granulated sugar (50g) —it sweetens the deal. yeast is your magic ingredient here, so make sure you’re using 2 1/4 teaspoons active dry yeast (1 packet) .
It can be a bit finicky, so check the expiration date just to be safe. the fresher, the better!
Got all that? now, don’t forget quality. look for whole milk (240ml) that’s fresh and creamy. and when picking butter, always aim for unsalted butter ; it gives you better flavor control.
If you can, brown that butter up—oh my gosh, the nutty brown butter flavor will elevate your rolls to bakery level!
Signature Seasoning Blend
Cinnamon is the star here, so 1 cup packed brown sugar (220g) combined with 2 tablespoons ground cinnamon will set the stage for your rolls.
The blend of these flavors transforms simple dough into pure comfort heaven. if you're feeling adventurous, add a touch of nutmeg (just 1/4 teaspoon ) for that extra warmth.
And remember: freshness matters! check your spices’ expiration date. old spices can dull your flavors, making it all taste...well, blah.
You want your rolls to hit the taste buds like a hug from grandma.
Smart Substitutions
Sometimes life gets in the way, and you don’t have everything on hand. no worries! if you're out of whole milk , use whatever milk you have—almond or oat milk work just fine.
Running low on sugar? you can swap that brown sugar for coconut sugar. it’s slightly less sweet but still works wonders in your baked goods.
And if you’re no gluten fan, grab a good gluten-free flour blend . it might take some tweaking, but it can bring those soft pastry rolls right into your world!
Kitchen Equipment Essentials
Let's talk tools! you don't need a fancy bakery setup to make these easy cinnamon rolls . a good mixing bowl , a whisk , and a rolling pin are your best friends.
If you have a stand mixer, great—let it do the kneading for you!
Make sure you’ve got a solid baking dish (9x13 inches) for that golden finish. cover your rolls with a towel while they rise; it keeps them cozy.
And here’s a fun tip: use dental floss to cut your rolls! it gives you nice clean cuts without squishing the dough.
No pancake rolls here, thank you very much!
Closing Thoughts
Alright, so you’re all prepped with the essentials. remember, baking is about confidence and a dash of love—your rolls will absolutely reflect that! once you’ve got these ingredients and tools in place, you’re ready to take the plunge into making those bake brown butter cinnamon rolls: irresistible —the kind that practically melts in your mouth.
Next up, we’ll dive into the juicy details of the step-by-step instructions for making these show-stopping sweet breakfast rolls.
Get ready to impress your family and friends with these delicious bakery-style cinnamon rolls that are worth every moment of the effort! who’s hungry?
Get Ready to look into into Professional Cooking!
Alright, friends! let’s dive into the professional cooking method —where the magic really happens in your kitchen. you might think, "professional? really? i just want to make some fluffy cinnamon rolls !" but fear not, because even the pros have got their tricks up their sleeves.
And today, we are going to whip up some bake brown butter cinnamon rolls: irresistible !
Essential Preparation Steps
First things first, let’s talk about mise en place —a fancy term for having all your ingredients ready and set before you start cooking.
It’s like setting the stage before a big performance. chop your ingredients, measure out your flour, and don’t forget to preheat your oven to 350° f ( 175° c) ! i learned the hard way once—can’t find the right spice when the butter’s melting everywhere; it’s chaos!
Now, time management is key. try to keep track of your dough rising time, which is about 1 hour for your sweet rolls.
I always set a timer because, honestly, i could binge-watch a whole series in a minute if i'm not paying attention.
Staying organized is also crucial. lay everything out before you start. you wouldn't want to be searching for that baking dish when the dough is ready to roll! and remember, safety first.
When you’re browning butter , it’s hot. use a whisk and make sure it’s not too dark—nobody wants burnt flavors sneaking into those rolls!
Step-by-Step Process
Let's break it down, step by step.
-
Make the dough : start by mixing 1 cup of warm milk and 1/4 cup of sugar . sprinkle 2 1/4 teaspoons of active dry yeast over it.
Let it sit for 5 minutes . it should get all frothy—like a little yeasty party!
-
Combine ingredients : mix 4 cups of all-purpose flour with 1 teaspoon of salt and the yeast mixture. add in melted butter and 2 room-temperature eggs .
Knead that dough for 8- 10 minutes till it’s smooth and elastic.
-
First Rise : Toss that dough into a greased bowl, cover it, and let it rise in a warm spot for about 1 hour .
-
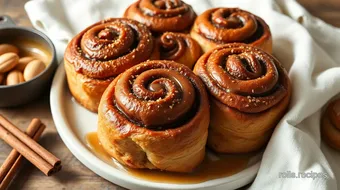
Prepare the filling : now comes the fun part! brown 1/2 cup of unsalted butter in a saucepan. look for that golden color and nutty aroma—trust me, it’s heaven.
Mix that with 1 cup of brown sugar and 2 tablespoons of cinnamon .
-
Assemble : Roll out that dough into a rectangle, spread the brown butter all over, then add the filling mixture. Roll it up tightly and cut into 12 pieces.
-
Second Rise : Let those rolls rise for another 30 minutes in a greased baking dish.
-
Bake : Bake for 25- 30 minutes , until golden brown. You’ll know they’re done when the whole house smells amazing!
-
Frost : For the frosting, mix 1 cup of powdered sugar , 2 tablespoons of milk , and 1 teaspoon of vanilla until it’s smooth. Drizzle it over your warm rolls.
Expert Techniques
Alright, let’s kick it up a notch with some expert techniques!
- Check the quality of your yeast. It should be fresh—otherwise, those rolls won’t rise!
- Timing is crucial—don’t rush those rises. Good things come to those who wait, right?
- Keep an eye on those rolls while baking. Sometimes they need a minute or two less than you expect!
Success Strategies
We've got to watch out for those common baking blunders. like forgetting to let your dough come to room temp before rolling.
Oof, can be a disaster, my friends! always double-check your ingredients too; trust me on that one.
Remember, quality assurance is crucial. if something feels off, trust your gut and fix it! whether that means adjusting the baking time or adding a sprinkle of nutmeg for an unexpected twist, follow your taste buds.
For a day ahead, you can prepare your rolls and let them rise in the fridge overnight for an even more delightful flavor and fluffy texture when baked.
So there you have it! You’re ready to tackle those homemade cinnamon rolls like a pro. Feeling brave? Experiment with flavors like chocolate or cream cheese frosting!
And before I wrap things up, keep an eye out for the last section coming up— Additional Information —where I share even more tips and tricks to help you become the cinnamon roll champion of your block! Happy baking!
Pro Tips & Secrets for Baking Bliss
Let’s start right at the heart of every bake brown butter cinnamon rolls: irresistible adventure—those little chef’s secrets that will turn your kitchen into a bakery.
First off, don’t be shy about browning that butter ! this step gives your rolls a nutty flavor that’ll blow your mind.
You just melt it over medium heat until it turns golden and smells divine. this isn’t just butter anymore; it’s magic.
If you’re in a hurry, i get it. no one wants to wait around forever. try making the dough ahead of time .
You can pop it in the fridge after it’s risen. just let it sit overnight and roll it out in the morning.
Time-saving? yes, please!
Also, sprinkle a pinch of nutmeg into your filling to jazz it up. It gives a mellow earthy warmth that plays nicely with the cinnamon.
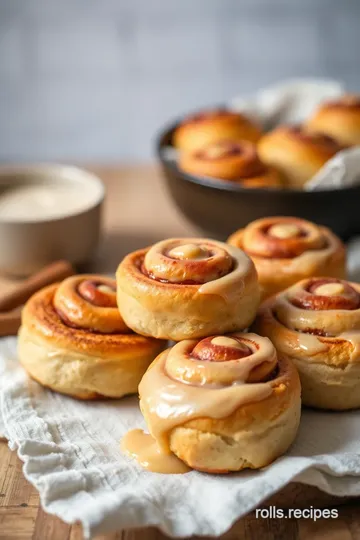
When it comes to presentation, less is not more here. drizzle your rolls with homemade icing before serving, and don’t be shy with that frosting! use a spoon to swirl it around—trust me, it looks gourmet and tastes like a sweet dream.
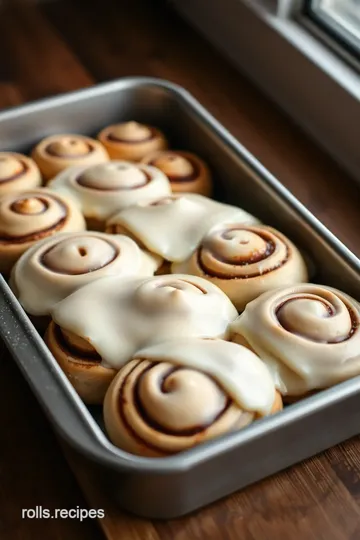
Perfect Presentation That Wows
Speaking of presentation, let’s make those rolls instagram-worthy. when it comes to plating , a clean white dish can make your fluffy cinnamon rolls pop right out.
Arrange your rolls in a circular pattern with the frosting on top to create that bakery-style look.
For garnish, think fresh! a sprinkle of chopped pecans or a dusting of powdered sugar can really elevate things. remember: color matters! fresh fruit like bright berries on the side adds a nice contrast and enhances visual appeal.
And don’t forget your decorating ideas for cinnamon rolls . an extra drizzle or spirals of icing will make your rolls as beautiful as a european-style pastry.
Try not to go overboard, though. we want to enhance the roll, not steal the show!
Storage & Make-Ahead Magic
Alright, now let’s talk about how to keep your rolls fresh because nobody wants to bite into a stale treat.
Honestly, these rolls are best served warm, but if you have leftovers (and that’s a big if, let’s be real), you can keep them in an airtight container on your counter for about 2 days.
For longer storage, wrap them tightly and stick them in the freezer for up to a month. just remember to thaw them overnight in the fridge before you reheat.
The oven is the way to go here; pop them in at 350° f for about 10- 15 minutes. this keeps that scrumptious nutty brown butter flavor intact, making them taste freshly made.
Creative Variations to Spice Things Up
How fun is it to think outside the box? you could play around with different cinnamon roll variations ! what about adding some chopped apples to the filling for a fresh twist? or turn these rolls into sweet breakfast rolls by adding a layer of cream cheese before rolling them up.
If you’re vegan or have dietary restrictions, swap out regular butter with coconut oil and use almond milk. These little changes make it easy to cater to everyone’s tastes.
Feeling adventurous? Try going seasonal. During the fall, add pumpkin puree and spices to the filling. In summer, roll in fresh berries. Talk about hearty breakfast ideas that can suit any occasion!
Complete Nutrition Guide
Let’s not ignore the numbers, folks. while these rolls are definitely considered comfort food , it’s nice to know what you’re diving into.
A single roll typically packs about 310 calories . yes, that’s more than your average snack, but when you think about the health benefits of cinnamon—like its potential to lower blood sugar levels—you feel a bit better about indulging.
As part of your brunch recipes arsenal, you can decide on portions that suit your guests. a good rule of thumb is to cut each roll in half if you’re serving with side dishes.
This way, your guests can enjoy a taste without going overboard.
Expert FAQ Solutions
Now, i can almost hear your questions from here! if your dough doesn’t rise, check your yeast to make sure it’s active.
You want to see those bubbly action shots in your warm milk.
Want to know how to layer flavor? Remember to experiment with spices like ginger or even cardamom! Your baking tips are only limited by your imagination.
If you’re nervous about rolling the dough, it’s all about pressure control. Don’t squash them; just roll gently until they’re tightly wrapped.
In Conclusion
So there you have it! the best way to bake brown butter cinnamon rolls: irresistible . they’re a little labor-intensive, but every swirl of that sweet cinnamon goodness is worth it when you bite into that soft, warm pastry.
It’s a champion of weekend breakfasts and special occasions alike. trust me; once you make these, you’ll be the one bringing the bakery-inspired recipes to every brunch! happy baking, my friends!
Bake Brown Butter Cinnamon Rolls: Irresistible Card
⚖️ Ingredients:
- 4 cups all-purpose flour (500g)
- 1/4 cup granulated sugar (50g)
- 2 1/4 teaspoons active dry yeast (1 packet)
- 1 teaspoon salt
- 1 cup whole milk (240ml), warmed
- 1/3 cup unsalted butter (75g), melted
- 2 large eggs, at room temperature
- 1/2 cup unsalted butter (115g), browned and cooled
- 1 cup packed brown sugar (220g)
- 2 tablespoons ground cinnamon
- 1/4 teaspoon nutmeg (optional)
- 1 cup powdered sugar (120g)
- 2 tablespoons milk (30ml)
- 1 teaspoon vanilla extract
🥄 Instructions:
- Step 1: In a bowl, combine warm milk and sugar; sprinkle yeast over and let sit for 5 minutes until frothy.
- Step 2: In a separate bowl, whisk flour and salt; add melted butter, eggs, and yeast mixture.
- Step 3: Mix until a dough forms. Knead on a floured surface or in a stand mixer for 8-10 minutes until smooth.
- Step 4: Place dough in a greased bowl, cover with a towel, and let rise in a warm place until doubled, about 1 hour.
- Step 5: Brown the butter in a saucepan over medium heat until golden brown and nutty, cool slightly.
- Step 6: In a bowl, mix brown sugar, cinnamon, and nutmeg (if using).
- Step 7: Roll out the dough on a floured surface into a rectangle.
- Step 8: Spread the browned butter evenly over the dough. Sprinkle the sugar mixture on top.
- Step 9: Roll the dough tightly into a log. Cut into 12 equal pieces.
- Step 10: Place rolls in a greased baking dish, cover, and let rise for 30 minutes.
- Step 11: Preheat the oven to 350°F (175°C). Bake rolls for 25-30 minutes or until golden brown.
- Step 12: In a bowl, whisk together powdered sugar, milk, and vanilla until smooth.
- Step 13: Drizzle frosting over warm rolls; allow to cool slightly before serving.
Previous Recipe: Easy Bake Pepperoni Pizza Rolls - A Family Favorite Snack
Next Recipe: How to Bake Chocolate Rolls with Hazelnut Delight: The Ultimate Recipe!