Crispy Spring Rolls with Yum Sauce
Discover my favorite Fry Crispy Spring Rolls with Yum Sauce recipe! Perfectly crunchy and delicious, these are a hit for any gathering. Try them today!

- Let’s Roll Up Some Flavor!
- A Taste of History
- Why You’ll Love This Recipe
- The Inside Scoop on Ingredients
- Essential Ingredients Guide: Spring Roll Mastery
- Mastering the Art of Professional Cooking: Your Guide to Perfectly Crispy Spring Rolls
- Pro Tips & Secrets for Frying Crispy Spring Rolls with Yum Sauce
- Perfect Presentation: Plating Techniques for Spring Rolls
- Storage & Make-Ahead: Keeping Your Spring Rolls Fresh
- Creative Variations: Tailoring Your Spring Rolls
- Complete Nutrition Guide: Spring Rolls Breakdown
- In Conclusion: Let’s Roll!
- Frequently Asked Questions
- Recipe Card
Let’s Roll Up Some Flavor!
Oh my gosh, i remember the first time i bit into a crispy spring roll . it was at a little street food stall in thailand, and let me tell you, it was like a flavor bomb exploded in my mouth! the crunch, the savory filling, and that zesty yum sauce on the side! i was hooked.
And that's how my love for these asian appetizers began. who doesn’t love a crispy bite that transports you straight to a bustling street market?
Today, we’re diving into how to Fry Crispy Spring Rolls with Yum Sauce . Whether you’re hosting a party or just want a snack, this easy spring roll recipe is sure to impress!
A Taste of History
Now, let’s rewind a bit. spring rolls have a rich history. originating from vietnam and thailand , they were traditionally enjoyed during festivals.
Fast forward to today, and they’re a staple in many cultures around the world. they’ve evolved into vegetable spring rolls , shrimp spring rolls , and even crunchy thai spring rolls .
This dish's popularity has only grown. It's perfect for serving as savory snacks at casual get-togethers or as appetizers during fancy dinners. Plus, they're often a hit at potlucks, trust me!
Getting into the kitchen for this recipe is an adventure, but don’t worry; it’s classified as medium difficulty . you’ll need about 30 minutes of prep and resting time, plus another 10- 15 minutes cook time .
In no time, you'll have about a dozen delicious rolls that can serve up to six people!
Why You’ll Love This Recipe
Let’s get to the best part – why should you make these?
First off, health benefits galore! packed with fresh veggies like cabbage and carrots, these rolls are a great way to get your greens without sacrificing taste.
Plus, they can easily be made vegetarian or gluten-free with just a few simple swaps. so, whether you're munching on veggie rolls or hearty shrimp ones, you're making a wholesome choice.
On top of that, they’re super versatile. perfect for party appetizers , they can fit right in with everything else on the snack table.
You can also serve them on date night to impress that special someone. and let's not forget how fun they are to make! gather some friends, roll up your sleeves, and have a mini spring roll-making party!
The Inside Scoop on Ingredients
Feeling intrigued? let’s get into what you need for these homemade spring rolls . you’re probably wondering how to fry these beauties up properly.
But fear not! the frying techniques i’ll cover will help you achieve those crispy, golden edges every time!
You'll need spring roll wrappers or rice paper, a mix of fresh veggies like shredded cabbage and carrots, and some cooked shrimp or tofu if you want to switch it up for vegetarian spring rolls .
And of course, no spring roll is complete without a killer dipping sauce ! our yum sauce recipe combines soy sauce, lime juice, and a jolt of chili paste for that spicy zing.
So now that we’ve piqued your interest, let’s dive into the fantastic filling options and all the good stuff you need to get rolling on this tasty adventure!
Are you ready? Let’s gather our ingredients and get rolling!
Essential Ingredients Guide: Spring Roll Mastery
When it comes to cooking, knowing your ingredients is everything. whether you’re making crispy spring rolls or vegetable spring rolls , getting those ingredients right means everything.
This guide has your back, helping you nail those flavors and techniques.
Premium Core Components
Let’s kick things off with premium ingredients . You’ll need:
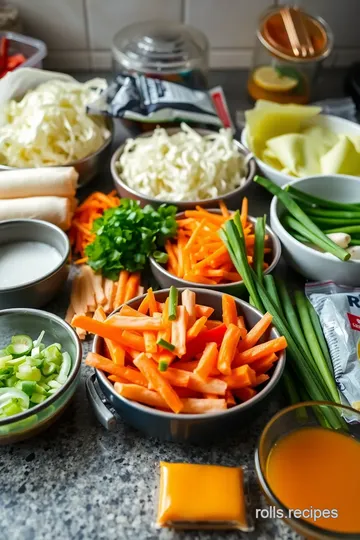
- Spring roll wrappers : Grab about 12 of ‘em (check for the best brands like rice paper if you want that authentic touch).
- Cabbage : A cup of shredded cabbage adds crunch.
- Carrots : Half a cup of shredded carrots brings sweetness.
- Bean sprouts : They give that fresh pop, so use ½ cup .
- Cooked shrimp or tofu : For protein, how about ½ cup of cooked shrimp? Or go all-in on a tofu swap for a vegetarian twist.
Quality indicators for freshness? check for vibrant colors, and avoid anything that looks sad or wilted. store these fresh beauties in the fridge and use them within 3-5 days for the best flavor.
Signature Seasoning Blend
Now, let’s talk flavor. To make the ultimate Yum Sauce , you need the right spices and herbs:
- Soy sauce and sesame oil : These are foundational for that umami flavor.
- Fresh garlic and ginger : Just a teaspoon of each will elevate your dish. Fresh is best!
Don’t forget about your regional variations . If you're feeling adventurous, why not use Thai or Vietnamese spring roll recipes for inspiration?
Smart Substitutions
What if you’re out of something? No worries, my friend! Here are some smart substitutions that will keep you in business:
- Spring roll wrappers : If all else fails, you can make gluten-free spring roll wrappers with rice flour or use the thin rice papers .
- Shrimp : Swap in shredded chicken or even mushrooms for a veggie twist.
- Soy sauce : Go for coconut aminos for a soy-free option.
These substitutions will work great in your spring roll recipe without compromising flavor!
Kitchen Equipment Essentials
Let’s not forget the tools! For crispy spring rolls, you need some must-have kitchen essentials:
- Frying pan or deep fryer : For frying, get that oil nice and hot (around 350° F is your magic number).
- Tongs or a slotted spoon : You'll need these for transferring your the spring rolls in and out of the oil safely.
- Mixing bowl : You gotta have a spacious bowl to mix all those fresh ingredients together.
If you don’t have a deep fryer, a regular pan does just fine, no worries!
Storing and Prepping Tips
- Keep your spring roll wrappers in a cool, dry place until you're ready to use them.
- Don’t skimp on resting your filling before rolling: letting it hang out for 30 minutes can make or break your spring rolls.
- Watch those temperatures when frying. No one likes a soggy spring roll, am I right?
Cooking those crispy spring rolls might seem a bit fancy, but trust me, it's way easier than you think. By understanding these essential ingredients , you're setting yourself up for success.
So, are you ready to learn how to fry spring rolls? let’s jump into the step-by-step instructions for making those crunchy little parcels of joy that pair perfectly with your homemade spicy yum sauce .
Mastering the Art of Professional Cooking: Your Guide to Perfectly Crispy Spring Rolls
If you’ve ever strolled through a bustling street market in southeast asia, you likely stumbled upon those shiny, golden treasures: crispy spring rolls .
Oh my gosh, just thinking about them makes my mouth water! the right spring roll recipe can transport you straight to those vibrant corners of the world.
So, sit tight as we dive into how to fry spring rolls like a pro, with a special focus on that addictive yum sauce recipe .
It’s about to get tasty!
Essential Preparation Steps
Before you whip up those crunchy delights, let’s talk about getting organized. this is where mise en place steps in, my culinary bff.
It means gathering and prepping all your ingredients beforehand. trust me, it saves you from scrambling around mid-cooking.
Time management is crucial too. i usually break my prep time into chunks. spend about 30 minutes on your filling and another 30 minutes to let everything rest.
It keeps your spring rolls from being soggy. you don’t want your delicious wrappers to lose their crunch!
And don’t forget safety considerations ! When frying, oil can get dangerously hot. Keep a fire extinguisher nearby just to be safe, and always maintain a good distance from the hot oil.
Step-by-Step Process
Now, let’s get into the good stuff! Here’s how we’re gonna do this:
-
Prepare the filling: in a large bowl, mix together your shredded cabbage, carrots, bean sprouts, and cooked shrimp (or tofu, if you’re keeping things vegetarian).
Drizzle in 2 tablespoons of soy sauce and 1 tablespoon of sesame oil . make sure it's well-mixed!
-
Prep the Wrappers: Lay out those beautiful spring roll wrappers . If you’re going with rice paper wrappers, give them a quick soak in warm water until they're pliable.
-
Assemble the rolls: take a spoonful of filling and place it at the corner of each wrapper. fold in the edges and roll it up tightly.
Use a little water to seal the edges.
-
Heat the Oil: In a frying pan or deep fryer, heat up the oil to 350° F ( 175° C) . Trust me, this is the sweet spot for achieving crispy perfection!
-
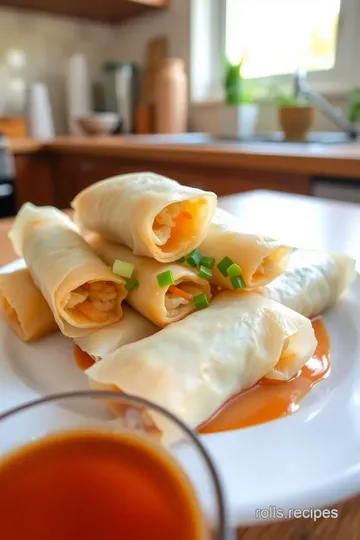
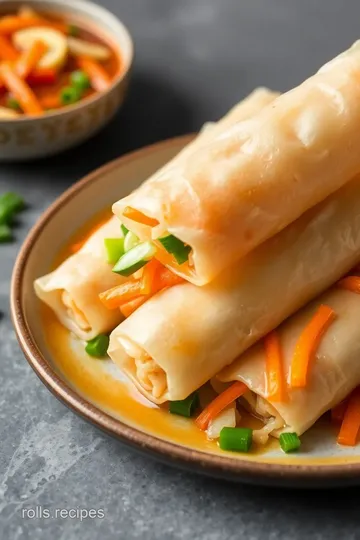
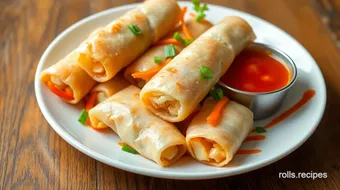
Fry the spring rolls: carefully drop those rolls into the hot oil. fry in small batches to keep that oil hot! cook until they’re golden brown and super crispy—about 3- 4 minutes per side.
-
Drain and Cool: Once they're out of the oil, drain them on paper towels.
Expert Techniques
Here’s where I channel my inner chef!
-
Critical Steps Explained: Always monitor the temperature of the oil; if it drops too low, the rolls become soggy. Use a cooking thermometer if you have one!
-
Quality Checkpoints: Look for that delicious golden hue. If they’re not golden, they’re not done. It’s all about those visual cues for doneness !
-
Troubleshooting Tips: If your rolls are bursting open while frying, you’ve either over-filled them or didn’t seal them tightly enough. Don’t fret! Just adjust next time.
Success Strategies
You don’t wanna mess up, especially when serving guests! So here's how you can nail it:
-
Common Mistakes to Avoid: Don’t overstuff your rolls—that's how they explode. And really, make sure those veggies aren't wet.
-
Quality Assurance Tips: Taste before serving! I mean, who wants to bite into bland spring rolls? The filling should have a good balance of flavors.
-
Perfect Results Guide: If you’re aiming for that restaurant-quality crunch, double-fry ‘em. Fry once, let them cool, and then fry again for 1- 2 minutes .
-
Make-ahead Options: Prep your filling in advance and store it in the fridge. Assemble and fry just before serving for ultimate freshness.
Those crunchy bites of goodness paired with a side of that spicy yum sauce are sure to be a hit! so, grab your friends and dig into these delicious appetizers that'll have your taste buds doing a happy dance.
Additional Information
Ready to impress at your next gathering? making homemade spring rolls is easier than you think, especially when you follow these steps.
You’ll be the superstar in the kitchen, and your friends will be wondering where you learned to fry spring rolls like a pro! whether you opt for veggie, shrimp, or even cabbage spring roll filling , the possibilities are endless.
Whipping up this quick spring roll recipe is just the beginning of delightful, crunchy fun! happy cooking!
Pro Tips & Secrets for Frying Crispy Spring Rolls with Yum Sauce
Alright, let’s dive into some insider tips to make your spring roll recipe not just good, but downright legendary .
1. chef’s personal insights:
there’s a trick to achieving that crunchy texture : the oil! always ensure your oil is hot—around 350° f ( 175° c)—before you pop in those rolls.
Trust me; you want that satisfying crunch, not soggy mess. i learned this the hard way after a big batch went straight from oil to a soggy defeat .
2. time-saving techniques:
prep your filling the day before. store it in an airtight container. this not only saves time but allows the flavors to meld wonderfully.
Oh, and if you have an air fryer, hello! you can make air fryer spring rolls for a lighter version.
Just pop them in for about 10 minutes at 375° f ( 190° c), and you’re golden!
3. flavor enhancement tips:
don’t skimp on spices! a sprinkle of five-spice powder can take your filling to the next level.
Also, add a splash of vinegar to your yum sauce recipe for that extra zing!
4. presentation advice:
make those rolls sing! when serving, sprinkle some sesame seeds on top, and add fresh cilantro or mint leaves.
It’s all about serving visually appealing bites that make folks reach for more—talk about the best asian appetizers !
Perfect Presentation: Plating Techniques for Spring Rolls
Let’s make those crunchy spring rolls as stunning as they are tasty!
1. plating techniques:
a simple white plate or slate can really make your spring rolls pop! arrange them in a fan shape or stack them in a tower for that restaurant vibe.
2. Garnish Ideas:
Edible flowers or microgreens give your dish that wow factor. Trust me; the Instagram likes will roll in!
3. Color Combinations:
Contrast is key. Think vibrant green cilantro next to those golden-brown rolls. It keeps the eye dancing and the mouth watering.
4. Visual Appeal Tips:
Use dipping dishes for your sauces—get creative! A small bowl for your Thai dipping sauce and a charming plate for your rolls really elevates the dining experience.
Storage & Make-Ahead: Keeping Your Spring Rolls Fresh
Are you planning for a big gathering? Here’s how to keep those vegetable spring rolls fresh without losing that precious crunch.
1. Storage Guidelines:
Store cooked spring rolls in an airtight container. If you’ve got extras (which is rare, but hey), place parchment paper between layers to keep them from sticking.
2. Preservation Methods:
You can freeze uncooked rolls too! Just flash freeze them before transferring them to a freezer bag. They keep well for up to 3 months .
3. Reheating Instructions:
Pop them back in the fryer at 350° F for a quick 3- 4 minutes, and you’re all set. No microwave mush allowed!
4. Freshness Duration:
Cooked rolls last about 3 days in the fridge, but for the best taste, enjoy them fresh!
Creative Variations: Tailoring Your Spring Rolls
The beauty of homemade spring rolls is that they’re a blank canvas. Let’s get a little creative!
1. Flavor Adaptations:
Craving something sweeter? Try adding fruit like mango or apple to your filling. Trust me; it’s a game changer!
2. Dietary Modifications:
Going vegetarian? Swap meats for beans or more veggies. You can make vegetarian spring rolls that pack a punch!
3. seasonal twists:
football season means comfort food! add some shredded chicken and a spicy kick for a warming roll, or in summer, use fresh herbs and shrimp for a light bite.
4. Regional Variations:
Think Vietnamese spring rolls or a Thai-inspired twist . The sky’s the limit with flavors and fillings!
Complete Nutrition Guide: Spring Rolls Breakdown
Let’s talk about the goodies inside those delicious spring rolls.
1. Detailed Breakdown:
Each roll has about 180 calories . A good snack without the guilt.
2. Health Benefits:
Full of fresh veggies? Check! Lean proteins? Double-check! These rolls can fit nicely into a balanced diet.
3. Dietary Considerations:
Need gluten-free? Grab some gluten-free spring roll wrappers . Easy peasy!
4. Portion Guidance:
You might think 12 spring rolls is a lot—but trust me, with a crowd, they disappear fast!
In Conclusion: Let’s Roll!
After all that, you’re ready to conquer the kitchen and prepare these fry crispy spring rolls with yum sauce . they’re quick, easy, and honestly, way better than store-bought.
Plus, you’ll impress anyone who takes a bite!
So gather your ingredients and get creative. whether you're making street food spring rolls for a party or a cozy night at home, this recipe is a total win.
Happy cooking, and don't forget the spicy yum sauce for dipping! enjoy!
Frequently Asked Questions
What are the best tips for frying crispy spring rolls with yum sauce?
To ensure your Fry Crispy Spring Rolls with Yum Sauce come out perfectly, make sure the oil is hot enough (around 350°F or 175°C) before adding the rolls. This prevents them from absorbing too much oil and becoming soggy. Additionally, fry in small batches to maintain oil temperature and ensure even cooking for a crispy texture.
Can I make the spring rolls in advance?
Yes, you can prepare the spring rolls ahead of time! After assembling, place them on a parchment-lined baking sheet, cover with plastic wrap, and refrigerate. It's best to fry them just before serving to ensure they stay crispy, but you can also freeze them for longer storage. Just make sure to thaw before frying.
Are there any variations for fillings besides shrimp in the spring rolls?
Absolutely! While the classic version uses shrimp, you can customize the filling to your preference. Popular options include tofu for a vegetarian take, chicken, or even a mix of colorful vegetables like bell peppers, mushrooms, or zucchini. Feel free to experiment with flavors and textures!
How do I store leftover spring rolls and yum sauce?
To store leftover fry crispy spring rolls with yum sauce, keep the rolls in an airtight container in the refrigerator for up to 2-3 days. For the yum sauce, store it in a sealed container in the fridge for about a week. To reheat, use an oven or air fryer for a few minutes to regain the crispiness.
How can I make the yum sauce spicier?
If you prefer a spicier yum sauce, you can increase the amount of chili paste or sriracha to your liking. You can also add finely chopped fresh chilies or a pinch of cayenne pepper for an extra kick. Adjust gradually to achieve your desired heat level!
What are the nutritional considerations for these spring rolls?
Each serving of Fry Crispy Spring Rolls with Yum Sauce contains approximately 180 calories, along with 6g of protein and 10g of fat. This can vary based on the specific ingredients used. If you're looking for a lighter option, consider using less oil for frying or opting for a baked version instead.
Crispy Spring Rolls with Yum Sauce Card
⚖️ Ingredients:
- 12 spring roll wrappers (or rice paper wrappers)
- 1 cup (100 g) shredded cabbage
- 1/2 cup (50 g) shredded carrots
- 1/2 cup (75 g) bean sprouts
- 1/2 cup (75 g) cooked shrimp, chopped (or tofu for a vegetarian option)
- 2 tablespoons (30 ml) soy sauce
- 1 tablespoon (15 ml) sesame oil
- 1 teaspoon (5 g) minced garlic
- 1 teaspoon (5 g) minced ginger
- Oil for frying (e.g., vegetable or canola oil)
- 1/4 cup (60 ml) soy sauce for the Yum Sauce
- 2 tablespoons (30 ml) lime juice for the Yum Sauce
- 1 tablespoon (15 g) sugar for the Yum Sauce
- 1 teaspoon (5 g) chili paste (or sriracha) for the Yum Sauce
- 1 clove garlic, minced for the Yum Sauce
🥄 Instructions:
- Step 1: In a large mixing bowl, combine shredded cabbage, carrots, bean sprouts, shrimp (or tofu), soy sauce, sesame oil, garlic, and ginger. Mix well.
- Step 2: Lay out spring roll wrappers on a clean surface. If using rice paper, soak in warm water until pliable.
- Step 3: Place a small amount of filling at the corner of each wrapper. Fold the edges over the filling, then roll tightly from the corner to form a cylinder. Seal the edges with water if necessary.
- Step 4: In a frying pan or deep fryer, heat oil over medium-high heat until it reaches 350°F (175°C).
- Step 5: Carefully add spring rolls to the hot oil, cooking in batches if necessary. Fry until golden brown and crispy, about 3-4 minutes per side.
- Step 6: Remove spring rolls from the oil using tongs or a slotted spoon and drain on paper towels.
- Step 7: In a small bowl, whisk together soy sauce, lime juice, sugar, chili paste, and minced garlic until smooth.
- Step 8: Arrange spring rolls on a serving platter with a side of Yum Sauce for dipping.
Previous Recipe: Easy & Juicy Fried Chicken Egg Rolls with Zesty Jalapeños: My Family's Favorite Recipe
Next Recipe: Easy Bake Chicken Pot Pie: Quick & Comforting Dish for Cozy Family Dinners