Homemade Bulkie Rolls
Craving the ultimate bulki roll? Join me as I share my kitchen-tested tips to create soft, pillowy bites that are perfect for sandwiches. Let's bake!

- The Comfort of Homemade Bulkie Rolls
- The Essential Ingredients Guide for Homemade Bulkie Rolls
- Mastering the Art of Bulkie Rolls: Chewy Delights to Savor
- Pro Tips & Secrets for Bulkie Rolls
- Perfect Presentation for Your Homemade Rolls
- Storage & Make-Ahead Tips
- Creative Variations to Try
- Complete Nutrition Guide
- Expert FAQ Solutions
- Conclusion: Your Homemade Baking Adventure Awaits!
- Recipe Card
The Comfort of Homemade Bulkie Rolls
Oh my gosh, let me tell you about my first experience with bulki rolls. i remember it like it was yesterday: i'd just moved into a new apartment, and my kitchen was full of boxes instead of pots and pans.
One rainy afternoon, i stumbled upon a recipe for those soft, chewy delights known as bulki rolls. being a fan of over-the-top sandwiches and hearty soups, i decided to give these bad boys a try.
The scent of warm, freshly baked rolls wafting through my tiny kitchen was pure magic. seriously, they became my go-to comfort food!
So, what exactly is a bulkie roll ? well, these rolls have their roots in new england cuisine and have become trusty companions for any sandwich or soup.
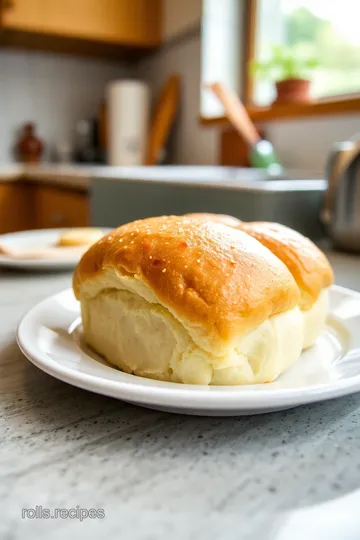
They’re not just any rolls; they bring a hint of sweetness to the table with a soft, golden crust that makes them irresistible.
Oh, and if you’re wondering why they’re called "bulkie," it’s because they’re a bit, well, bulky! but that’s what makes them perfect for stuffing with your favorite fillings.
Recipe Overview: A Bit of History and What to Expect
Bulky rolls have a rich history, often linked to local bakeries up north that churn out batch after batch of these soft sandwich rolls.
They’ve become a staple at family dinners, barbecues, and, quite frankly, any occasion where good food is involved. nowadays, you can find them at bakeries, cafes, or, better yet, whip them up right in your kitchen.
Time-wise, you’ll want to set aside about 1 hour and 35 minutes . it sounds like a lot, but trust me, most of that time is just the dough rising while you can get some other stuff done.
Difficulty level? i’d say it’s medium. it involves some kneading and a little patience, but if you’ve got some basic skills, you’ll be kneading like a pro in no time!
As far as cost goes, these rolls are budget-friendly. you might already have most of the essential baking ingredients in your pantry.
Plus, with this recipe yielding about 12 rolls , it's a win-win for anyone looking for a quick crowd-pleaser.
Key Benefits: Why You’ll Love These Rolls
First off, let's talk health. bulkie rolls can be made with whole wheat flour for a heartier option, giving you some added fiber.
Plus, if you're using fresh ingredients, you can avoid those mysterious preservatives found in many store-bought varieties.
Now, when it comes to versatility, these rolls can’t be beaten. imagine serving them with a warm bowl of homemade soup or using them for sandwiches loaded with all sorts of goodies.
Seriously, the sandwich ideas are endless, from classic turkey and cheese to a pile of veggies with hummus.
One of the greatest things about the bulkie roll recipe is that it's easy to adapt. want a bit of flavor? toss in some garlic or sprinkle some seeds on top before baking.
Those additions can really kick your rolls up a notch. and let’s be honest, if something's made from scratch, it just hits differently.
Thinking about special occasions? these homemade rolls are perfect for gatherings. whether it’s a sunday family dinner or a casual get-together, serving bakery-style rolls that you created makes you look like a culinary rock star.
So, are you ready to get started on this delicious adventure ? let’s dive into what you’ll need to make these dreamy bulki rolls! trust me, once you’ve made them once, you’ll be hooked—have fun experimenting with different variations and toppings; they make for amazing homemade bread variations.
Now, grab your apron and let’s get those yeast rolls into action!
The Essential Ingredients Guide for Homemade Bulkie Rolls
Oh my gosh, folks! if you’re diving into the world of baking, especially when it comes to those fluffy bulkie rolls beloved in new england, you're in for a treat.
Let's break down some essential ingredients that'll help you whip up a batch that's soft, chewy, and just begging to be served alongside your favorite soups or piled high with deli meats.
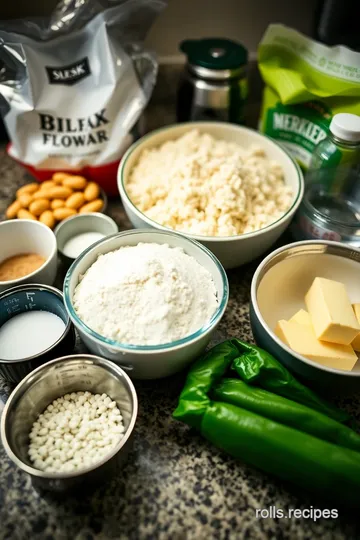
Premium Core Components
First off, let's chat about the premium core ingredients that make these rolls tick. to get started, you’ll want 4 cups (480g) of all-purpose flour .
This is your backbone for any good roll. and don't forget the 2 tablespoons (25g) of granulated sugar ; it gives that slight, sweet hint we crave.
You’ll also need 2 teaspoons (7g) of instant yeast —this is what makes your dough rise. if you’re a yeast newbie, just remember: it loves warm water.
1 cup (240ml) of warm water , about 110° f ( 43° c) , is perfect. to round it off, mix in 3 tablespoons (42g) of unsalted melted butter .
Now, freshness is key! when selecting your ingredients, check those expiration dates, especially on the yeast. no one likes flat rolls! store your flour in a cool, dry place, and once you open that yeast, it's best kept in the fridge.
And that butter? it freezes well if you've got leftovers!
Signature Seasoning Blend
When it comes to a signature seasoning blend , while bulki rolls are fairly simple, they do benefit from some thoughtful choices.
A sprinkle of salt— 1 teaspoon (6g) —balances the sweetness and enhances the flavors. and if you want to jazz them up? try adding a poppy seed topping before baking.
It gives a lovely crunch and oomph to your rolls.
Smart Substitutions
Now, let’s say you’re out of something or want to make a tweak. smart substitutions come in handy! have whole wheat flour? that can step in for half of the all-purpose flour.
Need it dairy-free? swap that unsalted butter for olive oil. if you’re short on sugar, honey or maple syrup works nicely too.
Cooking is all about creativity!
Kitchen Equipment Essentials
Let’s take a quick peek at the kitchen equipment essentials you’ll need. you’ll want a solid mixing bowl—nothing too fancy, just something that holds all that good dough.
A wooden spoon or spatula will help you mix without a fuss. a baking sheet lined with parchment paper is also a must for that easy cleanup.
And don’t forget a kitchen towel or plastic wrap to cover your rising dough!
Got a kitchen scale? awesome! use it for precision. if you’re just starting out and don’t have much gear, you can make do with what you have—seriously, it’s all about getting in there and making some delicious homemade rolls .
It’s Time to Get Baking!
So there you have it! with these essential ingredients and tips, you’re set for a fun baking adventure. the journey of baking fluffy rolls is beyond rewarding.
Not only will you end up with a basket of warm, bakery-style rolls, but you’ll also learn some valuable skills along the way.
Plus, there’s nothing like the smell of freshly baked bread wafting through your kitchen, am i right?
Once you get all your essentials together, we can dive right into the instructions for making those soft and chewy bulki rolls that’ll steal the show at your next meal.
Let’s get rolling!
Mastering the Art of Bulkie Rolls: Chewy Delights to Savor
If you’ve never had a bulkie roll , oh my gosh, you’re seriously missing out! these hearty rolls are soft, slightly sweet, and make the perfect companion for soups, sandwiches, or just slathering on some butter.
They hail from new england, and trust me, once these beauties are out of the oven, you’ll want to hoard them forever.
So, let's dive into how to nail that perfect bulkie roll recipe !
Essential Preparation Steps
Mise en Place: First thing’s first, get everything together before you start. Measure out your essential baking ingredients like flour, sugar, and yeast. It really makes the process smoother.
Time management: after you’ve lined up your ingredients, think about timing. activate that yeast by mixing warm water and sugar.
You need about 5- 10 minutes for it to get all foamy and activate, so use that time to prep other stuff.
Organization Strategies: Create a clean workspace. You want to have your bowls, measuring cups, and kitchen equipment for baking laid out. Reduces stress, trust me!
Safety Considerations: Always be cautious with those temperatures. Your warm water should be about 110° F ( 43° C) —too hot can kill your yeast, and that’s a disaster in the making!
Step-by-Step Process
-
Activate the Yeast: Combine 1 cup (240ml) of warm water with 2 tablespoons (25g) of sugar, sprinkle on 2 teaspoons (7g) of instant yeast, and wait until it’s foamy—around 5- 10 minutes is perfect!
-
Mix Dry Ingredients: While you wait, whisk together 4 cups (480g) of all-purpose flour and 1 teaspoon (6g) of salt in a big bowl.
-
Combine the Goods: Pour your yeast mixture and 3 tablespoons (42g) of melted butter into the flour bowl. Stir until it forms a rough dough.
-
Knead Away: Get your hands in there! Knead that dough for about 10 minutes on a floured surface until it’s smooth and elastic.
-
Let It Rise: Pop that dough in a greased bowl, cover it, and let it rise in a warm place for about 1 hour , or until it’s doubled in size.
-
Shape the Rolls: Punch down that dough! Divide it into 12 equal pieces. Roll them into balls, placing each one on a lined baking sheet.
-
Second Rise: Cover again and let those rolls puff up for another 30- 40 minutes . So much patience, but so worth it!
-
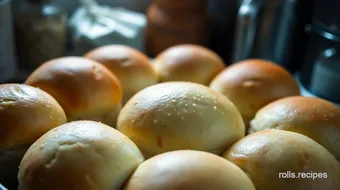
Get ready to bake: preheat your oven to 375° f ( 190° c) . brush those rolls with an egg wash, sprinkle sesame seeds if you like, and pop them in the oven.
-
Bake time: bake for 15- 20 minutes until they’re golden brown and reach an internal temp of 190° f ( 88° c) .
Just wait until you catch that aroma filling your kitchen!
-
Cooling Down: Let them cool on a rack before diving in. Trust me on this one—burnt tongues are no fun!
Expert Techniques
To step up your game, remember these critical steps . Use a kitchen scale for measurements if you can; precision makes a big difference.
When you're kneading, make sure to really work that dough —you want it to be soft, not sticky. And, if it seems a bit dry, feel free to add a splash more water!
Also, watch for those quality checkpoints : the dough should bounce back when you poke it. They’re ready to be shaped when they pass that test.
If things don't go as planned, don't sweat it! Overcooking? No problem—just whip up a quick garlic bread rolls version! Smother ‘em in garlic butter and get creative.
Success Strategies
Avoid the common mistakes like not letting enough air into the dough or skipping the second rise. Seriously, patience is key in baking fluffy rolls!
For extra quality assurance , do this: after shaping, give them a poke before the last rise. They should bounce back a little. Too mushy? Let them rise longer.
And if you want to be a roll-making pro, think about make-ahead options . you can freeze the rolls after the first rise.
Just thaw, let them rise again, and bake. fresh bread whenever you want? yes, please!
Alright, my friends, you're all set to make the most delicious bulkie rolls that’ll knock your socks off. From sandwiches to sweet treats, these rolls are a game changer.
Additional Information
And hey, if you're feeling adventurous, poke around for variations—try whole wheat or even an herby addition. Whatever you decide, just remember to enjoy the process. Happy baking!
Pro Tips & Secrets for Bulkie Rolls
Oh my gosh, if there's one recipe that can take your baking game up a notch, it's this bulkie roll recipe ! here’s the lowdown from the kitchen to ensure you nail it every time.
First off, chef’s insights : always use instant yeast . it’s a game-changer. you won’t need to proof it, so you can skip that extra step.
Trust me, time-saving techniques like this allow you to focus on the fun stuff, like shaping the rolls!
If you want an flavor enhancement tip, add a pinch of nutmeg or a dash of cinnamon to your dough.
It’s those little things that elevate the taste. want to impress? brush those golden tops with an egg wash before baking for a shiny finish.
Perfect Presentation for Your Homemade Rolls
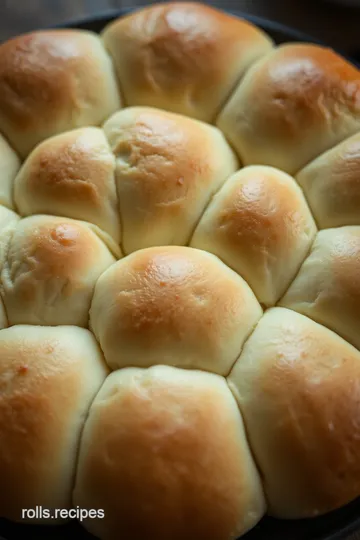
Let’s talk about how to make those rolls spin around on the plate. plating techniques can be simple but effective.
Arrange the bulkie rolls in a circular pattern on a platter. it’s like they’re having a roll party!
For a fun twist, throw on a sprinkle of sesame seeds or even poppy seeds as a garnish. you could also mix it up with fresh herbs.
Think green chives or a small sprig of rosemary for a pop of color against that golden crust .
When you plate these, aim for contrasting colors. the golden rolls against a deep green salad? chef’s kiss. seriously, those visual appeal tips can make a difference in how folks perceive your homemade rolls.
Storage & Make-Ahead Tips
Ready to be a roll hero? storage guidelines for these rolls are super simple. let them cool completely, then pack 'em in a zip-lock bag or a sealed container.
They can stay fresh for about three days at room temp. if you wanna stretch that out a bit, toss them in the freezer instead.
Preservation methods ? you can freeze these beauties! just pop ‘em in a freezer-safe bag after they've cooled. when you’re ready to dig in, just let them thaw in the fridge overnight and reheat them in the oven at 350° f (about 175° c) for 10 minutes.
Creative Variations to Try
Alright, get this—there’s room for creativity here! want a twist on your yeast roll recipe ? try adding some shredded cheese in the dough for a savory kick.
How about some chopped jalapeños for a little heat? or if you're feeling sweet, a bit of orange zest can turn these into sweet bread rolls .
If you need dietary modifications , swap out half of the all-purpose flour for whole wheat flour . You’ll still get that chewy texture but with a little extra health benefit—win-win!
Complete Nutrition Guide
These rolls are not just tasty; they’re great in moderation. a rough nutrition breakdown shows they’re around 150 calories each, 4g of protein, and just 4g of fat.
They work well as a side dish for soups or as a base for awesome sandwiches!
Dietary considerations ? Make sure to watch the sodium if that’s a concern for you. And with portions, two rolls per serving can hit the spot without overdoing it.
Expert FAQ Solutions
You might have questions, and I’ve got answers! Common dilemmas include dough not rising. Don’t panic; check your yeast! If it didn’t foam, you might’ve used water that was too hot.
Not sure how to troubleshoot? If your rolls turn out too dense, it could be from over-kneading. Aim for a smooth and elastic texture.
Conclusion: Your Homemade Baking Adventure Awaits!
So, whether you're diving into the world of baking fluffy rolls for the first time or you’re a seasoned pro, making these bulkie rolls is sure to be a winner! It's a journey filled with experimentation and creativity, which makes baking all the more fun!
Get in that kitchen, whip up some dough, and enjoy the sweet aroma of rolls filling your home. You got this; I believe in you! Happy baking!
Homemade Bulkie Rolls Card
⚖️ Ingredients:
- 4 cups (480g) all-purpose flour
- 2 tablespoons (25g) granulated sugar
- 2 teaspoons (7g) instant yeast
- 1 teaspoon (6g) salt
- 1 cup (240ml) warm water (110°F/43°C)
- 3 tablespoons (42g) unsalted butter, melted
- 1 egg, beaten (for egg wash)
- Sesame seeds (for garnish)
🥄 Instructions:
- Step 1: In a small bowl, combine warm water and sugar. Sprinkle instant yeast on top. Let it sit for 5-10 minutes until foamy.
- Step 2: In a large mixing bowl, whisk together all-purpose flour and salt.
- Step 3: Add the yeast mixture and melted butter to the flour mixture. Stir until a rough dough forms.
- Step 4: Turn dough onto a floured surface. Knead for about 10 minutes until smooth and elastic.
- Step 5: Place dough in a greased bowl, cover with a towel, and let it rise for about 1 hour or until doubled in size.
- Step 6: Punch down the risen dough and divide it into 12 equal pieces. Shape each piece into a ball and place them on a parchment-lined baking sheet.
- Step 7: Cover the rolls with a cloth and let them rise for another 30-40 minutes until puffy.
- Step 8: Preheat your oven to 375°F (190°C). Brush the tops of the rolls with the beaten egg and sprinkle sesame seeds if desired.
- Step 9: Bake for 15-20 minutes or until golden brown and the internal temperature reaches 190°F (88°C).
- Step 10: Remove rolls from the oven and transfer them to a cooling rack. Let them cool slightly before serving.
Previous Recipe: Delicious Bob Evans Sausage Roll: 5 Easy Steps to Cherish Brunch
Next Recipe: How to Make Heavenly Farmhouse on Boone Cinnamon Rolls: An Amazing Comfort Treat