Homemade Tootsie Rolls: A Gluten-Free Delight
Wondering are Tootsie Rolls gluten free? Discover my easy homemade recipe, a nostalgic delight that melts in your mouth! Perfect for everyone!

- Let’s Dig Into Tootsie Rolls!
- A Sweet History Lesson
- The Lowdown on Making Tootsie Rolls
- Why You’ll Love ‘Em
- Let’s Get to the Good Stuff: Ingredients!
- Essential Ingredients Guide
- Mastering the Art of Homemade Tootsie Rolls: A Gluten-Free Gem
- Pro Tips & Secrets to Mastering Homemade Tootsie Rolls
- Perfect Presentation: Turning Candy into Eye Candy
- Storage & Make-Ahead: Keeping Your Treats Fresh
- Creative Variations: Jazzing Up Your Tootsie Rolls
- Complete Nutrition Guide for Health-Conscious Sweet Lovers
- Expert FAQ Solutions
- Recipe Card
Let’s Dig Into Tootsie Rolls!
You ever have a moment that just hits you right in the feels? for me, it was the day i realized how much i missed biting into a chewy tootsie roll.
Honestly, they remind me of family road trips, halloween candy bags, and those lazy afternoons just kicking back with friends.
But here's the kicker: i started wondering if are tootsie rolls gluten free . turns out, they aren't, which got me thinking about how to make my own version.
And you know what? i found out it’s super simple, fun, and most importantly…chewy!
A Sweet History Lesson
Tootsie rolls have been around since the early 1900s. a little piece of american history wrapped up in chocolate, they were created by leo hirschfield, who named them after his daughter.
Fast forward to today, and these chewy chocolate treats are beloved by kids and adults alike! they scream nostalgia, don’t they? pretty amazing how a small bite can bring back such memories.
What's really cool is that this homemade version is totally gluten-free . so, whether you’re avoiding gluten for health reasons or just want to try something new, these gluten-free candy recipes hit the spot.
The homemade tootsie roll is a fun twist on a classic, and it’s easier than you might think!
The Lowdown on Making Tootsie Rolls
You’re not gonna believe this, but you can whip these up in under an hour. prep time is about 15 minutes, and then they chill for just 30.
Cook time? only 10 minutes! plus, you’re just using common ingredients like cocoa powder, butter, and powdered sugar. talk about a wallet-friendly treat!
This recipe yields about 20 pieces, so it’s perfect for parties or just when those sweet tooth cravings hit. you might want to double the batch, though.
Trust me, they won’t last long!
Why You’ll Love ‘Em
Let’s chat health benefits. these homemade tootsie rolls can be a better option than your typical store-bought candy. when you make them at home, you get to control the ingredients.
You can swap in dairy-free options for a vegan candy or use different sweeteners if you like. plus, they’re less processed than many candies on the market.
Guilt-free treats? yes, please!
Thinking of special occasions? these bad boys are perfect for birthdays, movie nights, or just because it’s tuesday. you can even get creative and shape them into fun designs for halloween or parties.
Talk about customizable candy recipes !
Let’s Get to the Good Stuff: Ingredients!
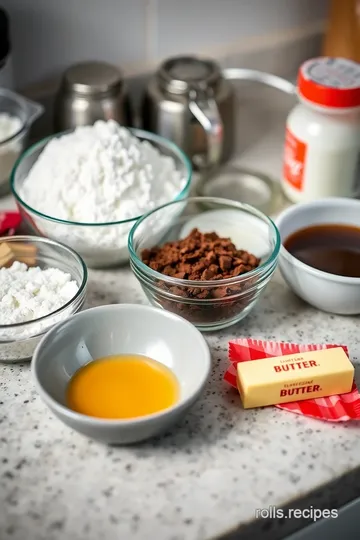
Now that you’re drooling over the thought of these chewy delights, let’s jump into the ingredients you’ll need for this easy Tootsie Roll recipe:
- 2 cups powdered sugar
- 1/2 cup cocoa powder (unsweetened)
- 1/4 cup milk (or any non-dairy alternative)
- 1/4 cup unsalted butter (or coconut oil for vegan)
- 1/4 cup light corn syrup
- 1 tsp vanilla extract
Everything here is gluten-free, so you’re safe to indulge. Got your ingredients together? Great! Let’s move on to how to make these delicious chocolate treats that will blow your mind.
Stay tuned, because later, we’ll dive into the step-by-step instructions for crafting your own batch of homemade Tootsie Rolls. You won’t want to miss it!
Essential Ingredients Guide
Let’s dive into the magical world of ingredients! cooking isn't just about throwing stuff together; it’s about choosing the right ingredients that will elevate your dish.
So, let’s break it down, shall we?
Premium Core Components
When you're whipping up something scrumptious, detailed measurements matter. use 2 cups (240g) of powdered sugar for that sweet punch, and don’t forget your 1/2 cup (50g) of cocoa powder to crank up the chocolate vibes.
Now, for newcomers, don't fret; measurements can be in both us & metric to make it easy on everyone!
Quality indicators are key too. when picking cocoa powder, go for high-quality brands that look rich and dark. your nose knows—give it a sniff! if it smells like deep chocolate heaven, you’re on the right track.
Storage guidelines are your best friends. keep your dry ingredients in a cool, dry place, and they can last for months.
But check for shelf life! no one wants stale cocoa in their homemade candy. and oh, freshness tips —smell it, touch it, and always check dates on packages.
You deserve the good stuff!
Signature Seasoning Blend
Moving on to the fun parts: signature seasonings ! combine a dash of salt with your dry ingredients—trust me, it makes a world of difference.
It's like a secret handshake between flavors. you need that balance!
Herbs like mint or a sprinkle of cinnamon can change the game. if you’re feeling adventurous, try some herb selections and pairings that match your dish’s vibe.
For our tootsie rolls, hints of vanilla extract work wonders.
Let’s not forget regional variations ! Depending on where you're at, you might swap in local favorites. Looking for gluten-free candy recipes ? A dash of creativity could put your own twist on classic candy recipes!
Smart Substitutions
Okay, real talk—sometimes you run out of vanilla, but that doesn’t mean a recipe is doomed! for quick replacements, think of common alternatives like maple syrup or even almond extract.
These can be lifesavers.
And if you’re dealing with different dietary needs, don’t sweat it! There are gluten-free dessert ideas that fit everyone's diet. Dairy-free Tootsie Rolls ? Yup, swap butter for coconut oil. Easy peasy!
Ever in a pinch? check out those emergency replacements . no light corn syrup? honey or agave can step in just fine.
What if strawberries are out of season? frozen ones work too, but always taste first!
Kitchen Equipment Essentials
Now, let’s chat tools! Every home cook should have must-have tools like a medium mixing bowl, a good spatula, and a trusty saucepan. These are your bread and butter—well, metaphorically speaking!
If you don’t have fancy equipment, no problem! Just get creative with alternative options . A regular spoon can work as a whisk; just keep it moving, you know?
Want to optimize your prep? keep your space tidy and organized. when everything is within reach, it makes cooking a breeze.
For storage, airtight containers work wonders for keeping your treats fresh longer.
And speaking of making yummy treats, let’s talk about how to make Tootsie Rolls . You’ll want those caramel chocolate bites melting in your mouth without any hassle.
By staying smart and organized, you’ll not only conquer the kitchen—you’ll also whip up delicious goodies like chewy chocolate treats and chocolate flavor enhancements that impress everyone!
As we gear up to tackle the easy tootsie roll recipe, remember that cooking connects us all, from sweet tooth cravings to creating guilt-free treats for your loved ones.
Now, let's jump into how to actually make those irresistible, homemade, gluten-free sweets!
Mastering the Art of Homemade Tootsie Rolls: A Gluten-Free Gem
When it comes to candy, nothing hits the nostalgia button quite like tootsie rolls. those chewy chocolate bites are a hit at parties or tucked into lunch boxes, but what if i told you that you can whip up a homemade version that's gluten-free ? oh my gosh, yes! you heard me right! not only can you recreate those chewy chocolate treats, but you can also enjoy them without worrying about gluten.
It’s a win-win for everyone! so, let’s dive into this delicious adventure together.
Essential Preparation Steps
First things first—let's get organized! if you want to cook like a pro, mise en place is key. this fancy term simply means having all your ingredients measured out and ready to go.
Trust me; it makes everything easier! think of it like being on a cooking show—minus the dramatic music.
Time management is another vital piece. you'll want to gather everything you need before you even turn on the stove.
And remember, safety first ! if you’re handling hot ingredients or sharp tools, don't be a hero. use your oven mitts and a cutting board, please!
Step-by-Step Process
Ready to roll? Here’s how to make your very own Tootsie Rolls in just a few simple steps:
- Prepare Your Workspace : Clean up your area like it's an episode of "Chopped"—but without the high stakes.
- Combine Dry Ingredients : Sift together 2 cups of powdered sugar and 1/2 cup of cocoa powder in a mixing bowl. Use a whisk; it’s like giving your ingredients a nice little spa day.
- Heat Wet Ingredients : In a saucepan, mix 1/4 cup of milk (dairy or non-dairy), 1/4 cup of softened butter , 1/4 cup of light corn syrup , and 1 tsp of vanilla extract . Heat this up over low-medium until the butter melts. Keep an eye on it so nothing burns!
- Mix It Up : Pour the warm stuff into the dry ingredients. Stir it like you’re trying to get your best friend's attention at a crowded bar!
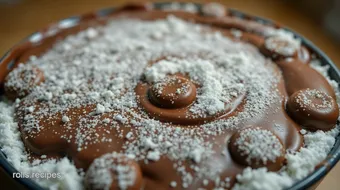
- Knead for Perfection : Dust your surface with powdered sugar and knead the mixture until it forms a smooth dough. It should be slightly sticky but easy to handle.
- Shape Your Rolls : Divide the dough into small pieces and roll them into cylinders, about 1/2 inch wide —just like the classic Tootsie Roll shape!
- Wrap and Chill : Use wax or parchment paper to wrap each piece tightly and chill them in the fridge for about 30 minutes . This helps firm them up for the perfect bite.
- Enjoy the Goodness : Unwrap and devour your homemade candy! Store any leftovers in an airtight container (but who are we kidding? They probably won’t last long!).
Expert Techniques
Now that you've got a handle on the basics, let’s talk professional! Here are a few critical steps to think about:
- Temperature Control : Don't let that saucepan overheat! Keep it on low-medium heat to avoid burning your sweet masterpiece.
- Timing Precision : Pay attention to those 30 minutes of chilling . Patience is a virtue, my friend!
- Visual Cues for Doneness : Your dough should be soft yet firm when it's ready to roll. If it’s too sticky, knead in a tad more powdered sugar.
Success Strategies
Everyone wants to be the candy-making superstar! Here are a few sweet tricks to ensure your homemade Tootsie Rolls come out perfect:
- Common Mistakes to Avoid : Don’t skip the chilling—your Tootsie Rolls need that time to set!
- Quality Assurance Tips : Always use gluten-free ingredients to keep this a safe option for everyone. Are Tootsie Rolls gluten-free, you ask? Well, with this recipe, they definitely are!
- Make-ahead Options : These chewy delights are perfect for prepping ahead of a party. Just make them a day in advance!
Wrapping It Up
So, there you have it! a super simple yet satisfying way to enjoy classic candy recipes without gluten. these gluten-free treats are just the ticket for anyone with a sweet tooth, guilty pleasure cravings, or a nostalgic heart.
And if you’re feeling adventurous, try customizing your tootsie roll variations with different flavors. who doesn’t love a good chocolate flavor enhancement?!
The best part of this entire process? you created something yummy that not only tastes good but also holds a place in your heart.
If you're looking for allergy-friendly dessert recipes , or craving chewy chocolate treats , this one's for you!
If you’re curious about other gluten-free dessert ideas or want more fun candy-making tips, stay tuned for more additional information coming up shortly!

Pro Tips & Secrets to Mastering Homemade Tootsie Rolls
Let’s be real—everyone loves a good homemade tootsie roll , right? but before we dive into making those delightful chewy chocolate treats, here are some insider tips you’ll want to keep in your back pocket.
Chef's insights: first off, don’t rush the kneading . you want that dough to be smooth and pliable , not a sticky mess.
Trust me, i learned the hard way that too much handling can ruin the texture.
Time-saving techniques: got less than 55 minutes? no worries! while the dough chills, take the time to prep your workspace and clean as you go.
You’ll feel like a pro, and you won’t leave a war zone in the kitchen.
Flavor Combinations: Ever thought of tossing in a dash of sea salt? It really elevates the chocolate flavor. Plus, try swapping vanilla for mint extract. Chocolate mint Tootsie Rolls? Yassss!
Presentation tips: for a classy touch, shape your rolls into cute mini bites or fun shapes using cookie cutters. wrap them up in colorful wax paper—it's a great way to add a pop of color to your party table.
Perfect Presentation: Turning Candy into Eye Candy
When you’ve got delicious homemade Tootsie Rolls ready to go, it’s time to make ‘em look as good as they taste .
Plating Techniques: Skip the plate and grab a cute mason jar. Layer your Tootsie Rolls and let people scoop their own! It’s super fun and lets them see all that gooey goodness.
Garnish Ideas: Finely crushed nuts or a sprinkle of cocoa powder on top can add a nice touch when serving. It makes it feel fancy without any extra fuss.
Color Combinations: Think about pairing your chocolate candy with colorful desserts. Maybe some fresh strawberries on the side? A splash of color always grabs attention!
Visual Appeal: Remember, we eat with our eyes first. So, keep candies neat and tidy, and they’ll be more tempting.
Storage & Make-Ahead: Keeping Your Treats Fresh
So, you've made a bunch—what now? Here’s how to keep those Tootsie Rolls fresh and delicious!
Storage Guidelines: Place them in an airtight container at room temperature. If your kitchen gets warm, a quick stop in the fridge might be best.
Freshness Duration: Generally, they’ll be good for about a week, but trust me, they won’t last that long! Keep an eye out for any changes in texture or smell.
Reheating Instructions: If you want that chewiness back, just leave them out at room temperature for a bit. No microwave needed!
Preservation Methods: For long-term storage, pop them in the freezer. Just make sure to double-wrap them in plastic to keep the moisture out!
Creative Variations: Jazzing Up Your Tootsie Rolls
Now, let’s think outside the box! Who says Tootsie Rolls have to be just chocolate?
Flavor Adaptations: How about caramel chocolate bites? Swap a bit of chocolate for caramel flavoring. Trust me—it’s a game-changer!
Dietary Modifications: For my vegan friends, sub in coconut oil for butter and use non-dairy milk. Voila, you’ve got some dairy-free Tootsie Rolls!
Regional Twists: Embrace the festive spirit! Around the holidays, you could even add a bit of peppermint or pumpkin spice for a seasonal touch.
Healthier Alternatives: Looking for gluten-free snack ideas? Replace some sugar with a natural sweetener like stevia. You can enjoy guilt-free treats without sacrificing taste.
Complete Nutrition Guide for Health-Conscious Sweet Lovers
Let’s break it down, shall we? If you’re curious about what’s going into your yummy little bites , here’s a quick breakdown :
Calories: Each Tootsie Roll has approximately 90 calories .
Macronutrients: You’re getting about 3g of fat and 12g of sugar per piece. Not the healthiest snack, but definitely a delightful pick-me-up.
Health Benefits: Yeah, they’re not a health food, but hey, chocolate has antioxidants and can make you feel good ! Enjoy in moderation!
Dietary Considerations: These little sweets are gluten-free, which makes them perfect for various diets. Plus, with the right modifications, they can fit into vegan and dairy-free lifestyles.
Expert FAQ Solutions
Got questions? I’ve been there! Here are the common ones I hear:
“Are Tootsie Rolls gluten free?” Absolutely! This homemade version is not just a treat, but a safe option for those avoiding gluten.
Troubleshooting: If your dough is too sticky, add a little more powdered sugar—just a smidgen !
Success Tips: Remember, the chill time is non-negotiable. It truly makes a difference.
Feeling inspired yet? whether you’re cooking with kids or just craving a good old classic, these homemade tootsie rolls are a fun and creative project.
So go on, gather your ingredients and dive into this delightful candy-making journey! you won’t regret it. indulge your sweet tooth and enjoy every bite!

Homemade Tootsie Rolls: A Gluten-Free Delight Card
⚖️ Ingredients:
- 2 cups powdered sugar
- 1/2 cup cocoa powder (unsweetened)
- 1/4 cup milk (or non-dairy alternative)
- 1/4 cup unsalted butter (softened)
- 1/4 cup light corn syrup
- 1 tsp vanilla extract
🥄 Instructions:
- Step 1: Prepare Your Workspace: Clean your kitchen area and gather all ingredients and equipment.
- Step 2: Combine Dry Ingredients: In a medium mixing bowl, sift together powdered sugar and cocoa powder until well mixed.
- Step 3: Heat Wet Ingredients: In a saucepan, combine milk, butter, light corn syrup, and vanilla extract. Heat over low-medium until butter melts, stirring occasionally.
- Step 4: Mix Together: Pour the warm milk mixture into the dry ingredients and stir until combined. It will be sticky.
- Step 5: Knead the Mixture: Transfer the mixture onto a clean surface dusted with powdered sugar. Knead gently until it forms a smooth, pliable dough.
- Step 6: Shape the Tootsie Rolls: Divide the dough into small, equal portions. Roll each piece into a cylinder shape, about 1/2 inch wide.
- Step 7: Wrap and Chill: Wrap each piece in wax or parchment paper, twisting the ends to secure. Chill in the refrigerator for approximately 30 minutes.
- Step 8: Serve and Enjoy: Unwrap the Tootsie Rolls and enjoy! Store any leftovers in an airtight container.
Previous Recipe: How to Make Libby's Pumpkin Roll: The Best Fall Dessert Ever!
Next Recipe: Ultimate Fluffy Sister Schubert Dinner Rolls: 5 Amazing Tips!