Libby's Pumpkin Roll Recipe
Craving a seasonal treat? My Libby's pumpkin roll is moist, filled with creamy goodness, and perfect for gatherings. You'll love this easy recipe!

- The Delightful World of Libby's Pumpkin Roll
- Essential Ingredients Guide to Seasonal Baking 🎃
- Cooking Like a Pro: Mastering the Essentials
- Step-by-Step Process
- Pro Tips & Secrets for Libby’s Pumpkin Roll
- Perfect Presentation of Your Pumpkin Roll
- Storage & Make-Ahead
- Creative Variations
- Complete Nutrition Guide
- Expert FAQ Solutions
- Conclusion: Your Pumpkin Roll Awaits!
- Recipe Card
The Delightful World of Libby's Pumpkin Roll
Okay, picture this: it’s a chilly afternoon in early fall, and the air is filled with hints of cinnamon and nutmeg.
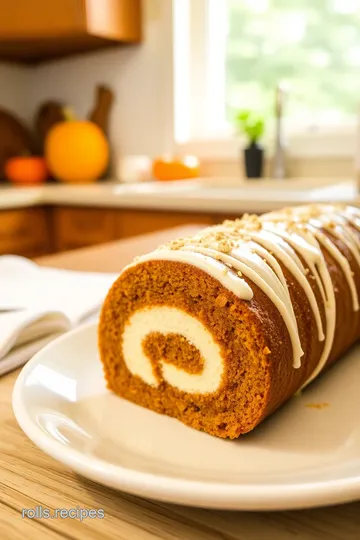
I’m in my cozy kitchen, whipping up libby's pumpkin roll —one of my all-time favorites! you know that feeling when a recipe just clicks? this pumpkin roll does! the soft cake wrapped around that creamy filling makes it an ultimate comfort dessert.
Seriously, who doesn’t love bites of pumpkin goodness as the leaves change outside?
A Timeless Recipe with a Twist
Now, let’s chat about the history behind this beauty. the libby’s pumpkin roll recipe has been a staple in american kitchens for years, thanks to libby’s canned pumpkin that's practically a household name.
This dessert takes the classic idea of pumpkin pie and gives it a fun spin! originally, the recipe started popping up in the 1960s, bringing together warm, festive flavors in a cute, rollable form.
It’s like a hug on a plate!
These days, you can find this pumpkin roll dessert gracing tables at thanksgiving, halloween parties, and even fall-themed baby showers.
It’s become a seasonal must-have that really channels those autumn vibes. honestly, once you get the hang of it, embracing a homemade pumpkin roll isn’t just easy—it’s delightful!
Time and Cost Considerations
Now let’s talk practicality. you can whip up this easy pumpkin roll recipe in under an hour (not counting chilling time).
Prepping takes about 25 minutes , with 15 minutes of baking while you probably dance around the kitchen to your favorite playlist.
The good news? it easily yields about 10-12 slices , making it perfect for those family gatherings without costing an arm and a leg.
Most of the pumpkin roll ingredients are pantry staples, so you probably won’t break the bank—just be sure to grab that canned pumpkin!
Why This Recipe Rocks
You might be wondering, “why should i make libby’s pumpkin roll?” well, let me give you the scoop on its benefits! for starters, the cake is moist and delectable, thanks to the pumpkin puree , which is also loaded with vitamins a and c.
Plus, when you combine it with cream cheese frosting for pumpkin roll , the contrast between rich sweetness and cozy spices is divine.
But it doesn't stop there! this roll isn’t just a dessert; it’s a showstopper for any occasion. imagine serving this at thanksgiving—it’s a festive pumpkin dessert that’s bound to impress your guests.
Best of all, you can customize it! whether you want to make a nut-free pumpkin roll for allergy-friendly gatherings or experiment with pumpkin roll variations like adding in some chocolate or nuts, the possibilities are endless.
The Perfect Transition
So, if you're ready to dive into making this stunning pumpkin cake rolled recipe , let’s check out what you’ll need.
You’ll want to grab that fluffy cream cheese for the filling, some classic spices, and of course, the star of the show, libby’s pumpkin.
Before you know it, you’ll smell the cozy aroma of freshly baked spiced pumpkin recipes wafting through your house, promising warm memories and delicious moments ahead!
Ready to get baking? Let’s gather those pumpkin roll ingredients and turn that kitchen into a fall wonderland!
Essential Ingredients Guide to Seasonal Baking 🎃
Alright, friends! as fall rolls in, there’s nothing quite like the smell of spices , pumpkin , and everything cozy in the oven.
If you’re all about those pumpkin dessert recipes —especially libby’s famous pumpkin roll—we’ve got to chat about the essential ingredients .
Let’s dive in!
Premium Core Components
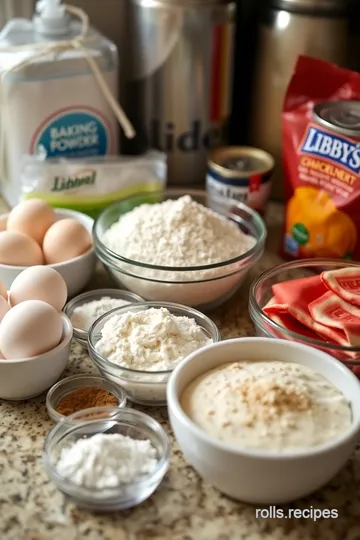
First thing’s first, let’s talk about what you need. Here’s a breakdown of the pumpkin roll ingredients you will need to whip up that spiced delight.
- Eggs : You need 3 large eggs (about 150g). Fresh is best! Check the date when you grab them.
- Granulated Sugar : Grab yourself a cup (200g). Look for fine, white sugar – it should be a nice dry mound in the bag.
- Canned Pumpkin Puree : One cup (240g) will do! Always check that it’s pure pumpkin, not pumpkin pie filling. Huge difference, people!
Storage tip : Keep your canned pumpkin in a cool, dry place, and it lasts about 1 to 2 years.
- Vanilla Extract : Just a teaspoon (5ml) gives that lovely aroma. Go for real vanilla when you can—trust me, it’s worth it.
Quality Indicators
Look for bright, vibrant ingredients. Dull eggs? Pass. As for canned goods, check for dents or bulges. Freshness is key!
Signature Seasoning Blend
Now, let’s get to the good stuff—the spices ! A well-balanced spice blend elevates your pumpkin roll from “meh” to “oh my gosh, yes please!”
- Ground Cinnamon : You’ll need 2 teaspoons (4g). This is the star of fall! The warm scent fills the house.
- Ground Nutmeg and Ginger : Just a pinch, about ½ teaspoon each (1g and 0.5g respectively) carries the cozy vibes.
Herbs and spices are all about the harmony; try pairing cinnamon with nutmeg and ginger for that magical flavor profile!
Smart Substitutions
Cooking isn’t always one-size-fits-all. We all have those moments of “Oops! I don’t have this!” But no worries, here are some smart substitutions for your pumpkin roll.
- Aquafaba for Eggs : Vegan or just out of eggs? Use 3 tablespoons of aquafaba for that moisture.
- Maple syrup instead of sugar : If you want a touch of earthiness, swap ½ cup maple syrup for granulated sugar. Just cut back on other liquids.
When making a pumpkin roll with cream cheese filling , slight adjustments can make a big difference!
Kitchen Equipment Essentials
You’re gonna need some key tools to get this bad boy baked properly.
- Jelly Roll Pan : This is critical! A 15x10 inch pan helps you create that perfect shape.
- Electric Mixer : Whipping the cream cheese filling? An electric mixer saves time and arm strength.
- Parchment Paper : Lining your pan prevents sticking. Seriously, no one wants a crumbled cake roll.
Quick Tips and Tricks
- Preheat your oven to 375° F ( 190° C) . Can't stress this enough!
- Chill Your Ingredients : Warming up your cream cheese to room temp helps it mix better with the sugar.
You’re looking at a moist pumpkin cake rolled with cream cheese filling that’s just the right amount of sweetness. Plus, with all these tips, you’ll set yourself up for pumpkin roll success.
Alright, now that you’re equipped with everything from ingredients to essential tools, it’s time to jump into making the libby's pumpkin roll ! this easy pumpkin roll recipe is a must-try for your next family gathering or cozy night in.
So, put on your favorite playlist, grab those pumpkin puree jars, and let’s get baking!
Cooking Like a Pro: Mastering the Essentials
So, you wanna step up your cooking game? i hear ya! it’s time to dig into some essential preparation steps.
You’re not just tossing ingredients together—you want to create something magical, like libby’s pumpkin roll . trust me, when it comes to crafting that moist pumpkin cake rolled with cream cheese filling, a bit of organization goes a long way.
Essential Preparation Steps
Mise en Place: The French Secret
First off, let’s chat about mise en place . it’s a fancy term, but all it means is “everything in its place.
” before you even think about turning on the oven, gather your pumpkin roll ingredients . measure out those three eggs and that cup of canned pumpkin puree.
It makes the whole process smoother when you’re not scrambling for stuff. seriously, forget that feeling of panic while searching for powdered sugar.
Just have everything ready!
Time Management Tips
Now, let’s get real about time management . timing is everything! for this libby’s pumpkin roll recipe , you’ll need about 25 minutes to prep , and let’s not forget that 15 minutes to bake .
Plan your tasks. while that cake is baking, whip up your cream cheese filling. the less waiting around, the more fun you’ll have!
Organization Strategies
Speaking of planning—stick to an organization strategy . use bowls or containers for each ingredient. it cuts down on mess and makes it way easier to follow your steps.
Plus, it’ll save you those awkward moments where you forget if you’ve added salt or not. we’ve all been there!
Safety Considerations
And don’t ignore safety ! Keep kitchen towels handy for hot pans and always use oven mitts. Keep those fingers safe, folks! Nobody wants a trip to the ER over a burnt hand, especially not when you’re about to enjoy something as heavenly as a pumpkin roll dessert !
Step-by-Step Process
Let’s dive right into how to create this pumpkin roll like a pro.
-
Preheat the oven to 375° F ( 190° C). And don’t forget to line that jelly roll pan with parchment paper!
-
Make the batter: Whisk eggs and sugar in a large bowl. Want a golden color that says, “I’m fancy”? Well, it’ll thicken up nicely—you’ll know you’re on the right track!
-
Spread & bake: pour that batter into your pan and pop it in the oven for 12- 15 minutes .
Here’s a pro tip: if a toothpick comes out clean, it’s ready to dance with the cream cheese filling.
-
Roll it up: this part can be tricky! right after baking, sprinkle some powdered sugar on a kitchen towel, then flip the cake onto it.
Roll it up while it’s still warm to avoid cracking.
-
Cool & fill: after waiting, gently unroll the cake, spread that creamy goodness on top, and roll it back up.
Wrap it tight and chill for an hour. trust me, waiting makes it even better!
Expert Techniques
Now, let's talk expert techniques !
-
Temperature control: Keep that oven steady at 375° F. Everyone’s oven is a little different, so keep an eye on your bake.
-
Timing precision: While the cake bakes for 12- 15 minutes , no peeking! Open that door too soon, and you risk a collapse.
-
Quality checkpoints: After the cake rolls out, it should be firm but spring back a little when touched. That’s how you know it’s just right!
-
Troubleshooting tips: Cake cracking when you roll? Try rolling it tighter next time. Or, see if it needs a tad more cooling time before you roll it.
Success Strategies
Now, for some success strategies .
-
Common mistakes to avoid: Overbaking is a big no-no. Keep that eye on it, and use a timer!
-
Quality assurance tips: While chilling, check that the center is firm. This’ll help with slicing later.
-
Make-ahead options: This pumpkin roll with cream cheese filling can even be made a day before. Just keep it wrapped tight in the fridge!
Cooking can seem daunting, but once you nail these steps, you’ll be on your way to making some of the best pumpkin dessert recipes out there.
Plus, just think of all the happy faces when you slice through that beautiful roll!
If you're ready to sprinkle those creative touches, let's dive into additional information about this delightful seasonal treat.
Pro Tips & Secrets for Libby’s Pumpkin Roll
Oh man, is there anything better than a homemade pumpkin roll ? if you’re diving into this delightful libby’s pumpkin roll recipe, you’ve got to arm yourself with some pro tips.
Remember, making this moist pumpkin cake rolled with cream cheese filling can seem a bit tricky, but i promise it’s easier than it looks!
-
Rolling technique: the key here is to roll the cake as soon as it’s out of the oven. you want it warm.
This helps prevent cracks. carefully roll it with a kitchen towel while it’s still hot. trust me, this little trick will save you a lot of heartache later!
-
Fluffy filling: for that velvety, smooth cream cheese frosting for your pumpkin roll, make sure your cream cheese is super soft.
Don't try to rush this part! if it's still cold from the fridge, you'll end up with lumps. eww.
-
Chilling time: don't skip that chill time ! if you want clean slices and a perfectly set filling, wrap that bad boy up and let it hang out in the fridge for at least an hour before you slice it up.
Waiting stinks, but it’s worth it in the end!
Perfect Presentation of Your Pumpkin Roll
Alright, now let’s make this pumpkin roll Instagram-worthy , shall we? Presentation can really take your pumpkin roll to the next level!
-
Plating Techniques: Slice your roll into even pieces — about 1-inch thick. Arrange them on a beautiful platter or a big wooden board. Layering the slices with some overlapping looks chic.
-
Garnish Ideas: A sprinkle of cinnamon or a small handful of pecans on top can elevate your presentation. You could even add a few fresh mint leaves for a pop of color.
-
Color Combinations: Pair your pumpkin roll with some bright fruits or a vibrant green on the side. The orange and green colors scream fall and are super inviting.
Storage & Make-Ahead
Now let’s talk about how to keep your masterpiece around for a little while longer.
-
Storage Guidelines: If you’re not eating it all in one go (but why wouldn’t you?), wrap the pumpkin roll tightly in plastic wrap, or stick it in an airtight container.
-
Freshness Duration: It will last about 3 to 4 days in the fridge. If you freeze it, it can stick around for up to 3 months!
-
Reheating Instructions: This rolls best served cold or at room temperature, so no reheating necessary. Just slice and serve for the best pumpkin roll experience .
Creative Variations
Feeling adventurous? Let’s jazz up that classic recipe!
-
Flavor Adaptations: Ever thought about adding a swirl of chocolate? Go ahead! Mixed chocolate chips into the cream cheese filling for a fun twist. Why not?
-
Seasonal Twists: During the holidays, add a splash of peppermint extract to your cream cheese frosting. It gives a festive flair that everyone will love.
-
Nut-Free Options: If you need a nut-free pumpkin roll, simply skip the nuts in the filling or add some crushed Oreos instead!
Complete Nutrition Guide
And hey, let’s chat a bit about what you’re indulging in.
-
Health Benefits: Pumpkin is packed with vitamins A and C. So you're not just eating a sweet treat, you're getting a bit of nutrition too, right?
-
Portion Guidance: If you’re serving 10-12 slices, a slice can be a perfect addition to your American Thanksgiving desserts table without overdoing it.
-
Low-Sugar Options: Looking for a healthier touch? Swap the sugars with a low-cal option! Your taste buds won’t even know the difference.
Expert FAQ Solutions
Common questions? I got you covered.
-
What if my pumpkin roll cracks? It happens to the best of us! Just cover it with a bit of extra icing. It’s all in the presentation, right?
-
Can I make this dairy-free? Yes! Use a non-dairy cream cheese if you need to. It’s a great substitute.
-
How can I adjust flavors? Change up the spices to suit your tastes! More cinnamon or even throw in some clove for an extra kick.
Conclusion: Your Pumpkin Roll Awaits!
So, there you have it! with my tips on making libby’s pumpkin roll, you’re set to impress everyone at the table and maybe whip up a few quick pumpkin roll variations over the season.
This festive dessert not only feeds the soul but also fills your home with that sweet autumn treat aroma that warms the heart.
Now get in that kitchen and show your friends and family how to bake a pumpkin roll that will have them begging for seconds!

Libby's Pumpkin Roll Recipe Card

⚖️ Ingredients:
- 3 large eggs
- 1 cup granulated sugar
- 1 cup canned pumpkin puree
- 1 tsp vanilla extract
- 1 cup all-purpose flour
- 1 tsp baking powder
- 1 tsp baking soda
- ½ tsp salt
- 2 tsp ground cinnamon
- ½ tsp ground nutmeg
- ¼ tsp ground ginger
- Powdered sugar for dusting
- 8 oz cream cheese, softened
- 2 cups powdered sugar
- ½ tsp vanilla extract
- 1-2 tbsp milk (optional)
🥄 Instructions:
- Step 1: Preheat the oven to 375°F (190°C) and line a jelly roll pan with parchment paper.
- Step 2: In a large bowl, whisk together eggs and sugar until pale and thickened. Mix in pumpkin and vanilla extract.
- Step 3: Sift flour, baking powder, baking soda, salt, and spices into the mixture and fold in gently.
- Step 4: Spread the batter evenly in the prepared pan and bake for 12-15 minutes until a toothpick comes out clean.
- Step 5: Dust a clean kitchen towel with powdered sugar, invert the cake onto the towel, peel off parchment, and roll the cake from the short end.
- Step 6: Let it cool for 30 minutes. In a bowl, beat cream cheese, powdered sugar, and vanilla until smooth, adding milk for consistency.
- Step 7: Unroll the cooled cake, spread the cream cheese filling, re-roll carefully, wrap in plastic wrap, and refrigerate for 1 hour before slicing.
Previous Recipe: Easy Garlic Bread with King's Hawaiian Rolls: 5 Delicious Twists!
Next Recipe: My Grandmother's Cinnamon Roll Cheese Danish Delight: 5 Amazing Tips!