Mrs. Baird's Cinnamon Rolls
Ever wondered how to make Mrs. Baird's cinnamon rolls? This recipe brings you soft, fluffy rolls topped with a cream cheese glaze, perfect for any breakfast!

- Rollin' in the Dough: A Sweet Introduction to Mrs. Baird's Cinnamon Rolls
- Your Essential Ingredients Guide for Cinnamon Roll Success
- Unleashing the Joy of Professional Cooking: Mastering the Art of Cinnamon Rolls
- Pro Tips & Secrets for Baking Mrs. Baird's Cinnamon Rolls
- Perfect Presentation: Elevating Your Cinnamon Rolls
- Storage & Make-Ahead: Keeping Those Rolls Fresh
- Creative Variations: Switch It Up!
- Complete Nutrition Guide: Healthy Indulgence
- Expert FAQ Solutions: Tips for Success
- Recipe Card
Rollin' in the Dough: A Sweet Introduction to Mrs. Baird's Cinnamon Rolls
You know those mornings when the sun peeks through your window, and you can just smell the magic in the air? that’s how i felt the first time i made mrs.
Baird's cinnamon rolls . i was channeling my inner baker, envisioning fluffy, buttery rolls groaning under a sweet cream cheese glaze.
It was like a warm hug, enveloping my kitchen in aromas that say, “hey, it’s going to be a good day!” if you’re ready for some cozy vibes, let’s dive into this delightful journey of making homemade cinnamon rolls.
A Slice of History
Mrs. baird's cinnamon rolls hail from the heart of texas, straight outta a beloved bakery that’s been feeding smiles for decades.
This isn’t just any roll; it’s a tribute to nostalgia. these rolls became a staple in many households, especially on lazy sunday mornings or during holiday gatherings.
And why not? they’re like a classic tune you can’t help but sing along with! in today’s world, everyone craves comfort food, and these cinnamon rolls perfectly fit that bill.
Rollin' With the Times
Now, you might be wondering, “how long will this take me?” well, it's not a race! from start to finish, baking cinnamon rolls from scratch takes about two hours .
The big chunk of that time? the dough rising. but don't sweat it; you can use that time to sip coffee or catch up on your latest binge-watch! this recipe isn’t just for the masters; it’s medium difficulty, making it perfect for most home bakers.
Sweet Budgeting
While baking may seem like a splurge, making these rolls won’t break the bank. the ingredients are everyday staples: flour, sugar, and some yeast.
For about $10 , you can whip up a batch of 12 rolls – that’s a steal! plus, there’s just something about homemade breakfast pastries that feels more special than anything store-bought.
Why You’ll Love These Rolls
Alright, let’s get to the goods! health benefits and nutrition in cinnamon rolls? you bet! well, they’re not exactly kale, but they can offer a little warmth for your soul.
We’re talking about soft cinnamon roll dough that’s a far cry from cardboard pastries. they bring joy—who doesn’t feel a little happier munching on something sweet?
Perfect for any occasion —whether it’s a sunday brunch with friends, a lazy holiday morning, or just when you feel like indulging (because, why not?!).
They are cozy, they’re fluffy, and if you’re feeling extra fancy, you can smother them in a delicious cream cheese glaze that’s just to die for!
You can also get creative! cinnamon roll filling ideas are endless; think brown sugar, walnuts, or even a sprinkle of chocolate chips.
And if you're watching your dairy intake, worry not! there are dairy-free cinnamon roll options so everyone can enjoy.
Let’s Get Rolling!
Now that you’re all in on why these mrs. baird's cinnamon rolls are practically a warm hug in pastry form, let’s roll right into the ingredients section .
You’ll need a few basics to start your baking adventure. so, grab your apron, your favorite mixing bowl, and let’s get ready to bake some warmth for the soul!
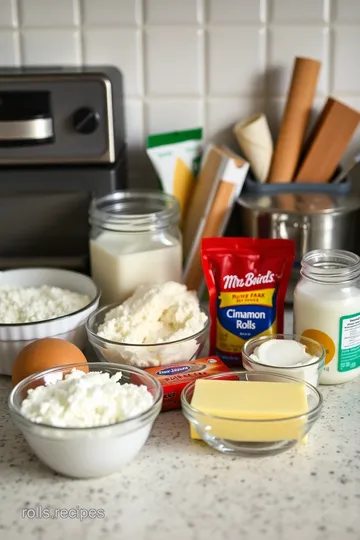
Your Essential Ingredients Guide for Cinnamon Roll Success
Oh my gosh, if there's one food that brings back sweet memories, it’s homemade cinnamon rolls . seriously, whether it’s a sunday morning or a special holiday gathering, those soft, fluffy rolls, warm with melty cinnamon goodness, are like a hug in food form.
And if you’re looking to recreate that amazing taste at home, you’re in the right place! let’s dive into the essential ingredients you need to make mrs.
Baird's cinnamon rolls—aka the best cinnamon roll recipe you’ll ever make!
Premium Core Components
First up, let’s break down the premium core components . You want your rolls to rise beautifully and taste incredible, so pay attention here!
- Flour: You’ll need about 4 cups of all-purpose flour (480g). Look for organic or high-gluten flour if you want that extra fluffiness!
- Yeast: Make sure to grab 1 packet (2 1/4 tsp) of active dry yeast (7g). Fresh yeast is key, or you might end up with a sad flat dough. Trust me; I’ve been there!
- Milk: Warm it up to about 110° F ( 43° C) before adding it to that yeast. This gives your rolls that super soft texture.
- Butter: Don’t skimp! Use 1/4 cup (56g) of unsalted butter , melted for the dough and a bit more for the filling. Rich and buttery is how we roll!
- Cinnamon and Sugar: You’ll need 1 cup of packed brown sugar (220g) and 2 tbsp of ground cinnamon (15g) for that mouthwatering filling that rolls like dreams!
Storage Tip: Keep your flour sealed in a cool, dry place and your yeast in the fridge once it’s opened. That helps keep them fresh.
Signature Seasoning Blend
Now, we can’t forget about the signature seasoning blend ! Here’s the secret sauce that takes your rolls from great to out-of-this-world fabulous .
- Essential Spices: Besides cinnamon, mix it up with a hint of nutmeg - it adds depth to your traditional cinnamon roll recipe. Seriously, it’s like magic!
- Herbs & Aromatics: It’s not just about the sweet side—think about adding a pinch of salt in the dough. Just a little—not too much—balances out the sweetness beautifully.
Smart Substitutions
We all know life gets busy, and we can’t always have everything perfect in our kitchen. Here’s where smart substitutions come into play!
- Dairy-Free Options: Don’t want milk? Almond or oat milk works wonders, and you can use a dairy-free butter too.
- Sweeteners: If you’re out of brown sugar, blend regular sugar with a drop of molasses. It works like a charm for that gooey filling!
- Emergency Replacements: No yeast? You can experiment with baking powder, but don’t expect the rolls to be fluffy like they are with yeast.
Kitchen Equipment Essentials
Okay, we can’t forget about the stuff you need to make this magic happen! Here’s a quick rundown of your kitchen equipment essentials .
- Mixing Bowls: Make sure you have a couple of large bowls for mixing dough.
- Rolling Pin: This is your best friend for rolling out the dough. Go with something sturdy!
- Baking Dish: A 9x13 inch dish is just perfect for your warm cinnamon rolls.
- Kitchen Thermometer: Okay, this one is optional, but it’s super helpful to make sure your milk is at the right temperature.
And hey, remember those cinnamon roll dough rising tips : keep it covered with a damp cloth and place it in a warm spot.
This helps the dough rise beautifully, and you’ll end up with rolls that are just to die for !
So whether you're following a classic cinnamon rolls recipe or thinking about some cinnamon roll variations like adding nuts or even some delicious cream cheese frosting for cinnamon rolls, you’ll be set to create something special.
Get ready to whip up those tasty rolls, because in the next section, we’ll cover how to make those buttery cinnamon rolls come to life in your kitchen! stay tuned for the step-by-step instructions for making those heavenly mrs.
Baird's cinnamon rolls. you won't want to miss it!
Unleashing the Joy of Professional Cooking: Mastering the Art of Cinnamon Rolls
Hey there! let me tell you about one of my absolute favorite baking experiences: making mrs. baird's cinnamon rolls. these delightful rolls aren't just any breakfast; they're a delicious hug in pastry form! but before we dive into the sweet stuff, let’s chat about the professional cooking methods that’ll set you up for success in the kitchen every time.
Essential Preparation Steps
First off, let's tackle mise en place. french for "everything in its place," this concept is vital! before you even think about mixing that soft cinnamon roll dough, gather your ingredients.
That means flour, sugar, yeast, and anything else you’ve got planned. it saves time and keeps your mind focused. oh, and it means fewer trips to the pantry mid-recipe!
Time management is another key. trust me, you don’t want to be scrambling last minute when those fluffy cinnamon rolls are rising.
Set a timer for each step, especially the reheating of your milk —make sure it's about 110° f ( 43° c) for activating that yeast.
And organization? Keep everything tidy. A clean work area is a happy work area! Plus, it means you can roll out the dough without flour flying all over the place.
Now, let’s talk safety. When you're using yeast, make sure your tools and surfaces are sanitized, especially if you're rolling out dough, where flour can get everywhere.
Step-by-Step Process to Pure Deliciousness
Alright, you’ve got your ingredients prepped and the kitchen is shining. Ready? Let’s dive in.
- Warm the Milk : Start by warming 1 cup of whole milk until it's lukewarm (about 110° F or 43° C ).
- Activate the Yeast : Combine it with 1/3 cup of sugar and your active dry yeast, letting it rest until frothy (5- 10 minutes).
- Make the Dough : Toss in 4 cups of flour, a large egg, and a pinch of salt. Knead it gently for about 5- 7 minutes until smooth.
If you start to see the dough puffing up, you’ve hit the jackpot! You'll want that first rise to be about 1 hour or until doubled.
Expert Techniques for Awe-Inducing Rolls
Alright, here's where the magic happens. When you’re ready to roll out that dough, try to get it to about a 15x10 inch rectangle. Don’t rush this—you want perfect-looking rolls!
When you spread that buttery filling thinly (use 1/4 cup softened butter, 1 cup brown sugar combined with 2 tbsp of cinnamon ), it adds that essential richness that makes these rolls so memorable.
Critical steps? make sure you cut those rolls evenly! each piece should be about the same size for even baking.
If you accidentally cut them unevenly, you might end up with some caramelly cinnamon rolls and some...well, doughy disasters.
Success Strategies for Perfect Rolls
Let’s wrap this up with a few success strategies! first off, avoid common mistakes like under-kneading or skipping the second rise.
Seriously, don’t skip it! that second rise is what creates those fluffy cinnamon rolls we all crave.
As for quality assurance? always check for doneness by looking for a golden-brown crust and a soft dough in the middle.
If they look like they're constantly dancing in the oven, that’s a good sign!
Oh, and if you want to prep ahead, consider making overnight cinnamon rolls . just shape them, cover them, and pop them in the fridge overnight.
In the morning, give them a quick hour to rise before baking!
And don't forget the pièce de résistance— cream cheese frosting for cinnamon rolls . Just combine 4 oz of softened cream cheese, 1 cup powdered sugar, a splash of milk, and a hit of vanilla for a smooth, gorgeous glaze!
Additional Information
As you bring those rolls out of the oven, the smell will transport you right back to those warm texas bakery mornings.
Trust me, once you get this best cinnamon roll recipe down, you’ll want to experiment with various cinnamon roll filling ideas and maybe even try some cinnamon roll variations.
Get creative with nuts, chocolate, or fruits!
The world of baking wonderful homemade breakfast pastries is waiting for you. so go on, give it a whirl! there's nothing quite like those warm cinnamon rolls to brighten your day.
Happy baking!

Pro Tips & Secrets for Baking Mrs. Baird's Cinnamon Rolls
Let’s get down to the nitty-gritty of perfecting those warm, fluffy rolls we all know and love. when you dive into this mrs.
Baird's cinnamon rolls recipe , a few tidbits can really take your experience from “meh” to “wow!”
Chef's Personal Insights
First off, kneading the dough can feel like a workout, but trust me, it’s worth it. i learned the hard way that if you don’t knead enough, your dough might end up a bit too dense.
We want soft, fluffy cinnamon rolls, not hockey pucks!
Time-Saving Techniques
Want to save some time? make the dough the night before! just pop it in the fridge after it has risen.
You’ll wake up to freshly baked rolls without all the fuss. just remember to let it come back to room temperature before you roll it out.
Flavor Enhancement Tips
Add a splash of vanilla extract to your dough for a flavor boost! you can also switch it up by mixing in some nutmeg or cardamom.
It adds that wow factor that will have folks scratching their heads, wondering what the secret ingredient is!
Presentation Advice
Don’t just throw those rolls on a plate! drizzle that cream cheese glaze artfully over the top. i’m telling you, a little effort into the presentation makes your homemade cinnamon rolls look gourmet.
Add a sprinkle of cinnamon or some chopped nuts on top, and you have a brunch showstopper!
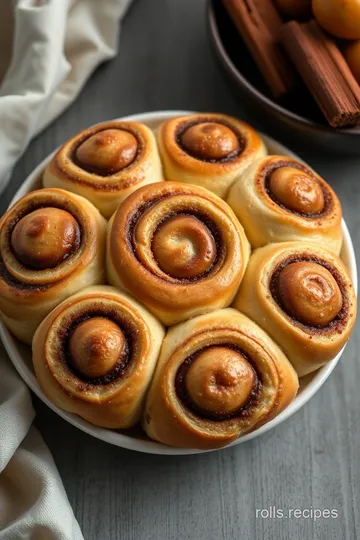
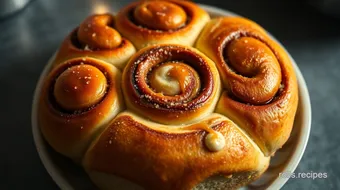
Perfect Presentation: Elevating Your Cinnamon Rolls
Okay, now that we've got our techniques down, let’s get these rolls looking Instagram ready .
Plating Techniques
Use a large white platter to really make those gooey rolls pop! a colorful hand-painted one is fun too if you wanna get crafty.
Layer the rolls in a circular pattern and drizzle the glaze on top in a zig-zag fashion for that pro look.
Garnish Ideas
Fresh mint leaves or zest from an orange can add a punch of color and freshness. Seriously, green against that ooey-gooey sweetness just sings!
Color Combinations
You want a balance of colors. The caramel browns of the rolls combined with the white glaze is classic. But throw in some berries, and suddenly it’s a whole color palette!
Visual Appeal Tips
Lighting matters! A slice of roll with gooey glaze under some natural light looks like a postcard. Good lighting can make a world of difference in how your creation is perceived!
Storage & Make-Ahead: Keeping Those Rolls Fresh
Let's face it, nobody wants stale cinnamon rolls. Here are some simple guidelines on how to keep that goodness fresh.
Storage Guidelines
Once they’ve cooled, put those rolls in an airtight container. Trust me, nothing worse than biting into a dried-out roll!
Preservation Methods
These rolls can be frozen too. just separately freeze the dough or the baked rolls. a few minutes in the microwave, or a little time in the oven, and they’re as good as new.
Reheating Instructions
To reheat, pop them in a 350° F ( 175° C) oven for about 10 minutes. If they're frozen, cover with foil to prevent over-browning until heated through.
Freshness Duration
These rolls are best eaten fresh, of course, but you can keep them in the fridge for up to a week.
Just warm them up before serving for that freshly baked feel .
Creative Variations: Switch It Up!
Feeling adventurous? Let’s shake things up a bit with cinnamon roll variations .
Flavor Adaptations
You could go sweet and spicy by adding cranberries and orange zest for a seasonal twist. Or how about a pumpkin spice cinnamon roll ? Talk about fall vibes!
Dietary Modifications
Going dairy-free? Substitute in almond milk and coconut oil for the butter. Honestly, they still turn out delicious!
Seasonal Twists
For summer gatherings, I love making rolls with fresh peaches in the filling. It adds that juicy sweetness that pairs beautifully with cinnamon.
Regional Variations
Think outside the box! you could infuse some southern charm by adding pecans or ingredients typical of a texas bakery cinnamon roll.
Play around until the perfect combination has your taste buds singing!
Complete Nutrition Guide: Healthy Indulgence
Let’s not forget about eating in moderation—even with comfort food!
Detailed Breakdown
One of Mrs. Baird's cinnamon rolls typically puts you at about 320 calories. Not bad for a delightful treat!
Health Benefits
With a mix of carbs and protein, these rolls give you just the right kick to fuel your day. The warmth will wrap you in nostalgia, too—a real win-win!
Dietary Considerations
Think about your audience. If serving folks who are gluten-free, try almond or gluten-free flour to modify the original dough.
Portion Guidance
Stick to one or two rolls at breakfast, especially if they’re paired with a protein source like eggs or a hearty smoothie. Balance is key!
Expert FAQ Solutions: Tips for Success
Let me break down some FAQs to help you conquer any challenges you might face.
Common Questions
Many wonder if they can use quick-rise yeast instead of active dry yeast. Totally fine! Just skip the first rise.
Troubleshooting Guide
If your rolls don’t rise, check your yeast. Make sure it’s frothy before mixing into the dough!
Success Tips
Don't rush! Give the dough time to rise properly. It’s tempting to just want to bake and eat but patience is key!
Variations Explained
For anyone wondering how to incorporate nuts or raisins, add them directly into the filling! It’s an easy way to boost flavors.
Wrapping it all up, making mrs. baird's cinnamon rolls is a journey filled with delicious excitement. from preserving them correctly to trying out new twists, the world of cinnamon rolls is vast and scrumptious.
So, roll up your sleeves, gather your ingredients, and join me in celebrating these soft, buttery rolls that define comfort food baking.
I promise, you’ll end up making them over and over again. happy baking, friends!
Mrs. Baird's Cinnamon Rolls Card
⚖️ Ingredients:
- 4 cups all-purpose flour (480g)
- 1 cup whole milk, warmed (240ml)
- 1/3 cup granulated sugar (67g)
- 1/4 cup unsalted butter, melted (56g)
- 1 packet (2 1/4 tsp) active dry yeast (7g)
- 1/2 tsp salt
- 1 large egg
- 1 cup packed brown sugar (220g)
- 2 tbsp ground cinnamon (15g)
- 1/4 cup unsalted butter, softened (56g)
- 4 oz cream cheese, softened (113g)
- 1 cup powdered sugar (120g)
- 1-2 tbsp milk (15-30ml)
- 1/2 tsp vanilla extract
🥄 Instructions:
- Step 1: Warm the milk in a saucepan or microwave until lukewarm (about 110°F or 43°C).
- Step 2: In a large bowl, combine warm milk, sugar, yeast, and let sit for 5-10 minutes until frothy.
- Step 3: Add melted butter, egg, and salt to the yeast mixture; mix well.
- Step 4: Gradually incorporate flour until a soft dough forms.
- Step 5: Turn the dough out onto a lightly floured surface and knead for about 5-7 minutes until smooth and elastic.
- Step 6: Place dough in a greased bowl, cover with a damp cloth, and let rise for 1 hour or until doubled in size.
- Step 7: In a bowl, mix brown sugar and cinnamon; set aside.
- Step 8: Once risen, punch down the dough and roll it into a rectangular shape (about 15x10 inches).
- Step 9: Spread softened butter over the dough, then sprinkle the cinnamon-sugar mixture evenly on top.
- Step 10: Starting from one side, roll up the dough tightly into a log; cut into 12 equal pieces.
- Step 11: Place rolls into a greased baking dish, cover, and let rise for another 30 minutes.
- Step 12: Preheat oven to 350°F (175°C) and bake rolls for 25-30 minutes or until golden brown.
- Step 13: While the rolls bake, mix cream cheese, powdered sugar, milk, and vanilla until smooth.
- Step 14: Once rolls are baked, drizzle with cream cheese glaze and serve warm.
Previous Recipe: The Ultimate Libby's Pumpkin Roll: A Delicious Fall Treat
Next Recipe: Delicious Zaxby's Egg Rolls: My Ultimate Guide to Crispy Perfection