Quick Cinnamon Rolls: Soft, Sweet & Scrumptious
Craving Quick Cinnamon Rolls: Soft, Sweet & Scrumptious? This easy recipe yields warm, fluffy rolls topped with creamy glaze. Perfect for breakfast or brunch!

- Get Ready to Roll: A Heartfelt Intro to Quick Cinnamon Rolls
- Recipe Rundown: What to Expect
- Why You Need These Rolls in Your Life
- Let’s Get Those Ingredients!
- Essential Ingredients Guide: The Backbone of Your Baking
- Let’s Bake Some Cinnamon Rolls!
- The Magic of Professional Cooking: Mastering Your Kitchen
- Pro Tips & Secrets for Quick Cinnamon Rolls
- Perfect Presentation That Wows
- Storage & Make-Ahead Tips to Keep It Tasty
- Creative Variations for Everyone
- Complete Nutrition Guide
- Final Thoughts
- Frequently Asked Questions
- Recipe Card
Get Ready to Roll: A Heartfelt Intro to Quick Cinnamon Rolls
Have you ever woken up with an urge for something sweet, warm, and irresistibly delicious? picture this: it’s sunday morning.
You’re snuggled under your blanket, and the aroma of freshly baked cinnamon rolls dances through the air, making it impossible to resist rolling out of bed.
That moment? pure magic. this is why i’m thrilled to share my recipe for quick cinnamon rolls: soft, sweet & scrumptious .
Trust me, after one bite, you’ll feel like you’re wrapped up in cozy comfort.
Cinnamon rolls aren’t just pastries; they’re a hug in food form. originating from the scandinavian tradition, these delightful treats have found a permanent spot in our american culture.
Remember those holiday mornings where cinnamon rolls were the star of the breakfast table? you know, those moments when the family gathers, and the kitchen buzzes with laughter and love? well, i’m telling you, making these rolls is just the right blend of easy and rewarding.
And folks, this is an easy cinnamon roll recipe that doesn’t require advanced skills—if i can make them, you can too!
Recipe Rundown: What to Expect
This easy breakfast pastry recipe doesn’t take much time at all. the prep is a swift 15 minutes , and while the dough rises (which is super important), you can sip your coffee, scroll through your phone, or dance like nobody’s watching (i recommend the latter).
In just over an hour, you’ll have fluffy cinnamon rolls that are ready to rock your taste buds.
Cost-wise? you won’t break the bank. most ingredients you probably have at home, so why not whip up a sweet indulgence? you’ll yield about 12 rolls , perfect for sharing… or not.
No judgment here if they mysteriously disappear before breakfast!
Why You Need These Rolls in Your Life
These Quick Cinnamon Rolls are not just tasty; they're also packed with heart. Let’s break down the goodness:
-
Comfort food at its best : there’s something about warm cinnamon rolls that just feel like home. perfect for holiday baking treats or relaxed sunday brunch, you can serve them anytime you want to elevate your morning.
-
Health highlights : okay, so they’re sweet. but let’s not forget all the warm, buttery goodness that makes you feel good inside! these rolls can be customized.
Want them nut-free or dairy-free? easy! just switch to specific alternatives. go ahead and check the cinnamon roll nutrition facts if you're curious.
-
Cinnamon sugar filling : oh, that gooey, rich filling! it’s what dreams are made of, a sweet spot between sugar and spice.
Plus, if you’re feeling adventurous, you can play with different flavored cinnamon roll fillings . chocolate chips, anyone?
-
Perfect for any occasion : these rolls are a total showstopper for family gatherings, brunch with friends, or simply as a sweet ending to a weekday dinner.
People will be begging for the recipe, trust me!
Let’s Get Those Ingredients!
So now that you’re on board with this delightful adventure, grab your apron and let’s check out what you need to bake these beauties.
From flour to the perfect creamy glaze, i promise you’ll be whipping up something scrumptious in no time!
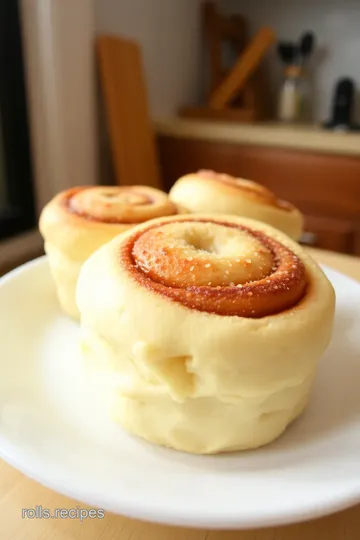
Just wait till you see the golden-brown warm cinnamon rolls emerge from the oven, topped with a glistening cinnamon roll glaze .
Once you take that first bite, you’ll understand why they’re called soft, sweet, and scrumptious . seriously, they’re like little clouds of happiness!
So, are you ready to dive into the sweet world of homemade cinnamon rolls ? I can’t wait to share all the steps with you! Just keep that roller rolling and those dreams baking!
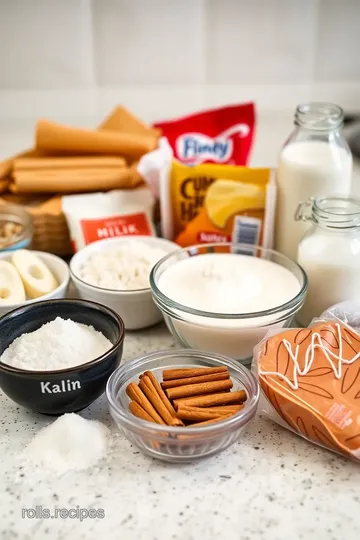
Essential Ingredients Guide: The Backbone of Your Baking
Oh my gosh, have you ever tried making quick cinnamon rolls: soft, sweet & scrumptious ? if you haven’t, you’re in for a treat that’ll turn your kitchen into a cozy haven! but before we dive into those delicious rolls, let’s chat about some key ingredients and what makes them essential for success.
Premium Core Components
First things first, measurements matter . For baking, you’ll usually want to use precise amounts. So if you’re using 2 ¾ cups (350g) of all-purpose flour, weigh it if you can! That way, you can ensure the right texture—because no one wants tough cinnamon rolls, right?
How can you tell if your ingredients are high-quality? well, look for signs like shiny, plump grains for your flour and a nice aroma from your spices.
Storage guidelines are also super important. keep your flour in a cool, dry place for up to six months , while spices should be checked for freshness—most last a year if stored properly.
When you’re shopping, tap into your inner detective: pick fresh eggs and check expiration dates on yeast. trust me; it makes a difference!
Signature Seasoning Blend
Now onto the fun part—spices! your cinnamon rolls wouldn’t be the same without that cinnamon sugar filling . but don’t stop there.
Try mixing it up with some nutmeg for warmth or even a dash of cardamom for a unique twist. pair your spices with fresh herbs if you’re feeling adventurous.
Sometimes i toss in a little allspice just because it screams “cozy vibe” for me.
And here’s a tip: in the kitchen, regional variations add a rich depth to recipes. southern-style rolls might leave you craving more brown sugar, while northern versions are lighter on sweetness.
If you're whipping up a fluffy cinnamon roll for a holiday party, you might want to level up your spices.
Smart Substitutions
Sometimes life throws curveballs. if you’re out of something, don't panic! friends, i have created a list of common alternatives to keep your roll game strong.
No butter? use coconut oil. no milk? almond milk works like a charm. and for my vegan pals, a flax egg can save your breakfast pastry recipe faster than you can say "yum!"
When baking on a budget or just working with what you have, consider using seasonal options—like adding some pumpkin spice in fall or peppermint during holidays.
This way, you’re not just stuck to one flavor, which leads to tons of fun options!
Kitchen Equipment Essentials
Let’s move to the tools that’ll help you create those warm cinnamon rolls! you'll need some basic must-have tools —a good mixing bowl, a trusty rolling pin, and a baking sheet.
Honestly, i sometimes just roll the dough right on the counter; you do you!
And if you’re lacking fancy stuff, don’t stress. a sturdy spoon can mix just as well as a fancy electric mixer, and a bottle can even help roll the dough if you forget a pin.
Also, let’s remember that proper storage solutions can extend the life of your ingredients and tools. keep flour in airtight containers, spices in dark cabinets, and clean your utensils right away to avoid clutter.
You’ll thank yourself when it’s time to whip up those simple dessert ideas !
Let’s Bake Some Cinnamon Rolls!
With all this talk about ingredients and tools, my mouth’s watering for those quick cinnamon rolls . i’m so excited to dive into the actual baking process with you! so, gather your ingredients, roll up those sleeves, and let’s bake some warm, comforting rolls that’ll fill your kitchen with the sweetest aroma ever.
Trust me, once you try them, you might just start believing you’re the next great baker in the family!
The Magic of Professional Cooking: Mastering Your Kitchen
So you’re ready to tackle something amazing in the kitchen? let’s dive right into the professional cooking method . no, you don’t need a culinary degree.
Just some simple preparation steps and a dash of passion will do the trick!
Essential Preparation Steps
Before you start whipping up those quick cinnamon rolls: soft, sweet & scrumptious , you’ve gotta get organized. this is what the french call mise en place —everything in its place.
Grab all your ingredients and equipment ahead of time to avoid that last-minute scramble. trust me, i’ve burnt enough things while searching for a missing ingredient to know this!
Time management is equally crucial. you’ll want to keep your cooking flow smooth. set a timer for your dough rising—a perfect 30 minutes is ideal, but feel free to keep an eye on it.
And speaking of eyes, keep your workspace tidy. it’s a lot easier to work when you’re not dodging flour bags and mixing bowls everywhere.
Safety is key! always make sure your hands are clean and remember to handle hot pans and ovens with care.
And don't forget, a sharp knife is safer than a dull one, so invest in a good knife!
Step-by-Step Process
Alright, let’s get into the nitty-gritty. Here’s how to hammer this out step-by-step.
-
Prepare the Dough: Start by tossing together 2¾ cups of flour, ¼ cup of sugar, 1 packet of active dry yeast (that’s about 2¼ tsp), and ½ tsp of salt .
-
Mix the wet ingredients: in another bowl, mix ½ cup of warmed milk, ¼ cup of melted butter, and 1 large egg .
Pour this into your dry mix and bring it all together.
-
Knead Away: Turn that dough onto a floured surface and get your hands in there, kneading for about 5- 7 minutes until it’s nice and smooth.
-
Rise and Shine: Let your dough rise in a greased bowl, covered with a cloth, for 30 minutes , or until it doubles in size.
-
Time to roll: roll the dough out, spread 3 tbsp of softened butter , sprinkle with the cinnamon-sugar filling , then roll it into a log.
Cut it into 12 equal pieces .
-
Bake ‘Em Up: Pop them in a preheated oven at 350° F ( 175° C) and bake for 15- 20 minutes until golden brown.
-
The glaze is key: make that cinnamon roll glaze by whisking 1 cup of powdered sugar with 2-3 tbsp of milk and ½ tsp of vanilla extract .
Drizzle this over the warm rolls.
-
Dig In! Serve immediately and watch your family devour those soft cinnamon rolls !
Expert Techniques
Now, let’s sprinkle in some expert advice.
Always check the dough’s texture ; it should bounce back when pressed. And make sure your oven is at just the right temp—check it with a thermometer if you want to get fancy!
Did those rolls not rise as expected? no worries! it could be your yeast; freshness is key. if things don’t seem right, take a moment to breathe.
Cooking is all about learning and adapting.
Success Strategies
Here are some common mistakes to avoid. first off, don’t skip that dough rising! seriously, you want fluffy rolls, right? another thing: make sure to measure your ingredients accurately.
A few tablespoons too much flour? that’ll make your cinnamon rolls dense, not delightful.
Feeling ambitious? Consider make-ahead cinnamon rolls ! You can prepare the rolls the night before and let them rise in the fridge. Just bring them to room temp before baking.
Oh, and let’s not forget about the variations of cinnamon rolls ! How about adding walnut bits or swapping the icing for a cream cheese glaze? The options are endless!
Alright, so now you’re fully equipped with the tools to master this easy cinnamon roll recipe . You're about to create something truly delicious!
Additional Information
When it comes to cooking, don’t be shy. embrace your inner chef and enjoy the process. you're making memories in the kitchen, after all! and remember, every great dish starts with a little confidence and a sprinkle of love.
Now roll up those sleeves and get baking! your homemade cinnamon rolls are waiting!

Pro Tips & Secrets for Quick Cinnamon Rolls
Let me tell you right off the bat, making quick cinnamon rolls: soft, sweet & scrumptious doesn’t have to be a high-stress ordeal.
In fact, i found that cooking should be fun, so let's dive into some pro tips and secrets that can change the game for you in the kitchen.
First things first, use fresh yeast . the last thing you want is to pour in that old packet sitting in the back of your pantry, only for those buns to not rise.
And honestly, i speak from experience! it can be so disappointing to watch your soft cinnamon rolls turn out flat.
Make sure to also be patient with the rise time —that dough needs to puff up to bring you those light, fluffy dreams.
Now, onto flavor enhancements. elevate your cinnamon sugar filling by adding a little vanilla extract or nutmeg. trust me, just a pinch will take these rolls from good to mind-blowing.
If you want to get really fancy, add some cream cheese to your cinnamon filling for that extra rich taste.
And hey, don’t forget about presentation ! seriously, halo top has nothing on how good these will look at your breakfast table.
Use a drizzling spoon technique to pour the creamy glaze over those warm cinnamon rolls. it's all about making it look as great as it tastes, right?
Perfect Presentation That Wows
Now let’s talk about the art of plating. you know how you get that instant craving just by looking at a delicious dish? well, it's all about those color combinations .
Serve your warm cinnamon rolls on a bright plate, and maybe add some colorful fruits like strawberries or blueberries on the side.
If you're feeling artistic, consider using a squeeze bottle for that glaze. i’ve gone with just drizzling it from a spoon before, but it can get a bit chaotic.
A bottle gives you a controlled flow, and it’s just easier to make that beautiful drizzle.
Garnishing with some powdered sugar on top? Yes, please! It not only looks pretty, but it’s one of those simple dessert ideas that add an alluring touch.
Storage & Make-Ahead Tips to Keep It Tasty
Now let’s get down to the nitty-gritty: how to handle leftover rolls. if you have them (which i can’t promise, because these might disappear fast), just place them in an airtight container or wrap tightly in plastic wrap.
They’ll last 2 to 3 days at room temperature, but don’t be surprised if they vanish by breakfast .
For those who want to prep in advance, here’s how: you can make the dough a day in advance. just allow it to rise, roll it out, fill it, and cut it into pieces.
Instead of baking, cover those rolls and place them in the fridge overnight. the next morning, let them sit at room temperature while you preheat the oven.
Boom, you’ve got ready-to-bake make-ahead cinnamon rolls !
Creative Variations for Everyone
Feeling adventurous? try some flavored cinnamon roll fillings ! imagine throwing in some chocolate chips or walnuts. you can even make nut-free cinnamon rolls by skipping the nuts and adding a sprinkle of dried fruits.
What about a holiday twist? swap out regular spices for pumpkin pie spice for fall or go gingerbread-style in winter.
It’s a simple way to turn this comfort food recipe into a festive treat.
If you're looking to spice things up again, think about seasonal adaptations. Fresh berries could make a great option for summer rolls, complimenting the sweet dough with some tang.
Complete Nutrition Guide
Okay, we can’t ignore the nutrition facts, right? each roll is around 250 calories , so if you're sharing (or not), keep that in mind.
That’s not too shabby given the indulgent flavors.
Additionally, they're not a bad choice for a weekend breakfast, packed with carbs and a hint of protein. if you want to go the healthier route, opt for dairy-free baking alternatives like almond milk or coconut yogurt, and use whole wheat flour instead of regular.
Just expect your rolls to be a little denser, but still delicious!
Final Thoughts
You know, as i wrap this up, i genuinely hope you feel inspired to whip up these quick cinnamon rolls: soft, sweet & scrumptious this weekend.
This recipe isn't just about the fluffy cinnamon rolls ; it’s about making memories in the kitchen. they’re not just breakfast or a dessert for brunch —they’re a moment to savor, whether you’re sharing with family or enjoying solo with a hot cup of coffee.
So roll up your sleeves, get that dough ready, and enjoy every bite of these lovely creations. You're about to become a cinnamon roll expert! Happy baking!
Frequently Asked Questions
What makes the Quick Cinnamon Rolls: Soft, Sweet & Scrumptious so easy to make?
The Quick Cinnamon Rolls recipe utilizes simple ingredients and straightforward steps that make it approachable for cooks of all levels. With only 15 minutes of active prep time and a fast rise, you can have fresh rolls ready in about an hour!
Can I make these Quick Cinnamon Rolls ahead of time?
Absolutely! You can prepare the dough and filling the night before. Simply cover and refrigerate the assembled rolls overnight; in the morning, let them come to room temperature for about 30 minutes before baking.
What are some variations I can try with these cinnamon rolls?
You can add chopped nuts like pecans or walnuts for extra texture, or even mini chocolate chips for a sweet twist. For a gluten-free option, substitute the all-purpose flour with a 1:1 gluten-free baking mix to enjoy the same delicious flavor.
What’s the best way to store leftover Quick Cinnamon Rolls?
To store leftover rolls, place them in an airtight container at room temperature for up to 3 days. For longer storage, wrap them tightly in plastic wrap and freeze for up to 3 months. Reheat in the microwave or oven for the best texture when ready to serve.
Can I use dairy alternatives in this Quick Cinnamon Rolls recipe?
Yes, you can absolutely substitute dairy ingredients! Use plant-based milk (like almond or oat milk) instead of regular milk, and coconut oil or margarine can replace the butter. For the egg, a flax egg or unsweetened applesauce works well as a vegan option.
What should I serve with my Quick Cinnamon Rolls?
These cinnamon rolls pair wonderfully with a fresh fruit salad for a balanced breakfast or alongside crispy bacon for a savory contrast. Enjoying them with a cup of freshly brewed coffee or a latte enhances their delightful, sweet flavor.
Quick Cinnamon Rolls: Soft, Sweet & Scrumptious Card

⚖️ Ingredients:
- 2 ¾ cups (350g) all-purpose flour
- ¼ cup (50g) granulated sugar
- 1 packet (2 ¼ tsp, or 7g) active dry yeast
- ½ tsp salt
- ½ cup (120ml) milk, warmed
- ¼ cup (60g) unsalted butter, melted
- 1 large egg
- ½ cup (100g) brown sugar, packed
- 2 tbsp ground cinnamon
- 3 tbsp (45g) unsalted butter, softened
- 1 cup (120g) powdered sugar
- 2-3 tbsp milk (adjust for desired consistency)
- ½ tsp vanilla extract
🥄 Instructions:
- Step 1: In a mixing bowl, combine flour, sugar, yeast, and salt.
- Step 2: In a separate bowl, whisk together warmed milk, melted butter, and egg.
- Step 3: Pour wet ingredients into the dry mixture and mix until a dough forms.
- Step 4: Turn the dough onto a floured surface and knead for 5-7 minutes until smooth and elastic.
- Step 5: Place in a greased bowl, cover with a damp cloth, and let rise in a warm place for about 30 minutes, or until doubled in size.
- Step 6: In a small bowl, mix brown sugar and cinnamon.
- Step 7: Spread softened butter evenly over the rolled-out dough, then sprinkle with the cinnamon-sugar mixture.
- Step 8: Roll the dough tightly into a log shape, then cut into 12 equal pieces.
- Step 9: Place rolls on a greased or parchment-lined baking sheet and bake at 350°F (175°C) for 15-20 minutes, until golden brown.
- Step 10: In a bowl, whisk powdered sugar with milk and vanilla until smooth. Adjust consistency as desired.
- Step 11: Drizzle the glaze over the warm cinnamon rolls and serve!
Previous Recipe: Irresistibly Juicy Fried Chicken Jerk Egg Rolls Delight: A Family Favorite!
Next Recipe: Blissfully Easy Bake Ice Cream Caramel Rolls: A Family Favorite Treat