Quick Pizza Rolls with Cheesy Goodness
Craving a quick snack? Discover these Quick Pizza Rolls with Cheesy Goodness that bring warmth to the kitchen. Perfect for gatherings or busy weeknights, try them out!

- Recipe Overview
- Key Benefits
- Essential Ingredients Guide: Fueling Your Kitchen Creations
- Mastering the Art of Quick Pizza Rolls with Cheesy Goodness
- Pro Tips & Secrets for Quick Pizza Rolls with Cheesy Goodness
- Perfect Presentation
- Storage & Make-Ahead
- Creative Variations
- Complete Nutrition Guide
- Expert FAQ Solutions
- Recipe Card
Growing up, friday nights were all about movie marathons and pizza. i still remember the glorious moment when my dad would pull that fresh pizza out of the oven and the whole house would smell like the best italian kitchen ever.
Fast forward a few decades, and i found myself thinking: how can i capture that classic pizza love in something even more fun? enter quick pizza rolls with cheesy goodness ! seriously, who doesn’t want pizza in a roll—especially when it’s gooey, cheesy, and so easy to make?
These rolls embody everything we love about pizza but come in a handy, bite-sized form. you can pack them full of toppings, veggies, or whatever leftover meats hangin’ out in your fridge.
Honestly, they’re the perfect easy pizza roll recipe for any occasion—whether it’s a cozy family dinner or a spontaneous gathering with friends.
Recipe Overview
So, where did these delicious rolls come from? pizza rolls are kind of like the cool cousin of traditional pizza, with a history that traces back to italian-american cooking.
You know those classic stuffed dough traditions? yeah, this is like their fun, laid-back younger sibling. nowadays, pizza rolls are a hit across the u.
S., especially among kids and busy parents looking for quick meal ideas . you can whip them up in about 30 minutes —15 for prep and another 15 for baking.
It’s like a little magic trick, and they require minimal effort .
And if you’re thinking about budget? you can make a dozen for just about the price of a large pizza from your favorite joint.
I mean, who doesn’t love saving a buck while chowing down on cheesy goodness snacks ?
Key Benefits
Alright, let’s talk benefits. first up, health! you can load these rolls with vegetables —think bell peppers, spinach, or even mushrooms—so they can be a sneaky way to get those nutrients in for your kids.
Plus, if you use whole grain pizza dough, you’re kicking up the fiber content. so yeah, these aren’t just comfort food recipes ; they can be pretty darn nutritious too!
Another selling point is versatility. these rolls are perfect for parties—they’re not just easy appetizers for parties , they’re also great for a casual dinner or a lunch on-the-go.
You can customize them according to your mood and pantry ingredients. got leftover grilled chicken? toss it in! feeling vegetarian? throw in some sautéed zucchini, and boom, you’ve got vegetarian pizza rolls !
Let’s not forget the pizza roll dipping sauces . marinara, ranch, or even a spicy aioli can amp up your game and keep your guests coming back for more.
Imagine setting up a mini pizza snack bar at your next gathering. sounds fun, right?
So, whether you're making these for game day or just a chill night at home, quick pizza rolls with cheesy goodness are sure to impress.
Now, let’s jump into what you’ll need to bring this cheesy delight to life!
Get ready to roll with me into the ingredients section and let’s make some magic happen!
Essential Ingredients Guide: Fueling Your Kitchen Creations
Alright, friends! let’s chat about the essential ingredients guide —you know, the backbone of every kitchen, especially when you're whipping up those comforting quick pizza rolls with cheesy goodness .
We're not just talking about throwing together random stuff; this is all about having the right ingredients and tools on hand to make your cooking adventures a breeze.
Premium Core Components
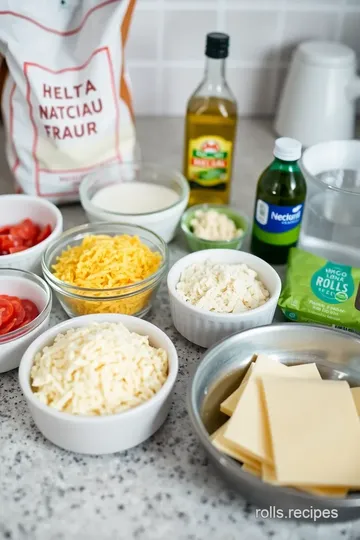
First things first, let’s talk core ingredients. Every easy pizza roll recipe needs a solid foundation. Here’s a handy list with detailed measurements (both US & metric ), so you can conquer the grocery store like a champ!
-
Pizza dough : you need 1 package (13.8 oz / 390 g) of refrigerated pizza dough. look for a brand that has good elasticity —that's how you know it’ll roll out nicely! store extra dough in the fridge and it can last up to a week or freeze it for up to three months.
-
Cheesy goodness : always opt for freshly shredded cheese over pre-shredded for the creamiest texture. glorious mozzarella (1 cup / 100 g) makes a world of difference.
For quality indicators , ensure the cheese smells fresh and isn’t too crumbly.
Signature Seasoning Blend
Next up, signature seasonings ! Think of your spices like the rockstars of flavor. For pizza rolls, you can't go wrong with:
- Dried Oregano : Full of earthy flavor. Just a teaspoon does wonders!
- Garlic Powder : That savory kick you crave. Go for at least ½ teaspoon.
Don't forget those regional variations ! If you’re feeling adventurous, throw in some fresh basil or even Italian seasoning.
Smart Substitutions
Life happens. Maybe you’re out of mozzarella or need a dietary modification . No sweat! Here’s a list of common alternatives to keep your cheese rolls rolling:
- Swap out mozzarella for Gouda or provolone if you want to up the cheese game.
- Don’t have pepperoni? Diced veggies, like bell peppers, or even chicken make for tasty vegetarian pizza rolls .
And let's be honest, who hasn’t had a moment where you realize you're out of something mid-cook? Keeping some extra cheese on hand can save your day!
Kitchen Equipment Essentials
Lastly, let’s gear up with the must-have tools ! Here’s what you need to whip up those party appetizer recipes :
- Rolling Pin : A must for achieving that tasty soft pizza roll texture.
- Baking Sheet : Your trusty sidekick. Line it with parchment paper for easy cleanup.
- Got a pastry brush? Brush your pizza rolls with olive oil for that golden-brown finish.
Storing Your Ingredients
Make sure you’re storing everything right! cheese should be wrapped tightly in the fridge, and pizza dough should be kept in an airtight bag to avoid drying out.
You’ll want all your ingredients as fresh as possible for the best cheesy snacks for kids !
Now that you’re armed with this knowledge, let’s dive into the fun part—the actual quick pizza rolls with cheesy goodness recipe! get ready to turn your kitchen into a pizzeria and create some comfort food recipes that’ll have everyone groaning in delight.
Trust me, you’ll want to keep these cheesy goodness snacks on hand for your next weeknight dinner ideas or those last-minute gatherings. Let’s get rolling!
Mastering the Art of Quick Pizza Rolls with Cheesy Goodness
Oh my gosh, if you’re on the hunt for easy pizza roll recipes , you’re in for a treat! i’ve whipped up some quick pizza rolls with cheesy goodness that are like little bites of heaven.
Seriously, these are perfect for snacking, a party appetizer, or a quick family dinner. they’re super simple to make, and trust me, they're gonna be a hit!
Essential Preparation Steps
Before diving into the creation of your cheesy pizza snacks, let’s chat about the important prep steps.
Mise en place: this fancy french term just means getting your stuff together before you start cooking. chop up those veggies and lay out your ingredients so you're ready to go.
It saves time and makes cooking less chaotic.
Time management tips: plan to take about 30 minutes in total – that includes 15 minutes of prep and 15 minutes of cooking time .
You can multitask by prepping while your oven preheats to 425° f ( 220° c) .
Organization Strategies: Keep your workspace tidy. A clean space means less stress. Use labeled bowls for each filling.
Safety Considerations: Don’t forget to wash your hands! Also, be mindful of hot trays when you take them out of the oven. Ouch!
Step-by-Step Process
Alright, let’s get down to business! Here’s your step-by-step guide on how to make these irresistible rolls:
- Preheat the Oven: Set it to 425° F ( 220° C) and line a baking sheet with parchment paper.
- Prepare the Dough: Unroll your pizza dough onto a lightly floured surface and roll it out to about 1/4 inch thick . The thinner, the better for those crispy edges!
- Make the Filling: In a bowl, mix together 1 cup shredded mozzarella, 1/2 cup sliced pepperoni (or sausage), 1/2 cup chopped bell peppers, and the other ingredients . You want a deliciously cheesy filling, so mix well.
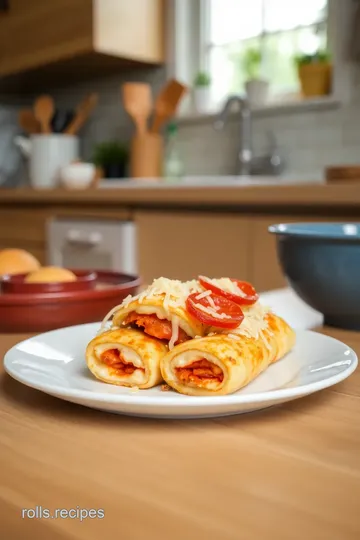
- Assemble the Rolls: Spread the filling evenly, leaving a 1/2 inch border . Roll it up tight from the long edge. Cut it into 12 even pieces for perfect little bites.
- Bake the Pizza Rolls: Place them cut-side up on your baking sheet. Brush the tops with olive oil, sprinkle with Italian seasoning, and pop ‘em in the oven for 12- 15 minutes or until they look golden brown and divine.
- Cool and Serve: Let them cool briefly. I know it’s tough to wait, but it’s worth it!
Expert Techniques
Now, if you wanna take these rolls to the next level, here are a few tips from my own kitchen experiments:
- Critical Steps Explained: Roll the dough evenly for the best bake. Uneven rolls could mean some are doughy while others are crispy. No one wants a soggy roll!
- Don’t Overfill: I’ve learned this the hard way. If you cram in too much filling, your rolls might burst in the oven. Keep it moderate.
- Quality Checkpoints: Look for that golden-brown color; it means your rolls are cooked through. Slightly crispy on the outside is key.
- Troubleshooting Tips: If they don't brown up, increase the bake time by a minute or two. Just keep an eye on them!
Success Strategies
Listen, we’ve all made mistakes in the kitchen. Here are some common pitfalls and how to avoid them:
- Common Mistakes to Avoid: Overfilling, not preheating the oven, or forgetting to oil the tops can lead to sad pizza rolls.
- Quality Assurance Tips: Always taste your filling first! Adjust seasonings as needed.
- Perfect Results Guide: For a vegetarian twist, load them with veggies instead of pepperoni. You’ll still get all that cheesy goodness !
- Make-Ahead Options: Want to prep for a party? Roll them up ahead of time and keep in the fridge for an hour before baking.
These Quick Pizza Rolls are not just food; they’re comfort food recipes that bring joy and smiles. Dip them in marinara or ranch and you’ve got the ultimate easy appetizers for parties !
So go ahead, gather your ingredients and get ready to indulge in these little bundles of joy. You’ll find they’re great for any occasion, from Friday movie nights to potluck fun.
Stay tuned for more Additional Information on customizing these rolls and serving them with style!
Pro Tips & Secrets for Quick Pizza Rolls with Cheesy Goodness
Oh, have i got some golden nuggets for you when whipping up these quick pizza rolls with cheesy goodness ! first off, let’s talk about time-saving techniques .
You don’t have to make your own dough! grab that store-bought pizza dough and save yourself a couple hours. seriously, you can have these rolls ready in about 30 minutes .
How amazing is that?
Now, flavor is where the magic happens. don't just stick with basic fillings. up your game with some flavor enhancement tips ! add a sprinkle of your favorite herbs or a dash of hot sauce into your filling for that extra kick.
Trust me, it takes your cheesy pizza snacks from "meh" to "wow." and don’t forget about presentation! brush those bad boys with a little olive oil and sprinkle on some italian seasoning before popping them in the oven.
The aroma is nothing short of heavenly.
Perfect Presentation
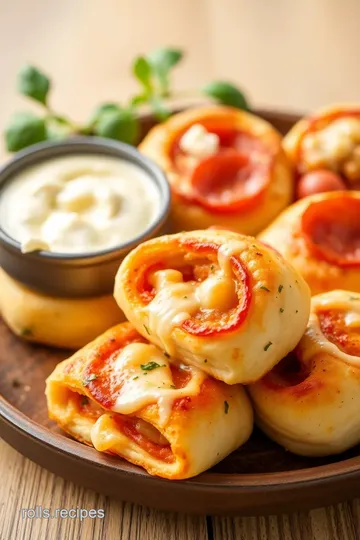
When it comes to plating techniques , you want your homemade pizza rolls to shine. place them on a colorful platter; it makes a huge difference! and garnishes? think fresh basil or a sprinkle of grated parmesan on top for that chef-touch.
Color combinations are key, too. a mix of golden-brown rolls and a vibrant marinara for dipping will have your guests reaching for their phones to snap a pic before diving in.
To boost their visual appeal even more, cut into one of the rolls before serving to show off that gooey, cheesy goodness inside.
A little effort goes a long way, especially when you're displaying these pizza-inspired appetizers .
Storage & Make-Ahead
So, you whipped up a huge batch of these tasty finger foods (because who can stop at just one, right?), but what now? you’ve got options! for storage guidelines , cool the rolls completely, then store them in an airtight container.
They’ll be good for about 3-4 days in the fridge. if you want to keep them longer, toss them in the freezer! just wrap each roll tightly in plastic wrap and then pop them in a freezer bag.
They’ll last for about 2-3 months .
When you're ready to munch, reheating instructions are simple. toss them back in a 350° f oven for about 10- 15 minutes until heated through.
Enjoy that freshness where every bite retains the charm of the first batch.
Creative Variations
Now let's get creative! these rolls are super adaptable. if you’re feeling adventurous, try using pizza rolls with vegetables for a tasty twist.
Spinach, mushrooms, or even some roasted zucchini can amp up the nutrition. if you have little ones, get them involved and make some pepperoni roll-ups for a fun dinner together.
Want a touch of seasonal flair? during fall, add pumpkin puree to the mix for a cozy autumn vibe—don’t laugh, it's a thing! and for those who love a kick, try incorporating jalapeños or pepper jack cheese for that spicy touch.
Complete Nutrition Guide
Let’s break it down with a complete nutrition guide . these rolls pack a punch with about 180 calories per serving .
With 8 g of protein and just the right amount of carbs, they make for a solid snack or a nifty quick meal for kids.
Plus, if you switch up your fillings, you get a different nutritional profile every time. high in calcium from that ooey-gooey cheese, they’re as good for the soul as they are for the body.
Expert FAQ Solutions
Got questions? i’ve got answers! one common query is how to avoid soggy rolls. the answer lies in how you fill them—don’t overstuff, or they’ll burst during baking.
If they do, troubleshooting might just be as simple as letting them bake a bit longer to get that golden crust.
Success tip: taste as you go. you’ll feel like a culinary genius when you’re snagging those little surprises along the way.
And if you’re wondering if these rolls can be frozen, the answer is a resounding YES! You may keep feeling those comforting vibes long after your pizza night.
So go ahead, adapt, enjoy, and serve up these Quick Pizza Rolls with Cheesy Goodness at your next gathering. Whether for a lazy dinner or that last-minute party, you've got this! Who knew comfort food could feel this effortlessly chic? Happy cooking!
Quick Pizza Rolls with Cheesy Goodness Card

⚖️ Ingredients:
- 1 package (13.8 oz / 390 g) refrigerated pizza dough (store-bought)
- 1 cup (100 g) shredded mozzarella cheese
- 1/2 cup (50 g) sliced pepperoni (or diced cooked sausage)
- 1/2 cup (75 g) finely chopped bell pepper
- 1/4 cup (30 g) grated Parmesan cheese
- 1 teaspoon dried oregano
- 1/2 teaspoon garlic powder
- 1/4 teaspoon red pepper flakes (optional)
- 1 tablespoon olive oil
- 1 tablespoon Italian seasoning
- 1/4 teaspoon salt
🥄 Instructions:
- Step 1: Preheat your oven to 425°F (220°C) and line a baking sheet with parchment paper.
- Step 2: Unroll the pizza dough onto a lightly floured surface and roll the dough into a rectangle about 1/4 inch thick.
- Step 3: In a mixing bowl, combine mozzarella cheese, pepperoni, bell pepper, Parmesan cheese, oregano, garlic powder, and red pepper flakes. Mix well.
- Step 4: Spread the filling evenly over the dough, leaving a 1/2 inch border around the edges. Roll the dough tightly to form a log and cut into 12 equal pieces.
- Step 5: Place the rolls cut-side up on the prepared baking sheet, brush with olive oil, and sprinkle with Italian seasoning and salt. Bake for 12-15 minutes until golden brown.
- Step 6: Remove from the oven and allow to cool slightly before serving.
Previous Recipe: Ultimate Bake Chorizo Rolls: Spicy & Delicious Snack for Game Day
Next Recipe: How to Bake Cheese Rolls with Savory Onions: An Irresistible Treat!