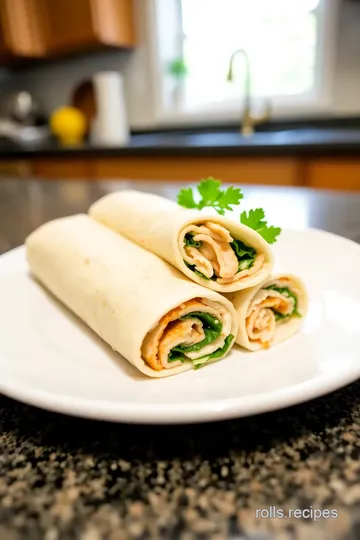
Quick and Cheesy Chicken Swiss Roll-Ups
Looking for a tasty treat? My Roll-Up Chicken Swiss Rolls for Quick Snacks are a must-try! These cheesy delights are easy to whip up and perfect for sharing.

A Snack That Rocks: Roll-Up Chicken Swiss Rolls for Quick Snacks
Oh my gosh, have you ever found yourself staring blankly into the fridge, just begging for inspiration? i totally get it! one afternoon, i was sifting through leftovers, thinking, “what the heck am i going to make?” then it hit me— roll-up chicken swiss rolls for quick snacks ! these beauties are perfect for a busy day, lazy lunch, or just when you need something deliciously satisfying .
Trust me, they're a game changer.
What’s the Story?
So, where did this snack love affair begin? roll-ups have been around for ages, really. they originate from combining leftovers, spices, and wraps, making them a kinda deconstructed meal that fits in your hand! these rolls gained popularity as quick finger foods during gatherings and parties.
Nowadays, they’ve made their way to every home cook looking for easy chicken snacks and finger food for parties.
When i first whipped up these chicken roll-ups , i never knew they’d become a family favorite. now, i make them for everything from quick meal prep on mondays to spontaneous movie nights .
You can prep them in just 35 minutes —15 for prep and 20 for baking—so they’re super manageable. plus, they’re easy peasy to throw together, even for those less confident in the kitchen.
Why You’ll Love These Roll-Ups
Now, let’s talk about the good stuff—the benefits! First off, these savory roll-ups are packed with protein. With chicken breast snacks and creamy Swiss cheese, you’re not just munching; you’re fueling up! Plus, they come together with wholesome ingredients that you probably have at home already—no fancy-schmancy stuff!
Whether you're throwing a last-minute get-together or prepping an afternoon treat for the kids, they’re an absolute hit. kids love biting into something they can hold, and adults appreciate the healthy snack ideas that don't compromise on flavor.
You can even get a little creative! think variation: add roasted veggies or switch up the cheese for your favorites.
Snack Attack: Perfect for Any Occasion
Looking for simple appetizer recipes ? you found it! these cheesy chicken appetizers are always a crowd-pleaser at parties—or hey, even at picnics! serve them warm out of the oven to impress guests, or let them cool down for a cold snack recipe that works just as well in your lunchbox.
They’re flexible!
And if you’re wondering about costs, you won’t break the bank here. with just a handful of ingredients, you can whip up enough for the whole family without feeling guilty about your budget.
It's comfort food and practicality rolled into one delicious bite-sized package!
Ready to Roll?
So, if you’re looking for quick finger foods that can dazzle even the pickiest of eaters, these homemade chicken wraps are where it’s at.
Whether served with a savory dip or all on their own, you won’t regret giving them a try.
Now, ⬇️ let's dive into what you'll need! get your shopping list ready because these quick and cheesy chicken swiss roll-ups are just waiting to be made in your kitchen.
Trust me; you’ll want to make them today!

Your Essential Ingredients Guide for Creating Delicious Roll-Up Chicken Swiss Rolls for Quick Snacks
So, you wanna whip up some quick and cheesy chicken swiss roll-ups ? perfect choice! they’re so easy to prepare and always a hit whether it's game night or just a chill evening at home.
Before we dive into the steps, let’s chat about some essential ingredients that’ll really amp up your cooking game.
Premium Core Components
You’ll need a solid foundation for a successful dish. Let’s break it down:
-
Measurements : for this recipe, you'll need 1 pound of cooked chicken breast and 1 cup of shredded swiss cheese .
If you're feeling fancy, weigh it in grams too —that's 450g chicken and 100g cheese. easy peasy, right?
-
Quality indicators : when selecting your ingredients, look for fresh herbs and quality cheeses . for the chicken, rotisserie is a lifesaver.
Check for no funky smells and always opt for whole ingredients instead of processed when possible.
-
Storage Guidelines : Your leftover roll-ups (if there are any, which I doubt!) can hang out in the fridge for about 3-4 days . Just wrap them up tight to avoid dryness.
-
Freshness tips : for the chicken, try to use it within 3 days of cooking it, and the swiss cheese is usually good for a week or two if unopened.
Always give it a sniff!
Signature Seasoning Blend
Now, moving on to the good stuff, right? Here’s how to give those roll-ups a fun twist:
-
Essential Spice Combinations : The garlic powder in the recipe is a must! It takes these roll-ups to the next level.
-
Herb Pairings : Fresh chives? Yes, please! They add a nice crunch and flavor. Dude, don’t sleep on mixing in some dill for a fun surprise.
-
Flavor Enhancers : A touch of your favorite hot sauce or even some mustard in the filling could spice things up—can't go wrong there!
-
Regional Variations : Sometimes I like to turn on my Southern roots and add a sprinkle of cayenne or use barbecue chicken for a sweet tangy twist. So good.
Smart Substitutions
Life happens, and so do ingredient shortages! Here are some quick swaps you can make:
-
Common Alternatives : Don’t have Swiss? Cheddar or mozzarella will work just as well!
-
Dietary Modifications : If you're vegan, swap out the chicken for grilled veggies and use vegan cream cheese .
-
Emergency Replacements : No tortillas? You can roll this filling in large lettuce leaves —hello, low-carb option!
-
Seasonal Options : Throw in some butternut squash or zucchini in the mix during fall. Yum!
Kitchen Equipment Essentials
Alright, gear up for the cooking action! Here’s what you’ll need.
-
Must-Have Tools : A mixing bowl and a baking sheet are non-negotiable. You could go fancy with a silicone mat if that's your vibe.
-
Alternative Equipment : If you don’t have a baking sheet, a cast-iron skillet can work too! Just make sure nothing sticks.
-
Preparation Tips : Use a sharp knife ; it makes slicing your roll-ups a breeze! Honestly, no one wants to wrestle with a dull knife.
-
Storage Solutions : After you've whipped up these tasty snacks, make sure to keep them in an airtight container. They’ll be your go-to quick finger food for days!
There you have it! with these tips and tricks, you’re all set to make those scrumptious roll-up chicken swiss rolls for quick snacks .
In no time, you'll be dishing out cheesy chicken appetizers that’ll have everyone coming back for seconds. let’s jump into how to bring this all together in the next section.
Your taste buds are gonna thank you!
Unleashing the Flavor: Professional Cooking Method
Alright, my friend! let’s dive right into some killer tips for mastering the professional cooking method. if you’re looking to create easy chicken snacks, like these roll-up chicken swiss rolls for quick snacks , you’ve come to the right place.
This snack is so simple, yet so satisfying!
Essential Preparation Steps
You may have heard the term mise en place thrown around like confetti at a new year’s party. what does it mean? basically, it means "everything in its place.
" before you get started, gather all your ingredients. chop, shred, you name it. for our cheesy chicken appetizers, you'll want that chicken shredded and cheese ready to go.
Nothing slows you down more than hunting for the garlic powder halfway through mixing!
Next on the list is time management . do your prep ahead of time. if you wanna enjoy these chicken roll-ups but life gets in the way, make the filling earlier.
Store it in the fridge for easy access later. trust me, it’ll save you time and drama—no one wants to be rushing around when friends show up for quick finger foods.
And let’s not forget organization strategies ! keep your counter tidy as you work. it helps you grab things quickly and stay in the flow.
Plus, clean spaces make me cook better —it’s a vibe!
Always think about safety too. when handling raw chicken, wash your hands thoroughly and keep that cutting board separate from your other veggies.
Nobody wants a side of foodborne illness with their homemade chicken wraps. that stuff is no joke!
Step-by-Step Process
Now, let’s get down to the nitty-gritty of the step-by-step process . Here’s how to whip up your savory roll-ups with ease:
- Preheat your oven to 400° F ( 200° C) . Get that heat rising!
- In a mixing bowl, throw together your shredded chicken, cheese, cream cheese, chives, garlic powder, salt, and pepper. Give it a good stir until it’s all combined.
- Lay your first tortilla flat and spread half that chicken mixture, leaving a little space on the edges.
- Roll it up tightly from one end to the other. Repeat with the next tortilla!
- Slice those beauties into bite-sized pieces, about 1.5 inches wide .
- Place the roll-ups cut side down on a baking sheet.
- Optional : Spritz the tops with olive oil or brush on melted butter. Make ‘em crispy!
- Bake for 15- 20 minutes , or until golden brown with melted cheese oozing out.
- Let them cool and get ready for compliments!
Expert Techniques
Alright, here comes the expert techniques section. You wanna make sure you hit all the quality checkpoints.
When baking, keep an eye on that temperature. If your oven runs hot, check your roll-ups at the 15-minute mark. Better to catch them just before they over-bake.
If you notice one rolls up a little too loose, don’t fret! you can stick toothpicks in them to help keep them together while they bake.
It’s a quick fix to prevent a cheesy explosion!
Success Strategies
One of the most important success strategies i can share is to learn from mistakes. if you overstuff your roll-ups, they might burst in the oven, which can be a nightmare.
Keep it simple! you don’t have to pack them like it’s a school lunch—leave some room for the cheese to melt.
And don’t forget about quality assurance. Before serving, take a quick peek at each roll-up—if the cheese isn’t still gooey and the tortilla isn’t browning perfectly, back in the oven they go.
For any last-minute snack ideas for kids, you can always opt for making these ahead of time. They’ll keep your family munching happily and can even be served cold!
These Quick and Cheesy Chicken Swiss Roll-Ups are not just a snack; they’re a delightful way to bring everyone together with bite-sized goodness.
As we wrap up this section, let’s transition to more delicious finds. You won’t want to miss out on some additional information that’ll make these roll-ups even better!

Additional Recipe Information
When it comes to roll-up chicken swiss rolls for quick snacks , there's so much to love beyond just the taste.
Let me fill you in on some pro tips and other nifty secrets to make your cooking experience a snap.
Believe me, these savory roll-ups are not only easy to whip up, but they also pack a ton of flavor in every bite!
Pro Tips & Secrets
First off, use rotisserie chicken! seriously, saving time while cooking is a game-changer. if you snag a rotisserie chicken from the store, you'll cut down on prep time like a pro.
Just shred it up and mix it into that creamy goodness.
Also, don’t skip on the seasonings ! adding a pinch of onion powder or smoked paprika can elevate your chicken roll-ups recipe to a whole new level.
It’s like going from good to wow in one spice swirl!
Perfect Presentation
Okay, let’s talk about the fun part— presentation ! i mean, we eat with our eyes first, right? once you slice those roll-ups, arrange them on a platter, cut side up.
It looks super tempting! a sprinkle of fresh herbs on top makes everything look gourmet, even though you know it’s just a simple quick meal prep .
For a garnish, some colorful bell pepper strips or a dollop of salsa next to your roll-ups can really make the plate pop.
Honestly, it’s all about that visual appeal . who wouldn’t want to dive into that!
Storage & Make-Ahead
Got leftovers? No problem! These rolls can be stored in an airtight container in the fridge for up to 3 days. Just make sure they’re completely cool before sealing them up.
If you want to keep them fresh longer, you could freeze the assembled but uncooked roll-ups for a future quick snack attack.
Just remember to thaw them in the fridge before baking. when reheating, pop them in the oven at 375° f ( 190° c) for about 10- 12 minutes to make them crisp again.
Perfect for those dippable chicken snacks cravings.
Creative Variations
Now, let’s get a little wild and talk variations . you can totally switch it up depending on your mood! feel like something spicy? toss in some pepper jack cheese for a kick.
Want to keep it light? try using large lettuce leaves instead of tortillas—low carb and fresh!
And for those with dietary restrictions, a simple switch to Greek yogurt instead of cream cheese does wonders. The possibilities are endless with these chicken roll-ups with dip ; think of them as a canvas for your creativity!
Complete Nutrition Guide
We all want to know what we’re munching on, right? a serving packs about 320 calories , which makes these a filling yet manageable snack option.
Plus, with 28g of protein , you can count on them to keep you satisfied. if you’re watching your sodium, just adjust the salt to fit your dietary needs.
Believe me, a little adjustment can help make these family-friendly snacks even more guilt-free.
Expert FAQ Solutions
You might have questions popping up, and i'm here for them! wondering why the rolls aren’t browning? maybe your oven needs calibration, or you didn’t use enough oil on top.
Those crispy bits make a difference! and if they’re a bit soggy, that’s usually because of too much liquid in the filling—maybe less cream cheese next time.
Just keep experimenting until you find what works for you.
Conclusion
So there you have it! whether you’re making these cheesy chicken appetizers for a last-minute gathering or just for a fun night in, your quick and cheesy chicken swiss roll-ups will steal the show every time.
These are perfect for busy families , entertaining guests, or even a picnic in the park.
With a little creativity and these tips, you'll have the ultimate easy chicken snacks at your fingertips. don’t be afraid to dive in and try them out.
Cooking is all about enjoying the process, so get rolling!
Quick and Cheesy Chicken Swiss Roll-Ups Card

⚖️ Ingredients:
- 2 large flour tortillas (10-inch)
- 1 pound (450g) cooked chicken breast, shredded
- 1 cup (100g) Swiss cheese, shredded
- 1/2 cup (120g) cream cheese, softened
- 1 tablespoon fresh chives, chopped (or 1 teaspoon dried)
- 1 teaspoon garlic powder
- Salt and pepper to taste
- Olive oil spray or melted butter for brushing (optional)
🥄 Instructions:
- Step 1: Preheat the oven to 400°F (200°C).
- Step 2: In a mixing bowl, combine shredded chicken, Swiss cheese, cream cheese, chives, garlic powder, salt, and pepper. Stir until well blended.
- Step 3: Place one tortilla on a flat surface. Spread half of the chicken mixture evenly over the tortilla, leaving a small border around the edges.
- Step 4: Roll the tortilla tightly from one side to the other. Repeat with the second tortilla and remaining filling.
- Step 5: Slice each roll into bite-sized pieces (about 1.5 inches wide).
- Step 6: Place the roll-ups cut side down on a baking sheet lined with parchment paper.
- Step 7: (Optional) Lightly spray the tops with olive oil or brush with melted butter for added crispness.
- Step 8: Bake for 15-20 minutes, or until golden brown and the cheese is melted.
- Step 9: Remove from the oven and let cool for a few minutes before serving.
Previous Recipe: How to Make Amazing Steam Corn Rolls for a Delightful Snack
Next Recipe: My Easy Chill Nut Roll with Healthy Nuts & Oats: A Delicious No-Bake Treat