Savory Turkey Rolls with Herbed Stuffing
Ever wonder how to make turkey rolls with stuffing just like Grandma? This recipe is packed with savory goodness and comforting flavors guaranteed to impress!

A Comforting Twist: Turkey Rolls with Stuffing
Ever had one of those nights where you just crave something warm and delicious? i remember a cold winter evening, staring at my fridge, searching for dinner motivation.
Then it hit me! turkey rolls with stuffing ! it’s a meal that brings back wonderful memories of family gatherings and cozy dinners.
I mean, who doesn’t love a good turkey dish? this easy turkey recipe is like a warm hug on a plate—perfect for those nights when you just want to feel at home.
The Story Behind Turkey Rolls
So, let’s dive a little deeper into these delightful savory turkey rolls with herbed stuffing . this dish has roots in classic holiday meals, often gracing tables for thanksgiving and christmas.
But here’s the kicker: you don’t need a holiday to enjoy these! they’re made with tender stuffed turkey breasts and can be whipped up any time of the year.
Super popular right now, they’re a hit for family dinners or even when friends come over. plus, they're a fantastic way to impress without breaking a sweat.
Now, don’t get me wrong; there’s some prep work involved. you’ll want about 20 minutes for preparation and another 25 minutes for cooking , so plan a bit.
And trust me, it’s worth every minute for that flavorful satisfaction!
Benefits of Turkey Rolls with Stuffing
Okay, let’s talk about the good stuff. first off, these turkey rolls are a nutritious turkey meal —lean protein that keeps you full without the guilt.
The herbed stuffing, bursting with garlic, rosemary, and thyme, is a personal touch that enhances those aromatic turkey roll flavors .
Plus, if you’re like me and love to experiment, feel free to switch up the stuffing! throw in cranberries or nuts for a fun twist.
These rolls shine at any event. whether you’re hosting a festive gathering or just cooking for your family, they fit right in.
Imagine serving these baked turkey rolls alongside creamy mashed potatoes and a spoonful of tangy cranberry sauce. total crowd-pleaser!
But here’s the real gem: unlike other turkey recipes that can get overly complicated, these are straightforward. even if you're new to the kitchen, the rolling and searing can be mastered with a little patience.
Honestly, it’s just two techniques that can elevate your cooking game. so why not give it a shot?
Wrapping It Up
Before we kick off the good part—talking about ingredients—let me just say that this simple turkey roll recipe is not only delicious but also a heartwarming experience.
It’s comforting, satisfying, and absolutely perfect for gatherings. think of it as your new go-to dish that’ll have everyone asking for seconds.
Ready to gather those ingredients? grab your turkey, breadcrumbs, and a few herbs because we’re about to get cookin’! let’s make those turkey rolls with stuffing the star of your dinner table tonight.
Trust me, you’ll be the kitchen hero in no time!
Essential Ingredients Guide for Delightful Turkey Rolls with Stuffing
Oh my gosh, let’s chat turkey! whether you’re trying to impress at a family dinner or just looking to satisfy those comfort food cravings, knowing your way around the ingredients is a game changer.
Today, we’ll break down everything from the premium core components for our savory turkey rolls with herbed stuffing to the must-have kitchen tools you’ll need.
Grab a cup of coffee (or a glass of wine, no judgment here!) and let's make cooking a fun adventure.
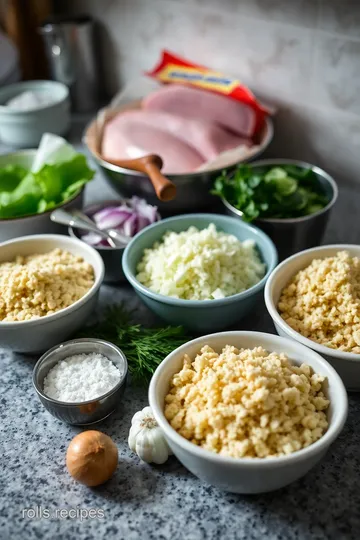
Premium Core Components
When it comes to ingredients, getting it right matters. Here’s the lowdown on what you want to have on hand.
-
Turkey breast: every great stuffed turkey breast starts with 1 ½ pounds of turkey breast, cut into nice thin cutlets.
The thinner, the better for rolling! look for fresh, pink meat with no discoloration.
-
Bread Crumbs: You’ll need about 1 cup of bread crumbs. If they're day-old, that’s even better. Day-old bread tends to hold its texture after soaking up those flavors.
-
Herbs: For that herbed stuffing for turkey , grab some dried thyme and rosemary. They should smell fragrant (like a little piece of heaven), which means they’re good to go.
-
Chicken Broth: Having ½ cup of chicken broth on standby is essential. It gives moisture and flavor. If you’re keen on variations, using vegetable broth also works wonders.
Storage guidelines: keep your fresh ingredients in the fridge. turkey should be used within 1-2 days of purchase, while dried herbs can last about 1-3 years when stored in a cool, dry place.
Bread crumbs? keep them sealed to avoid moisture.
Freshness Tips: Always check for the “best by” dates. A quick sniff doesn’t hurt either—trust your nose!
Signature Seasoning Blend
Now, let’s jazz it up with some seasoning!
Start with a mix of essential spices. Think salt and pepper—classic, right? But if you're feeling a little adventurous, consider adding a touch of paprika for smokiness or a pinch of cayenne for heat!
Herb Selections: For our turkey rolls, dried oregano and parsley can be great additions to the mix. They offer freshness and a pop in flavor.
Regional Variations: In some parts of the U.S., you might find folks using sage, especially around Thanksgiving. Feel free to switch things up based on what your family loves.
Smart Substitutions
Life happens, and sometimes you don't have everything on hand. That's okay!
-
Common Alternatives: If you’re out of turkey, how about using chicken cutlets? They'll work for your simple turkey roll recipe and still taste delish!
-
Dietary Modifications: Going gluten-free? Switch out regular bread crumbs for almond flour.
-
Emergency Replacements: No chicken broth? Use water in a pinch; just season it a tad more.
-
Seasonal Options: If you have leftover roasted veggies, chop 'em up and sneak ‘em into your stuffing for a colorful twist!
Kitchen Equipment Essentials
Let’s talk tools—the right ones can seriously simplify your life!
Must-Have Tools:
- A large skillet for searing those beautiful turkey rolls.
- A mixing bowl for combining your stuffing.
- Toothpicks or kitchen twine to keep those rolls together.
Alternative Equipment Options: If you don’t have a skillet, a grill pan works too!
Preparation Tips: It’s easier to roll turkey cutlets if you pound them gently with a meat mallet first.
Storage Solutions: Keep your ingredients organized in labeled containers. It saves time when you’re in “cook mode.”
So, there it is! we tackled the essentials for crafting these flavor-packed holiday turkey recipes —or just a delicious dinner any day of the week! the next step? let’s dive into the step-by-step instructions for those irresistible turkey rolls with stuffing .
You’ll have a savory dinner ready in no time, and i can't wait for you to taste it!
Mastering the Art of Cooking Turkey Rolls with Stuffing
Hey there, welcome to your new favorite recipe adventure! today, we're turning up the heat with some savory turkey rolls with herbed stuffing .
Trust me, this dish isn’t just for holidays; it’s perfect for any day when you need a comforting meal that feels a bit fancy.
We’ll walk through the essential preparation steps, share expert techniques, and arm you with success strategies. sound good? let’s dive in!
Essential Preparation Steps
First thing’s first: mise en place . this fancy french term is just a way of saying “everything in its place.
” gather all your ingredients before you start cooking. for our turkey rolls, you’ll need turkey breasts, some herbs, crushed bread for stuffing, onion, garlic, and a splash of chicken broth.
It makes the process smoother, and you won’t get caught fumbling around looking for stuff when it’s go-time.
Now, let’s talk time management . that’s crucial, fam! the total prep and cook time is about 1 hour and 15 minutes .
Here’s how to tackle it: chop your onions and garlic first while the bread cools. boom! you just saved some precious minutes.
Organizing your workspace is key too. keep a clean counter and maybe pour yourself a drink. you deserve it!
And don’t forget safety! keep your knives sharp (dull knives are a hazzard!), wash your hands frequently, and be cautious with that hot skillet.
Ain’t nobody got time for a kitchen injury, right?
Step-by-Step Process
Alright, let’s break down the cooking like it’s a recipe from a culinary school.
-
Prepare the stuffing : heat 1 tablespoon of olive oil over medium heat. sauté one chopped onion until it’s translucent, about 3- 4 minutes .
Toss in two cloves of minced garlic for a minute. that aroma's gonna hit you in the face like a warm hug! combine this in a bowl with 1 cup of breadcrumbs and 1/2 cup of chicken broth.
Mix it all up and set it aside.
-
Prep the Turkey : Take your 1 ½ pounds of turkey breast and lay cutlets flat. Season with salt and pepper to taste.
-
Roll it Up : Scoop a good spoonful of stuffing onto each turkey cutlet and roll ‘em up tight. Secure them with toothpicks or some kitchen twine. Easy peasy!
-
Sear those rolls : in the same skillet, heat another 1 tablespoon of olive oil over medium-high heat. sear each turkey roll for about 3- 4 minutes per side until they look golden brown.
Just imagine the crispy goodness!
-
Bake ‘em : transfer the rolls to a baking dish and slide them into a preheated oven at 375° f ( 190° c) for 15- 20 minutes .
You’re looking for that internal temperature to get to 165° f ( 75° c) .
-
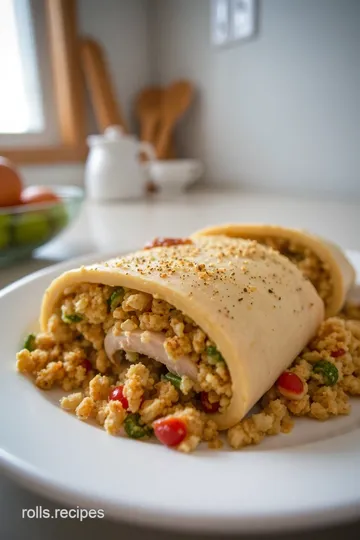
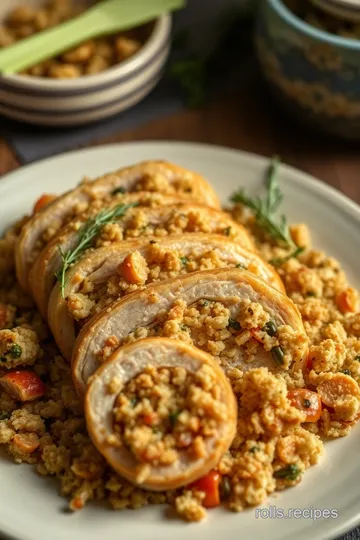
Rest and serve : after you take them out, let those rolls rest for about 5 minutes . this helps keep all the juices inside.
Finally, slice, remove the toothpicks, and serve warm.
Expert Techniques
Now here’s where we get fancy. you want quality checkpoints throughout the cooking process. when you sear those turkey rolls, get a nice caramelization going (that’s when they turn golden brown).
When baking, a meat thermometer is your best friend. trust me, once you use one, you’ll wonder how you ever lived without it!
And if it looks off at any point, don’t stress! troubleshooting can salvage your turkey roll disaster. if it’s too dry, splash a little broth or turkey gravy on when you serve.
Instant flavor boost!
Success Strategies
No one wants a turkey fail during dinner! here’s a quick rundown of what to avoid. first, don’t overstuff the rolls.
Keep it simple with 2-3 tablespoons of stuffing. second, ensure even cooking by rolling them tightly! nobody likes a messy turkey roll, right?
For those make-ahead options, assemble your rolls and chill them in the fridge for up to 24 hours. just sear and bake them when you’re ready, and you'll have the best family dinner waiting.
Additional Information...
I know it might feel like a lot, but guess what? cooking isn’t just a chore; it's an adventure! these turkey rolls with stuffing are a fantastic comfort food dish that can turn any ordinary night into something special.
With these tips and hacks, you’re all set to impress your family or guests! look into into these delicious rolls, and savor the cozy flavors.
Happy cooking, friends!
Additional Recipe Information
Pro Tips & Secrets
Okay, let’s talk real for a second! making turkey rolls with stuffing might sound a bit daunting, but trust me, i’ve got some insider tips that’ll make you shine like a pro! first off, always use day-old bread for your herbed stuffing .
It absorbs the broth better and adds a nice texture. speaking of broth, using chicken broth for stuffing instead of water is a game changer in flavor.
Now, i know rolling up those turkey cutlets can be tricky. if you gently pound the cutlets with a meat mallet first, they’ll roll perfectly.
Plus, my time-saving trick is to prep the stuffing and turkey the day before. chilling it in the fridge not only saves time but allows the flavors to mingle beautifully.
And let me tell you, that flavor enhancement makes a world of difference at dinner time!
Perfect Presentation
When it comes to serving up your yummy stuffed turkey breast , presentation is key! you want to make it look as good as it tastes.
Plating techniques can be super fun—slice those turkey rolls diagonally and arrange them on the plate like a fancy charcuterie board.
For garnishes, fresh herbs like parsley or thyme are perfect. a sprinkle of chopped parsley adds that pop of green that catches the eye.
Don't forget about color combinations ; pairing the golden brown turkey with bright veggies like roasted carrots or green beans gives you that appealing visual appeal.
Storage & Make-Ahead
If you’re like me, you want leftovers! the good news? these baked turkey rolls store wonderfully! just let them cool completely, then pop them in an airtight container.
They'll last in the fridge for about 3-4 days. need to freeze them? no problem! wrap each roll tightly in plastic wrap and place them in a freezer bag.
They should be good for about 2-3 months.
Now, reheating is simple; just throw them in the oven at 350° f until warmed through, about 15 minutes. if you’re a fan of make-ahead meals, prep these turkey rolls the night before and store them nicely in the fridge until you’re ready to bake.
Easy peasy!
Creative Variations
Now, let’s get a bit creative! your turkey roll variations are almost limitless. want a savory twist? toss in some cooked sausage or mushrooms into your herbed stuffing for a hearty filling.
Feeling festive? why not throw in some dried cranberries or chopped apples for that seasonal vibe?
And if you’re entertaining guests, stuffed turkey appetizers could be a hit! just slice the rolls into bite-sized pieces and serve with toothpicks.
Trust me; your guests will be raving about your creative flair before even trying the dish!
Complete Nutrition Guide
Let’s dive into the numbers! one serving of these turkey rolls is loaded with 30g of protein . talk about a nutritious turkey meal! plus, turkey is rich in tryptophan, which can help you feel calm and relaxed—perfect for family dinner recipes.
And here’s a little nugget of knowledge: these savory turkey dishes boast some serious health benefits, like being low in fat and high in nutrients.
Just keep an eye on portion sizes, especially if you're dishing up with comforting sides like those creamy mashed potatoes.
Expert FAQ Solutions
Got questions? I’ve been there! One common question is whether to cover the rolls while baking. I say no! Leaving them uncovered allows for that lovely golden brown crust.
If your rolls fall apart while cooking, don’t sweat it! it happens to the best of us. just remember to secure them tightly with toothpicks or kitchen twine before cooking.
This is one of those turkey cooking techniques that you’ll master with practice.
Conclusion
So there you have it, folks! making these savory turkey rolls with herbed stuffing is easier and more delicious than you might think.
Don’t hesitate to try these pro tips, and play around with those creative variations. trust me, whether it’s a quiet family dinner or a festive gathering, you’ll impress everyone at the table.
So roll up those cutlets, enjoy every bite, and bask in the glory of being the turkey roll chef extraordinaire! happy cooking!
Savory Turkey Rolls with Herbed Stuffing Card

⚖️ Ingredients:
- 1 ½ pounds turkey breast, cut into thin cutlets
- 2 tablespoons olive oil
- Salt and pepper, to taste
- 1 cup bread crumbs (preferably day-old)
- 1 small onion, finely chopped
- 2 cloves garlic, minced
- ½ cup chicken broth
- 1 teaspoon dried thyme
- 1 teaspoon dried rosemary
- 1 tablespoon fresh parsley, chopped (optional)
🥄 Instructions:
- Step 1: In a skillet, heat 1 tablespoon of olive oil over medium heat. Sauté onion until translucent, about 3-4 minutes.
- Step 2: Stir in minced garlic; cook for an additional 1 minute.
- Step 3: In a bowl, combine sautéed onion and garlic with bread crumbs, herbs, and chicken broth. Mix well.
- Step 4: Lay turkey cutlets on a clean surface, gently flatten if necessary. Season both sides of turkey with salt and pepper.
- Step 5: Place a spoonful of stuffing on each turkey cutlet. Carefully roll up each cutlet, securing with toothpicks or twine.
- Step 6: In the same skillet, heat remaining olive oil over medium-high heat. Sear the turkey rolls on all sides until golden brown, about 3-4 minutes per side.
- Step 7: Transfer seared rolls to a baking dish. Bake in a preheated oven at 375°F (190°C) for 15-20 minutes, or until internal temperature reaches 165°F (75°C).
- Step 8: Let rolls rest for 5 minutes before slicing. Remove toothpicks or twine and serve warm.
Previous Recipe: Ultimate Chicken Pot Pie with Crescent Rolls on Bottom and Top
Next Recipe: Ultimate turkey pot pie using crescent rolls: My Family’s Favorite!