Steaming Corn Rolls with Herb Butter Delight
Craving a taste of summer? These Steaming Corn Rolls with Herb Butter Delight are the perfect combo of sweet, fluffy, and herby goodness that’ll wow anyone! Let's dive in.

- The Sweet Summer Surprise: Steaming Corn Rolls with Herb Butter Delight
- A Little Corny History
- Easy on the Wallet
- Why You’ll Love These Rolls
- Perfect for Every Occasion
- How to Get Started
- Essential Ingredients Guide
- Elevate Your Cooking with Professional Methods
- Pro Tips & Secrets
- Perfect Presentation
- Storage & Make-Ahead
- Creative Variations
- Complete Nutrition Guide
- Wrapping It All Up
- Frequently Asked Questions
- Recipe Card
The Sweet Summer Surprise: Steaming Corn Rolls with Herb Butter Delight
Have you ever taken a bite of something so good it made you think, "wow, how did i live without this?" that little moment of discovery is exactly how i felt when i first made steaming corn rolls with herb butter delight .
It was a sunny sunday afternoon, and i wanted something that screamed summer. my friend suggested i try these rolls, and honestly, i was a bit skeptical at first.
But once i took that first fluffy, buttery bite filled with the nutty corn flavor, it was game on. i was all in!
A Little Corny History
Now, let's chat about where these delightful rolls come from. corn has been a staple in american cooking for centuries.
Native americans used corn in all sorts of ways, and honestly, not much has changed in that tasty tradition. today, steamed corn recipes like this one are a modern twist celebrating the sweet, fresh corn we love in summer.
People rave about these corn rolls because they’re not just delicious but also pretty approachable. they take about 70 minutes total, but don’t sweat it; most of that time is just letting the dough rest.
I mean, who doesn’t love a little downtime in the kitchen?
Easy on the Wallet
The beauty of this corn recipe idea is that it won’t break the bank. you can whip up a batch of these rolls for under ten bucks.
Plus, they yield 12 fluffy rolls , perfect for a family dinner or a barbecue gathering. trust me, if you bring these to your next cookout, you’ll be the star of the show, no contest.
Why You’ll Love These Rolls
Let’s dive into what makes these little gems so special! first off, they’re a great way to sneak in fresh corn recipes into your meals, especially if you’ve got picky eaters.
Kids adore the fluffy texture and the mild sweetness. plus, the herb butter brings an elegant touch that’ll have your guests rave about your culinary skills.
Nutritionally, they're a win too. cornmeal rolls are packed with fiber and provide a good dose of energy, making them ideal for casual family meals.
Plus, they’re vegetarian, so they suit a variety of dietary needs without sacrificing taste. i’m all about those comfort food recipes that make everyone feel good, and these roll recipes do just that.
Perfect for Every Occasion
Whether you’re hosting a summer bbq or just need a cozy side for a weeknight meal, steaming corn rolls with herb butter delight fit right in.
Serve them with some grilled meats, or just get fancy and pair them with a salad drizzled in lime vinaigrette.
Seriously, the possibilities for pairing are endless!
How to Get Started
Alright, let’s talk about what you’ll need to create these scrumptious rolls. the ingredient list is pretty straightforward. grab some fresh corn , all-purpose flour, cornmeal, and a couple of herbs for that buttery goodness.
You’ll find that the cooking with fresh herbs part makes it feel like you’re a gourmet chef, even if you’ve only been experimenting in the kitchen for a minute.
With a few steps of mixing, resting, and steaming, you’ll end up with fluffy little rolls begging for a smear of that homemade herb butter .
If you’re not sure where to start, don’t worry about it. i’ll guide you step by step in the recipe section.
You’ll whip up this easy corn roll recipe like a pro in no time!
So, who’s ready to dive into the kitchen and make these steaming corn rolls with herb butter delight ? trust me, once you try them, you’ll be dreaming up variations and ways to impress your family and friends.
Let’s get cooking!
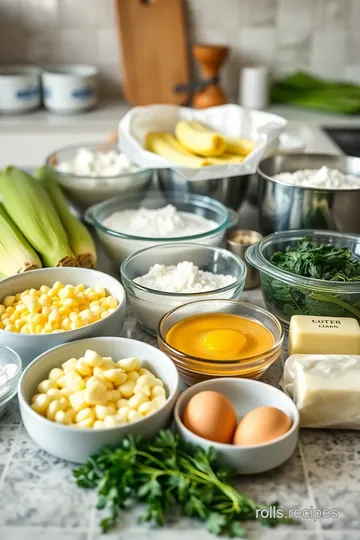
Essential Ingredients Guide
When it comes to cooking, having the right ingredients can totally make or break a dish. today, we’re diving headfirst into an essential ingredients guide for all you foodies out there! whether you're a seasoned chef or just starting out, knowing your staples is super important.
So let’s get into it!
Premium Core Components
First up, let’s talk Premium Core Components . Here are a few key ingredients that you should have in your pantry:
-
Fresh Corn Kernels: You absolutely need about 2 cups (300g) of corn for our incredible Steaming Corn Rolls with Herb Butter Delight . Fresh is best! Look for bright, plump kernels.
-
Flour and Cornmeal: For those light, fluffy rolls, you’ll want 1 cup (120g) of all-purpose flour and 1 cup (125g) of cornmeal. These mix perfectly for the texture you want.
-
Eggs and Dairy: One large egg and a cup of milk bring everything together. Don’t skimp on quality here; it makes a big difference!
-
Sugar and Salt: These may seem basic, but 2 tablespoons (30g) of sugar and 1 teaspoon of salt are crucial. They help balance the flavors.
Now, when it comes to storage , keep your flour and cornmeal in a cool, dry place. they’ll last about 6 months if sealed properly.
And don’t forget, seasonal ingredients like corn deserve extra love; try to use them within a couple of days for peak flavor!
Signature Seasoning Blend
Let’s spice things up! A Signature Seasoning Blend is key to elevating any dish. For our rolls, you'll want to keep it simple but meaningful:
-
Herbs: Fresh herbs like parsley and chives in the herb butter give an uplifting twist to the rolls. Trust me, the aroma is irresistible!
-
Aromatics: Feel free to add in a little garlic or lemon zest for some zing.
-
Regional Variations: Different areas have their own flair with corn; in the South, you might see some spicy twists, while the Midwest prefers a sweeter take. Experiment and find your favorite!
Smart Substitutions
Okay, let’s talk Smart Substitutions . You don’t always have to stick to the exact ingredients. Here’s how to make cooking with fresh corn even easier:
-
Common Alternatives: If you can’t find fresh corn, frozen works just as well in a pinch, but seriously, nothing beats fresh for a corn rolls recipe !
-
Dietary Modifications: For gluten-free eaters, swap out all-purpose flour with a gluten-free mix. It’ll change the texture slightly but still tastes awesome!
-
Emergency Replacements: Don’t have an ingredient? No problem! If you’re out of cornmeal, just use more flour instead.
Kitchen Equipment Essentials
Finally, let’s get into those Kitchen Equipment Essentials you need. Grab these must-have tools for a smooth cooking experience:
-
Mixing Bowls: You’ll need a good-sized bowl for combining your ingredients.
-
Steamer Basket: This is a game-changer for cooking those corn rolls to fluffy perfection. If you don’t have one, use a large pot with a lid and a heatproof plate—simple as that!
-
Spatula or Whisk: A good spatula helps combine ingredients without overmixing, which is crucial!
-
Storage Solutions: Store any leftovers (if there are any!) in an airtight container in the fridge for a couple of days. They’re great for quick lunches!
Bringing it All Together
All these ingredients and tips make up the foundation for many delicious corn recipe ideas like our steaming corn rolls with herb butter delight .
They’re not just easy to make; they’re also comforting and perfect for summer gatherings. now that you have the essentials down, stay tuned for the step-by-step instructions to whip up these tender, flavor-packed rolls that everyone will love.
You’re gonna crush this! Let’s bring on the fun in the kitchen!
Elevate Your Cooking with Professional Methods
When it comes to the art of cooking, there’s a whole world of professional methods that can spice up your kitchen game.
Just like in a chef's domain, getting the nitty-gritty right is key. today, let’s dive into how you can capture that professional edge—not just to impress, but to make cooking at home feel like a fun adventure!
Essential Preparation Steps
Mise en Place Details
First thing’s first: mise en place . this fancy french term just means "everything in its place." it’s all about having your ingredients prepped and at the forefront, like having that 2 cups of fresh corn kernels ready before you dive into making steaming corn rolls with herb butter delight .
Trust me; it saves you from the last-minute pantry scrounging.
Time Management Tips
Don't underestimate the power of good planning! timing is golden in the kitchen. you’ll want to use a little timer when you’re steaming those rolls for about 15- 20 minutes .
You can watch your favorite show or scroll through that tiktok feed while you wait—multitasking, am i right?
Organization Strategies
Keep it tidy! make sure all your tools are by your side before you start cooking. make a list, if you have to.
A clutter-free space not only helps to avoid accidents (safety first, folks!) but also lets you enjoy the process.
Safety Considerations
And speaking of safety, always remember to wash your hands when handling raw ingredients. plus, avoid cross-contamination by keeping raw meats and veggies separate.
Feeling extra cautious? maybe use gloves if you’re chopping herbs for that delightful herb butter sauce.
Step-by-Step Process
Now that we’re prepped, let’s get into a clear, numbered guide to make those fluffy corn rolls :
-
Start by mixing your dry ingredients—corn, flour, cornmeal, baking powder, salt, and sugar.
-
In another bowl, combine your wet ingredients (trust me, this is when the magic happens).
-
Pour the wet mix into your dry mix and stir gently. No overmixing here, or your rolls might end up more like hockey pucks than fluffy gems.
-
Let that batter rest for about 30 minutes . perfect time to whisk up that homemade herb butter . just mix butter with your choice of finely chopped herbs and a pinch of salt.
-
Now for the fun part! Shape your mixture into rolls and prep your steamer. Steam these bad boys for 15- 20 minutes .
-
Time for a toothpick test! It should come out clean when done.
Expert Techniques
Here are a couple of pro tips to elevate your home-cooking game.
- Temperature Control Points: Make sure your steaming water is nice and hot before placing the rolls inside.
- Visual Cues for Doneness: Look for those rolls puffing up. They’ll have that slightly golden touch on top that says they’re ready to rock.
Success Strategies
Let’s talk about what could trip up your process.
-
Common Mistakes to Avoid: Overcooking can lead to dry rolls. Stay vigilant!
-
Quality Assurance Tips: Always use the best ingredients. Fresh corn is a game-changer.
-
Make-ahead Options: You can prepare and shape your rolls a day in advance—store them in the fridge before steaming. Bam! Dinner is almost ready when you are.
Wrapping It Up
So there you have it—that guide for bringing professional cooking methods right into your kitchen. steaming corn rolls with herb butter delight isn’t just an easy corn roll recipe; it’s a delicious undertaking that brings layers of flavor together.
By following these steps, you’ll not only impress your family but also feel like a culinary wizard.
But wait, there's more! in our next section, we’ll delve into additional information about corn recipes, rolling techniques, and even explore creative ways of using fresh ingredients that'll make your mouth water.
Get ready to amp up your kitchen adventures—a whole new world of flavors is just around the corner!
Pro Tips & Secrets
Let me spill some of my secrets about making steaming corn rolls with herb butter delight . first off, using fresh corn is key.
The flavor is just unbeatable. you know that sweet, nutty punch? that's what you’re aiming for! if fresh corn isn’t available, don’t sweat it; frozen corn will totally work too, although it might not have that same fresh pop.
Now, about steaming—there’s a trick i learned. cover your steaming basket with a clean kitchen towel before placing the lid on.
It keeps the moisture in and helps your rolls come out fluffy and soft. oh, and don’t rush the resting time.
Letting the mixture sit for 30 minutes allows the flavors to meld and the gluten to relax, resulting in lighter rolls.
When it comes to your herb butter, mix and match! i love adding a little bit of fresh basil or even dill for a summer kick.
Just remember: keep it real with the herbs. they’re your flavor heroes here! you want to elevate those rolls, not overpower them.
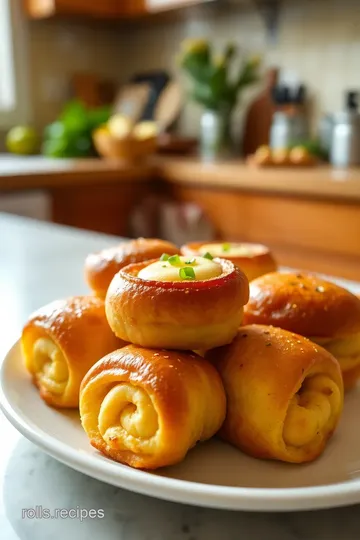
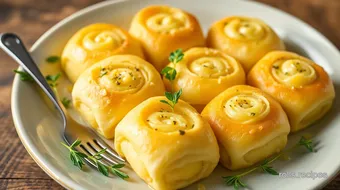
Perfect Presentation
Okay, you’ve mastered the rolls—now let’s talk about making them look fabulous. plating is an art! stack them on a cute plate and drizzle some of that luscious herb butter over the top.
Just a light drizzle; you don’t want to drown them but give them that elegant touch.
Garnishing is where you can get super creative. consider sprinkling a few chopped herbs or even some colorful edible flowers on the plate.
The pops of green contrast so well against the golden corn rolls. if you’re feeling fancy, throw on some lemon zest on top right before serving for that fresh zing!
Storage & Make-Ahead
Now, if you’re the kind of person who loves to meal prep (or, like me, just wants to make life easier during the week), these rolls are your new best friend! here’s the scoop: they can be stored in an airtight container for about 3 days in the fridge.
Just make sure they're completely cooled before you store them.
For the best results when reheating, pop them in a steamer for about 5 minutes , and bam! fluffy goodness revived.
If you’re looking to freeze them, wrap them tightly in plastic wrap and store them in a freezer-safe bag for up to 2 months .
Thaw them overnight in the fridge before steaming.
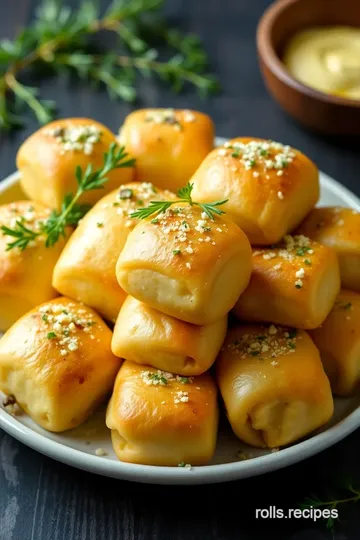
Creative Variations
Who doesn’t love a good twist on a classic? here’s where you can get wild with your corn rolls recipe .
Want something cheesy? toss in some shredded cheddar right into the mix. feeling adventurous? throw in a teaspoon of smoked paprika for a hint of spice.
Go vegetarian by adding some diced roasted peppers or mushrooms. you could also try seasonal variations like adding in pumpkin or butternut squash in the fall.
So many corn recipe ideas out there, you might just lose track!
Complete Nutrition Guide
You’re probably wondering about the health scene here. each roll packs about 150 calories , which is pretty darn solid for a fluffy comfort food like this! plus, they’ve got a good balance of protein and carbs to keep you feeling satisfied without being overly heavy.
If you’re counting your macros, feel free to swap out fats! if you want to cut calories a bit, you can lower the butter in the herb mix or switch to a gluten-free corn recipe by using a 1-to-1 blend for those sensitive to gluten.
Wrapping It All Up
So, next time you're looking for a delicious side dish or a notable appetizer for a get-together, give steaming corn rolls with herb butter delight a shot.
Trust me, these little beauties are not only easy to whip up but also bursting with flavor and personality. plus, they’ll impress even the pickiest eaters in your life—i've seen it happen!
Don't forget to get creative with the variations and make them your own. cooking should be fun! so gather your favorite people around the table and enjoy these rolls.
They’ll bring warmth and comfort that’s perfect for any occasion. happy cooking!
Frequently Asked Questions
What are Steaming Corn Rolls with Herb Butter Delight, and how are they made?
Steaming Corn Rolls with Herb Butter Delight are fluffy rolls made from fresh corn mixed with flour and milk, then gently steamed until cooked through. The combination creates a delightful sweet and nutty flavor, beautifully complemented by herb-infused butter. These rolls are easy to prepare, especially with the step-by-step instructions provided in the recipe.
Can I make Steaming Corn Rolls with Herb Butter Delight ahead of time?
Yes, you can prepare the corn roll dough ahead of time and refrigerate it for up to 24 hours before steaming. If you want to store the cooked rolls, let them cool completely, then store them in an airtight container in the fridge for up to 3 days. Reheat them in the steamer or microwave for the best texture.
What if I don't have a steamer? Can I still make these corn rolls?
If you don’t have a steamer basket, you can create a makeshift steamer by placing a heatproof plate upside down in a large pot filled with an inch of water. Place the parchment paper with rolls on top of the plate, cover, and steam as directed. Just ensure the water doesn’t touch the rolls directly.
Are there any variations I can try for Steaming Corn Rolls with Herb Butter Delight?
Absolutely! You can add shredded cheese for a cheesy flavor or incorporate herbs like thyme or dill into the dough for an aromatic twist. For a spicy kick, try mixing in chili powder or jalapeños. Feel free to experiment to find your perfect combination!
How should I store leftover Steaming Corn Rolls with Herb Butter Delight?
Store any leftovers in an airtight container in the refrigerator for up to 3 days. To maintain their freshness, you can also wrap them tightly in plastic wrap. Reheat in a steamer or microwave before serving to keep them fluffy.
Are Steaming Corn Rolls with Herb Butter Delight healthy?
These corn rolls are relatively healthy, offering a good source of fiber and nutrients from fresh corn. Each roll contains approximately 150 calories and 4g of protein. To make them even healthier, consider using whole grain flour or adding more vegetables to the mix!
Steaming Corn Rolls with Herb Butter Delight Card
⚖️ Ingredients:
- 2 cups fresh corn kernels (approximately 4 ears of corn)
- 1 cup all-purpose flour
- 1 cup cornmeal
- 1 teaspoon baking powder
- 1 teaspoon salt
- 2 tablespoons granulated sugar
- 1 large egg
- 1 cup milk
- 2 tablespoons melted unsalted butter
- ½ cup unsalted butter, softened
- 2 tablespoons fresh parsley, finely chopped
- 2 tablespoons fresh chives, finely chopped
- 1 teaspoon lemon zest
- Salt and pepper, to taste
🥄 Instructions:
- Step 1: In a large bowl, combine corn kernels, flour, cornmeal, baking powder, salt, and sugar.
- Step 2: In another bowl, whisk together the egg, milk, and melted butter.
- Step 3: Pour the wet ingredients into the dry ingredients and stir until just combined.
- Step 4: Let the mixture rest for 30 minutes while preparing the herb butter.
- Step 5: In a small bowl, mix the softened butter with parsley, chives, lemon zest, salt, and pepper until smooth.
- Step 6: Lightly grease a piece of parchment paper. Divide the corn mixture into 12 equal portions, shaping each into a roll.
- Step 7: Arrange the shaped rolls on the parchment paper and place in a steamer basket. Steam covered for 15-20 minutes, or until a toothpick inserted comes out clean.
- Step 8: Carefully remove the rolls from the steamer. Serve warm with a generous dollop of herb butter.
Previous Recipe: My Easy Chill Nut Roll with Healthy Nuts & Oats: A Delicious No-Bake Treat
Next Recipe: My Grandmother's Bake Nutty Cake Roll: Sweet Minnesota Delight