Sweet and Savory Hawaiian Roll Garlic Bread
Want to impress your guests? Discover how to make mouth-watering Hawaiian roll garlic bread with garlic butter. Perfect for any meal! Try it today.

- Before We look into In…
- Sweet and Savory Hawaiian Roll Garlic Bread: A Bit of History
- Hawaiian Roll Garlic Bread: A Culinary Journey
- Your New Favorite Garlic Bread Recipe
- Health and Nutrition Highlights
- Recipe at a Glance
- Master Ingredient List
- Kitchen Equipment Essentials
- Pro Ingredient Tips
- Perfect Cooking Technique for Hawaiian Roll Garlic Bread
- Success Guaranteed Tips
- Perfect Presentation
- Storage and Make-Ahead
- Creative Variations
- Complete Nutrition Guide
- Expert FAQ Solutions
- Recipe Card
Before We look into In…
Have you ever wondered why some foods just hit different? i mean, why does garlic bread taste like it was made by angels? here’s a kicker—what if i told you that the key to supercharged garlic bread lies in using sweet hawaiian rolls ? yep, it’s true! this recipe is not just a side dish; it's a celebration of flavor that transforms a classic favorite.
And don’t worry, we’re talking about a total prep time of only about 35 minutes here. plus, it’s easy—like, practically foolproof.
Sweet and Savory Hawaiian Roll Garlic Bread: A Bit of History
Let’s take a quick trip down memory lane, shall we? garlic bread has been around for ages. originating from italy, it was traditionally made with just bread, garlic, and olive oil.
Today, it’s found its way into many cultures and meals, especially since the rise of italian-american cuisine. but here’s the thing—you toss in hawaiian rolls, and you've got a rich culinary heritage with a twist.
What makes this hawaiian roll garlic bread unique is not just the palms-up sweetness of the rolls but also their soft, fluffy texture.
Gluten-heavy and buttery, they hug that savory garlic butter so beautifully that you might forget about regular bread altogether. it’s comfort food at its finest—perfect for family dinners or laid-back gatherings.
Hawaiian Roll Garlic Bread: A Culinary Journey
So, why hawaiian rolls? well, they originated in hawaii, of course! their soft and sweet nature is a staple in many households.
There’s something enchanting about taking a dive into cultural origins, right? these rolls are generally made with a touch of sugar and milk, marrying the savory and sweet elements perfectly.
It’s no wonder they have captured hearts—and appetites—everywhere!
In recent years, sweet Hawaiian rolls have grown in popularity, appearing in everything from sliders to breakfast recipes. But add a bit of garlic and butter, and oh my goodness, you've got something that could steal the spotlight from the main meal!
Your New Favorite Garlic Bread Recipe
Now let’s get real about why you’re going to love this recipe. it combines all the unique flavor combinations your taste buds crave—sweet, buttery, and garlicky, all nestled in a pillowy roll.
And fear not, because you don’t need to be a culinary wizard to nail this recipe. the techniques are straightforward, and i've got some expert-tested methods to ensure you don’t mess up your homemade garlic bread .
Did i mention the time-saving tips ? you’ll look like a kitchen rockstar without all the fuss.
Health and Nutrition Highlights
Don’t wail just yet about nutrition—while garlic bread isn’t exactly a health food , it does have some benefits! garlic is known for boosting the immune system and reducing blood pressure.
Plus, when you make it at home, you can control the amounts of butter and salt, tailoring it to your dietary needs.
Not to mention, those sweet hawaiian rolls deliver a little happiness in every bite.
Let’s break down the nutritional value of this amazing garlic bread: it’s soft, flavorful, and despite being a side, it packs a punch in comfort food recipes .
Recipe at a Glance
Okay, let’s get to business! Here’s a quick snapshot:
- Total Preparation Time: 35 minutes
- Skill Level Required: Easy
- Serving Size: About 12 pieces (serves 4-6)
- Cost Efficiency: Super budget-friendly, especially if you make it at home!
Now that i've whetted your appetite for some garlicky goodness, let’s talk ingredients ! you’ll want to gather everything you need—with a little splash of ensoiasm, we’re about to create the fluffiest and most delicious hawaiian roll garlic bread ever.
Trust me, it’s going to be a game-changer for your next dinner party!
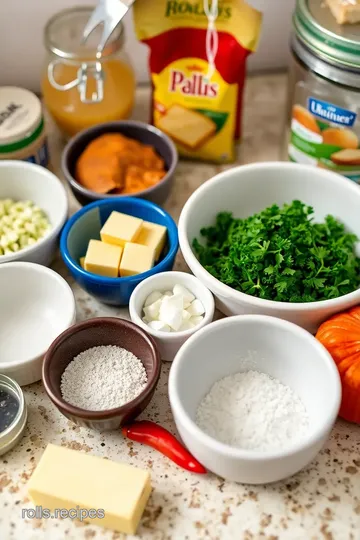
Master Ingredient List
Alright, friends, let’s dive into the heart and soul of any great recipe—the ingredients! you might be thinking, “why does it matter?” well, let me tell you, choosing the right ingredients can make or break your culinary adventure.
Trust me, i’ve been there.
Premium Core Ingredients
Whenever I whip up comfort food recipes like my Hawaiian Roll Garlic Bread , I start with premium core ingredients. For this recipe, you'll need:
- ½ cup (113 g) unsalted butter, softened : Opt for the real deal , as it provides a richer flavor. If you can find grass-fed butter, go for it!
- 4 cloves garlic, minced : There’s no substitute for fresh garlic! Dried just doesn’t cut it.
- Fresh parsley (or dried if you're in a pinch) : Fresh herbs add vibrancy, but dried can get you through when your kitchen garden’s not cooperating.
Selection Tips: Look for unsalted butter with a high fat content—around 82% is perfect for that fluffy garlic bread feel. And for garlic, choose plump cloves with tight skin; they’re the freshest.
Storage Guidance: Keep your garlic in a dark, cool place—not in the fridge, please! Butter can be stored in the fridge but also freezes wonderfully for later use.
Signature Seasoning Blend
Now, let’s jazz it up with a signature seasoning blend.
- Herb selections : I love to mix it up with 2 tablespoons chopped parsley—so fresh and green!
- Flavor enhancers : A pinch of salt and black pepper brings everything together. If you want that kick, add some red pepper flakes. Woohoo!
These simple yet powerful spices elevate homemade garlic bread from basic to wow .
Smart Substitutions
Life happens, and suddenly you’re out of something. Don’t stress! Here are some easy, smart substitutions:
- Butter : If you’re out, olive oil works fine, but it’ll give a slightly different flavor.
- No fresh herbs? Dried herbs are great, too—the rule of thumb is to use about one-third the amount.
And hey, if it’s wintertime and you’re feeling the impact of seasonal produce shift, using dried herbs is an awesome way to keep the flavor alive without fresh supplies.
Kitchen Equipment Essentials
Alright, let’s talk tools! If you’ve got the right kitchen equipment, you’re halfway there. The essential gear for our Hawaiian Roll Garlic Bread includes:
- Baking tray : A must-have! If you don’t own one, a regular cookie sheet works too.
- Parchment paper (yep, highly recommended): Makes cleanup a breeze and prevents sticking.
- Small mixing bowl : For your garlic butter blend.
- Pastry brush : This helps you spread your luscious garlic butter evenly. If you don’t have one, a spoon works just as well.
Pro Ingredient Tips
Now, my little secrets of the trade!
- Selection secrets : Fresh garlic’s the star of this show; it gives such a distinctive flavor that packets of dried just can’t replicate.
- Quality markers : When picking butter, avoid anything with additives. Pure is best.
- Storage solutions : Keep your garlic in a mesh bag for air circulation, and your butter can sit out for a week at room temperature if it’s unsalted.
- Money-saving tips : Buy herbs in bulk when they're in season and dry them yourself! You will feel like a pro.
Next up, we’ll explore some simple step-by-step instructions that’ll turn your kitchen into a savory bakery. whether you’re throwing together a quick side dish or gearing up for a themed dinner, you’ll want to stick around for these easy garlic bread techniques.
I promise, by the end of it, you’ll be wowing your family and friends with the most amazing hawaiian roll garlic bread ever!
Perfect Cooking Technique for Hawaiian Roll Garlic Bread
Hey there, my foodie friend! gather 'round because i have something absolutely delightful to share. we’re diving into the world of hawaiian roll garlic bread —and trust me, it’s gonna be a game changer! this recipe combines the sweetness of those fluffy hawaiian rolls with the savory goodness of garlic butter.
Ready to make your kitchen smell like heaven? let’s go!
Essential Preparation Steps
First things first, we need to get organized! you might’ve heard of mise en place , right? it’s a fancy french term, but all it means is getting everything in its place before you start cooking.
So, grab all your ingredients: rolls, butter, garlic, and herbs. it makes cooking feel less chaotic, kinda like a well-run battle plan—except here, the only thing you’re fighting is your craving!
For prep techniques, here’s a tip: make sure to soften that butter beforehand. you don’t want to be wrestling with a block of cold butter when you’re trying to make your savory garlic bread .
Also, mince your garlic and chop your parsley while taking a stroll down memory lane—think of all the comforting moments you’ve enjoyed garlic bread.
Sweet nostalgia!
Now, let’s talk time management . you’ll want to allocate about 10 minutes to prep the butter and rolls, and then 15 minutes for them to bake.
That’s a total of 35 minutes to bliss! and about organization—keeping your workspace tidy will help so much. little clutter, less distraction, and more yummy results!
Professional Cooking Method
Alright, let’s get into the nitty-gritty of this recipe. Start by preheating your oven to 375°F (190°C). This is crucial for that perfect bake.
-
Prepare the garlic butter : in a small mixing bowl, combine ½ cup of softened butter, 4 cloves of minced garlic, 2 tablespoons chopped fresh parsley, a sprinkle of salt and pepper, and if you fancy a bit of spice, toss in some red pepper flakes.
-
Slice Those Rolls : With a sharp knife, carefully slice your Hawaiian rolls in half horizontally, keeping them connected at the bottom. It’s like opening a cozy little pouch of goodness!
-
Spread the goodness : use a pastry brush or a spoon to generously coat the cut sides of the rolls with your garlic butter mixture.
Trust me, don’t skimp on this step—more butter equals more flavor!
-
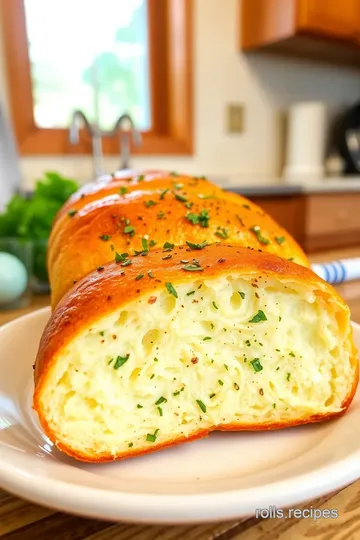
Arrange and bake : place your buttered rolls on a parchment-lined baking tray, cut side up, and slide them into the oven.
Bake for about 12-15 minutes until the tops are golden brown and that heavenly aroma fills your kitchen. you might want to hover around, but watch out for that lingering temptation to taste before they’re ready!
Expert Techniques
As you embark on this garlic-infused journey, here are some expert techniques to ensure your success.
-
Pay attention to temperature control . If your oven runs hot, check on the rolls a few minutes before the 12-minute mark. Timing precision is key—golden brown is the goal!
-
A great success indicator? The moment you see the butter bubbling up and your rolls turning that gorgeous golden hue, you know you’re winning!
Success Strategies
Alright, let’s chat about troubleshooting. if your bread seems a tad too dry, brush on a little extra melted garlic butter right after they come out.
That’s an instant fix! and how about quality assurance? fresh garlic is a must—dried garlic just doesn’t cut it in the flavor department.
Want a few more perfect results strategies? consider this: if you’re feeling adventurous, experiment with garlic bread variations . mix in some cheese, spice up the garlic butter with fresh herbs, or even try some garlic-infused recipes with roasted veggies on the side.
And as you serve this delectable homemade garlic bread to your loved ones, get ready for their delighted faces and unsolicited compliments.
I mean, who doesn’t want a fluffy piece of garlic goodness as a side dish?
Now that we’ve mastered the art of making this delicious Hawaiian Roll Garlic Bread, let’s keep rolling into the next section where we explore some additional information about variations, serving ideas, and the best ways to enjoy this dish!
Success Guaranteed Tips
Let’s be real for a sec: whether you’re a kitchen whiz or a total novice, everyone wants success when cooking! i’ve gathered some professional insights that have truly helped me along the way.
When making this hawaiian roll garlic bread , you want to ensure you get that buttery, garlicky flavor just right.
Use fresh garlic ; i mean, you wouldn’t bake a pie with old apples, right? mixing it into your garlic butter really enriches everything!
In terms of expert techniques , spreading the garlic butter evenly is key. a pastry brush does wonders, giving you that gorgeous, even coat, and i swear by this herb butter recipe when i want something slightly fancier.
And don’t forget the kitchen wisdom of always tasting your butter before spreading it on the rolls. just a tiny lick can tell you if it needs a pinch more salt or a sprinkle of crushed red pepper flakes for a kick! your taste buds are your best friends here.
Perfect Presentation
Alright, let's talk presentation. look, i’m all for digging in without much thought, but a little effort in the plating techniques can seriously step up your game.
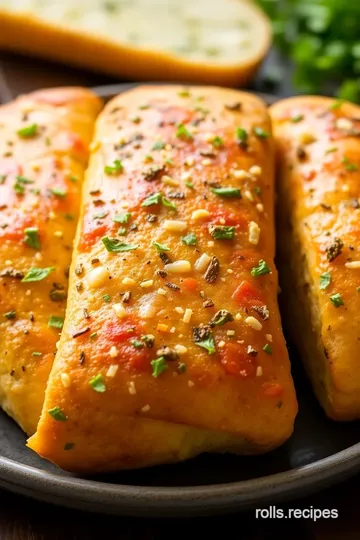
Cut the rolls nice and neat and arrange them cut-side up on a stylish serving dish. think of it as giving your savory garlic bread an instagram-worthy glow-up!
For garnish ideas , sprinkle some freshly chopped parsley on top before serving. it’s like a little green crown for your culinary creation.
Have you ever tried cheesy garlic bread options ? topping the rolls with a bit of grated cheese a couple of minutes before they’re done baking gives them a bubbly, melty finish that'll leave your guests salivating.
Storage and Make-Ahead
Let’s be honest: life is busy, and sometimes we can’t whip things up at the last minute. the good news? you can totally prepare your butter ahead of time! just follow the storage guidelines and stick that garlicky goodness in the fridge—it’s good for a week.
When you’re ready to bake, pull it out and let it soften a bit before slathering it all over your sweet hawaiian rolls !
If you have leftovers (which, let’s face it, is a miracle!), storing them is easy-peasy. place the rolls in an airtight container, and they’ll stay fresh for about two days.
As for reheating instructions , preheat your oven to 350°f (175°c) and pop them in for about 5-10 minutes. you’ll have that fluffy garlic bread texture again!
Creative Variations
Okay, here’s where things get fun! this recipe is so versatile. you can really play around! for instance, if you're looking for flavor adaptations , consider adding roasted red peppers or sautéed mushrooms for a gourmet touch.
Got dietary restrictions? no problem! just make some simple recipe modifications . swap the butter for a dairy-free alternative if you want a vegan garlic bread that's just as comforting.
And speaking of swaps, why not throw in seasonal twists? you could use some fresh herbs like dill in spring or even some pumpkin spice if you’re feeling festive during autumn.
Complete Nutrition Guide
Now let’s chat about the nutritional value of garlic bread . even though it’s a comfort food recipe that might not completely fit the health bill, being mindful of portions can help—you know, those portion guidance moments.
A couple of pieces paired with a salad can keep your meal balanced without sacrificing flavor.
These fluffy rolls provide carbs for energy, while the garlic and herbs bring some antioxidants into the mix. honestly, there’s something so hearty about biting into that garlic goodness that feels incredibly nourishing.
Expert FAQ Solutions
You know how everyone has questions? well, i’ve amassed a few of the most common ones to help you out! if you're worried about drying out your homemade garlic bread , keep an eye on the baking time.
And don’t be shy about troubleshooting ; if you find it lacks flavor, just add more garlic or salt. it's surprising how little tweaks can lead to success guarantees with this recipe.
If you find yourself a bit new to cooking, don’t fret! Everyone starts somewhere. Remember that cooking tips for garlic bread are just about getting comfortable in your kitchen—experiment and make it your own, maybe even throw on some unique garlic bread toppings !
So, to wrap it up: i just love hawaiian roll garlic bread . it’s simple, fluffy, and oh-so-tempting. don't shy away from making some variations, experimenting with new flavors, or trying out different serving ideas for garlic bread with your meals.
It's all about having fun and making those comforting connections with food that bring joy to everyday dinners! enjoy your baking adventures!
Sweet and Savory Hawaiian Roll Garlic Bread Card

⚖️ Ingredients:
- ½ cup (113 g) unsalted butter, softened
- 4 cloves garlic, minced
- 2 tablespoons fresh parsley, chopped (or 1 tablespoon dried parsley)
- ½ teaspoon salt
- ¼ teaspoon black pepper
- ¼ teaspoon red pepper flakes (optional, for spice)
- 12 Hawaiian rolls, either store-bought or homemade
🥄 Instructions:
- Step 1: Preheat the Oven: Set oven to 375°F (190°C).
- Step 2: Prepare the Garlic Butter: In a small mixing bowl, combine softened butter, minced garlic, parsley, salt, pepper, and red pepper flakes. Mix until well combined and creamy.
- Step 3: Slice the Rolls: Carefully slice the Hawaiian rolls in half horizontally, keeping them connected at the bottom.
- Step 4: Spread the Garlic Butter: Use a pastry brush or a spoon to spread a generous layer of garlic butter on the cut sides of the rolls.
- Step 5: Arrange on Baking Tray: Place the prepared rolls cut side up on a baking tray lined with parchment paper.
- Step 6: Bake: Bake for 12-15 minutes or until the tops are golden brown and the butter is melted.
- Step 7: Serve Warm: Remove from the oven and let cool slightly. Serve warm.
Previous Recipe: Delicious Eel and Avocado Roll: The Secret to Perfect Homemade Sushi!
Next Recipe: Easy Orange Chicken Pizza Rolls: 5 Delicious Ways to Snack Smart!