Whole Wheat Ciabatta Rolls: 5 Simple Steps to Joyful Baking
Discover the joy of baking with Whole Wheat Ciabatta Rolls: 5 Simple Steps to Joyful Baking! Nutritious, crusty, and perfect for meals. Grab my tips!

- Rolling into the World of Whole Wheat Ciabatta
- The Lowdown on This Recipe
- Why You’ll Love These Rolls
- Let’s Get Baking!
- Your Essential Ingredients Guide
- Professional Cooking Method for Whole Wheat Ciabatta Rolls: 5 Simple Steps to Joyful Baking
- Pro Tips & Secrets for Whole Wheat Ciabatta Rolls
- Perfectly Plated Future Rolls
- Storage & Make-Ahead Magic
- Creative Variations for Whole Wheat Ciabatta Rolls
- Complete Nutrition Guide
- Encouraging Conclusion
- Frequently Asked Questions
- Recipe Card
Rolling into the World of Whole Wheat Ciabatta
Have you ever taken a bite of bread fresh out of the oven and thought, “this is pure magic”? well, let me tell you about my first experience baking whole wheat ciabatta rolls: 5 simple steps to joyful baking .
It was one of those classic rainy sundays. you know, the kind where the mood just screams “let’s bake!” so, i rolled up my sleeves, thought about my love for artisanal baking, and decided to tackle this italian rolls recipe.
Spoiler alert: it was the best decision i made that day.
Baking really does have a unique way of connecting you to history and culture, doesn’t it? ciabatta traces its roots back to italy in the 1980s, created to be the ultimate sandwich bread.
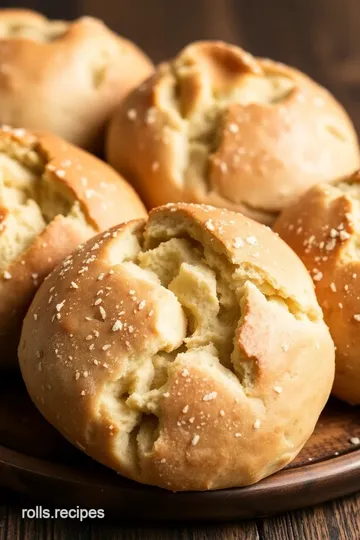
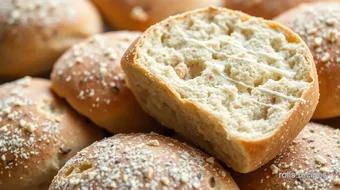
Who knew we could bring a piece of italy right into our kitchens? these rolls are not just any bread; they’ve got that perfect crusty exterior while holding a delightfully soft and airy inside.
When you incorporate whole wheat flour, you dial up the nutty flavor and nutrition. seriously, this isn’t just any whole wheat bread recipe ; it’s a celebration of wholesome, homemade goodness!
The Lowdown on This Recipe
Okay, let's chat about the nitty-gritty. if you're wondering about how hard this will be, relax! it’s a medium-difficulty recipe, and the simplicity is what makes it so charming! you’ll need about 15 minutes of active prep time and another 30 minutes chilling (but let’s be real, you can just kick back with a book during that time).
The grand finale? a bake that takes about 20- 25 minutes . so, roughly 2 hours from start to finish, including rise time.
And trust me, every minute will be worth it.
This recipe yields around 8 rolls , perfect for a family dinner or cozy gathering. just imagine a warm loaf served with soup or turned into the fluffiest whole wheat sandwich rolls .
Yes, please!
Why You’ll Love These Rolls
Let’s talk benefits ! not only do these rolls taste fantastic, but they also pack a nutritional punch. whole wheat flour is your friend, loaded with fiber and nutrients that keep you feeling satisfied.
And hey, if you’re hunting for healthy bread baking options, look no further! these ciabatta rolls could even become your go-to for special occasions, holiday feasts, or just a cozy night in.
Looking for a leg up on other bread? this recipe shines with its fermentation process. the way the dough bubbles and rises creates a unique flavor that you just can’t get from store-bought packages.
They’re also great for learning some handy bread shaping techniques . you’ll be impressed at how quickly you pick them up!
Now, you might be thinking about those “healthier bread alternatives” we often crave. these rolls fit the bill! whether you’re into the rustic vibe or just need a soft dinner roll to accompany that bowl of chili, this is your ticket.
Let’s Get Baking!
So you’re sold, right? ready to dive into making these delightful rolls? i know you can feel that delicious ciabatta dough nutrition calling your name.
Plus, baking at home means you can experiment with herbs or flavors that tickle your taste buds. it’s all about finding those flavorful bread variations that speak to you.
Before we jump into the ingredients, remember this: it’s all about having fun in the kitchen. baking is not just a chore; it’s a creative outlet, an opportunity to whip up something tasty with whole grain nutrition .
And hey, if you end up with some kitchen fails, just laugh it off! that’s all part of the journey, my friend.
Now, let’s gear up and check out what you’ll need to make your own Whole Wheat Ciabatta Rolls ! Ready? Let’s roll!
Your Essential Ingredients Guide
Hey there, fellow food lovers! if you're anything like me, you get a kick out of whipping up something delicious from scratch.
Today, we’re diving into some solid ingredient essentials that’ll make any baking adventure way easier and a lot more fun.
Trust me, whether you're a baking newbie or a seasoned pro, having the right tools in your kitchen is crucial.
So, let’s get into it!
Premium Core Components
When it comes to baking, those premium core components are where it all begins. first up, measurements. get yourself a kitchen scale if you can—it's super handy for baking.
For example, you’ll want 3 cups of whole wheat flour (that’s about 360 grams ). starting with accurate measurements keeps everything on track!
Now, what about quality? look for flour that's whole grain—this provides tons of nutrients and contributes that nice, nutty flavor in your crusty bread recipe.
Plus, it’s all about freshness. when buying flour, check the expiration date ; fresh flour makes a huge difference. store it in a cool, dry place.
And if you can, put it in an airtight container to extend its shelf life.
Signature Seasoning Blend
Next, let’s sprinkle in some flavor! every baker needs a signature seasoning blend . think about what spices make your heart sing.
And, oh boy , fresh herbs are the bomb ! basil and oregano are my go-tos for italian rolls, but feel free to get creative with other flavors!
And hey, if you're feeling adventurous, swapping out bland seasonal staples can make all the difference. for instance, a little crushed red pepper flake can add a killer kick to your whole wheat bread recipe .
Smart Substitutions
Now, i totally get that sometimes you might be missing an ingredient, right? no sweat! having a list of smart substitutions can save the day.
If you’re out of whole wheat flour, no worries ! you can use all-purpose flour or even a gluten-free blend—just watch those proportions!
For those who might be vegan, consider using applesauce instead of oil; it keeps your ciabatta dough nutrition on point while giving that moisture we all want.
Seasonal options? you can pop in some pumpkin puree in the fall for a unique twist - yum!
Kitchen Equipment Essentials
So, what equipment do you really need? well, besides that scale, a good mixing bowl is key. i’ve made do with cheap plastic bowls before and trust me, it sometimes ends in disaster.
Go for glass or stainless steel, and you’ll thank me later!
Don’t forget parchment paper on your baking sheet. this makes cleanup a breeze, and your rolls won’t stick—like, who wants a sad ciabatta with half of it left behind on the pan, am i right? and for those rolls, grab a bench scraper .
It’s not fancy, but it makes shaping and dividing dough a total cinch.
Wrap-Up Before We Bake
And there you have it, folks! you’re now armed with a solid essential ingredients guide that'll make your baking adventures not only easier but also way more enjoyable.
And for those of you keen to dive into something delicious, wait until you try my whole wheat ciabatta rolls: 5 simple steps to joyful baking ! these rolls aren't just any rolls—they’re soft, fluffy, and oh-so-perfect alongside your favorite soup or as the base for an epic sandwich.
So, grab your ingredients and get ready for some homemade ciabatta. remember, the kitchen is where the magic happens, and with these tips, you'll be creating nutritious bread options like an artisan in no time.
Let’s roll!
Professional Cooking Method for Whole Wheat Ciabatta Rolls: 5 Simple Steps to Joyful Baking
Oh my gosh, if you've ever wanted to dive into artisan baking with something that isn't just fun but also super satisfying, you've hit the jackpot with whole wheat ciabatta rolls: 5 simple steps to joyful baking ! so, let’s get our hands a little dusty and talk about how to make this rustic bread.
Here’s a peek into the professional cooking method you can totally rock at home.
Essential Preparation Steps
Before we dive into the dough, we need to talk about getting organized. mise en place (which is just french for “everything in its place”) is key here.
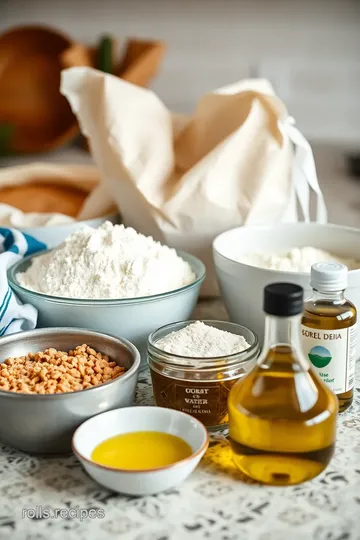
Gather all your ingredients – that’s 3 cups of whole wheat flour, some salt, yeast, lukewarm water, and optional olive oil.
Honestly, if you set everything up first, you’ll feel like a pro.
Next up, time management tips are super necessary. make sure you set aside about 2 hours overall for this whole process, including rising time.
It sounds like a lot, but trust me, it’s so worth it. as for safety considerations , remember to be careful with hot water and your oven.
No one needs a burned hand while trying to enjoy homemade ciabatta!
Step-by-Step Process
Alright, let’s break this down into some clear, numbered instructions .
- Combine Ingredients: Start by whisking together the whole wheat flour, salt, and yeast in a big bowl.
- Mix Dough: Gradually add your 1 ¼ cups of lukewarm water . It should form a sticky dough. If you’re feeling fancy, drizzle in a tablespoon of olive oil here.
- First Rise: Cover it with a towel and let that baby rise for 1 to 1. 5 hours in a warm spot until it doubles. The whole fermentation process in bread is crucial! You'll notice bubbles forming, which is a good sign.
- Shape Rolls: Once risen, turn it out onto a floured surface. With a bench scraper, divide it into 8 without too much hassle. Shape your rolls gently; you won’t want to squash that glorious airiness.
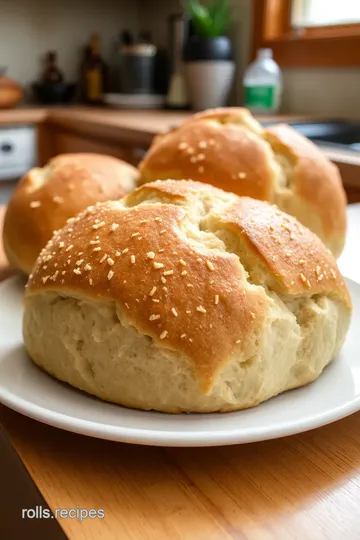
- Second Rise and Bake: Place those beauties on a lined baking sheet and let them rise again for another 30- 45 minutes . While they’re doing their thing, crank the oven up to 450° F ( 230° C) . Bake for 20- 25 minutes until they’re golden brown. You want them to sound hollow when you tap the bottoms!
Expert Techniques
This is where the magic happens! a couple of critical steps can make a huge difference. the key here is temperature control and timing precision .
Keeping an eye on the oven is essential, as every oven is different.
Some quality checkpoints ? look for that lovely golden color and give them a little tap – if they sound hollow , they’re done! and if they’re not quite golden enough? don’t be scared to stick them back in for a few more minutes.
You might run into a few hiccups – like dough being too sticky. Just dust with a little more flour when handling. Remember, there are no perfect loaves, just learning opportunities!
Success Strategies
Now, let’s get into those common mistakes to avoid . don't rush the rise; skipping this step will flatten your rolls into sad little discs.
Plus, always check that your yeast is fresh! stale yeast equals sad bread, and nobody wants that.
For quality assurance , always do the hollow sound test. it’s a classic trick! and if you’re thinking about make-ahead options , considering letting the dough rest overnight in the fridge will deepen those flavors and make morning baking a breeze.
So there you have it – professional cooking methods that make baking whole wheat ciabatta rolls feel like second nature! with a little patience and love, you'll whip up these delicious, nutritious rolls that pair perfectly with soups or even just some good ol’ butter.
Additional Information
Feeling inspired by the art of homemade ciabatta? perfecting your own rustic bread rolls goes beyond this recipe. keep exploring the world of healthy bread baking and discover whole grain nutrition through various baking methods.
There’s so much more to learn, and i can’t wait to dive into more amazing artisanal baking tips with you next time!
Pro Tips & Secrets for Whole Wheat Ciabatta Rolls
Oh my gosh, friends! when i think of bread that feels like a warm hug, i always come back to whole wheat ciabatta rolls: 5 simple steps to joyful baking .
There’s something magical about coming home to the aroma of freshly baked artisanal ciabatta rolls . but let me share some pro tips that have made my baking life so much easier and a lot more delicious!
First off, the fermentation process in bread is your best friend. let that dough rise long enough to develop its flavor.
I usually let mine go for the full 1. 5 hours. if you’re feeling adventurous, fridge it overnight! seriously, that extra time unlocks flavors you won’t believe.
Don’t stress about getting everything perfect the first time. the key to easy bread recipes is to mess up once or twice! i mean, i once ended up with a flat loaf because i forgot to preheat the oven.
Rookie mistake, right? it’ll happen, and you’ll laugh about it later.
Also, hydration levels in your dough can make a big difference. if it feels too sticky, that’s okay! you get a light and fluffy roll if you handle it with care.
Just remember: your hands are your best tools here, never shy away from getting them messy!
Perfectly Plated Future Rolls
Now let’s talk about making these rolls as pretty as they are tasty! oh, i can’t get enough of a good presentation.
It’s like delighting your guests with a visual feast before they even take a bite.
For plating, i love using rustic wooden boards or a simple white plate to showcase those golden-brown crusty bread rolls .
Right before serving, sprinkle a touch of coarse sea salt on top. it not only adds a nice crunch but looks super fancy too!
And don’t forget about garnish ! a few sprigs of fresh herbs like rosemary or thyme tucked in between the rolls can really make things pop.
The color combinations are everything—think deep brown crust contrasting against luscious green herbs. grab a good photo for your insta because it just screams “eat me!”
Storage & Make-Ahead Magic
Life gets busy, right? so it’s helpful to know how to keep these rolls fresh! if you have leftovers (lucky you!), let them cool completely before tossing them in an airtight bag.
They’ll keep at room temperature for about 3 days —but trust me, they won't last that long!
If you're planning a meal, why not make these in advance? you can freeze them for up to a month.
Just place them in a single layer on a baking sheet and once frozen, transfer them to a bag. that way, you can pop out a roll whenever guests show up or you want to whip up a quick snack.
To reheat, just put them in a 350° F ( 175° C) oven for about 10 minutes to restore that fresh-out-of-the-oven texture.
Creative Variations for Whole Wheat Ciabatta Rolls
So, what if you want to shake things up? i’ve tried a few flavor adaptations along the way and loved every one! add ciabatta with herbs for a mediterranean vibe—think rosemary, thyme, or even a sprinkle of garlic powder.
For a festive touch, toss in some caramelized onions or sun-dried tomatoes. if you’re going for something a bit healthier, add seeds like flax or chia right to the dough.
They’ll amp up the nutrition and texture while you're at it.
And let’s not forget about dietary modifications! if you’re vegan, ditch the olive oil for some apple sauce. or if gluten-free life is for you, swap that whole wheat flour for a good-quality gluten-free mix.
Complete Nutrition Guide
Finally, let’s chat about the good stuff—nutrition! whole wheat flour packs in the fiber and turns this into a nutritious bread option .
Each delightful roll has about 150 calories and gives you decent protein for a snack, plus a heartier meal when paired with soup!
Health benefits? You got it! We’re talking better digestion and sustained energy levels. No more bread coma after mealtime, I promise! Instead, these rolls offer a nice balance that pairs perfectly with salads, soups—oh, if you have a tomato soup on hand, you just won the dinner lottery!
Encouraging Conclusion
So, whether you’re using the whole grain nutrition to impress friends or simply enjoying these delightful rolls with a cup of tea, just know you’re doing something truly special.
The art of healthy bread baking is more than a trend; it’s about bringing warmth and joy into your home, one bite at a time.
Now, go out there and start kneading that dough. you got this! 🍞
Frequently Asked Questions
What makes Whole Wheat Ciabatta Rolls different from regular ciabatta?
Whole Wheat Ciabatta Rolls are made with whole wheat flour, which adds a nuttier flavor and more nutritional benefits, such as higher fiber content compared to regular ciabatta made with white flour. This variation also alters the texture slightly, providing a heartier roll that's perfect for sandwiches or as a side dish.
Can I make Whole Wheat Ciabatta Rolls: 5 Simple Steps to Joyful Baking ahead of time?
Absolutely! You can prepare the dough and let it rise, then shape the rolls and refrigerate them for up to 24 hours before the second rise. Just make sure to bring them back to room temperature and let them rise adequately before baking for the best results.
What are some tips for achieving a crispy crust on my ciabatta rolls?
To achieve a crispy crust, preheat your oven to a high temperature (450°F or 230°C) and consider placing a shallow pan with water at the bottom of the oven to create steam during baking. Additionally, make sure to bake the rolls until they are a deep golden brown and sound hollow when tapped on the bottom.
How should I store my Whole Wheat Ciabatta Rolls to keep them fresh?
To retain freshness, allow the rolls to cool completely before storing them in an airtight container at room temperature. They can also be frozen for up to 3 months; wrap them tightly in plastic wrap and place them in a freezer-safe bag. When ready to eat, thaw and reheat in the oven for a few minutes to restore their crust.
Can I make variations of Whole Wheat Ciabatta Rolls?
Yes! You can add herbs, such as rosemary or thyme, mix in seeds for added texture, or even make them gluten-free by using a gluten-free flour blend. Feel free to experiment with flavors to create a roll that suits your taste preferences.
What nutritional benefits do Whole Wheat Ciabatta Rolls offer?
Whole Wheat Ciabatta Rolls offer more fiber and protein than their white flour counterparts, making them a more nutritious option for any meal. By incorporating whole wheat flour, you'll also benefit from essential vitamins and minerals that contribute to overall health.
Whole Wheat Ciabatta Rolls: 5 Simple Steps to Joyful Baking Card
⚖️ Ingredients:
- 3 cups whole wheat flour (360 g)
- 1 ½ teaspoons salt (9 g)
- 1 teaspoon instant yeast (3 g)
- 1 ¼ cups water (300 ml), lukewarm
- 1 tablespoon olive oil (15 ml) (optional)
- Additional whole wheat flour for dusting
🥄 Instructions:
- Step 1: In a large mixing bowl, whisk together whole wheat flour, salt, and yeast.
- Step 2: Gradually add lukewarm water to the dry ingredients. Mix until a sticky dough forms. If using, incorporate olive oil at this stage.
- Step 3: Cover the bowl with a kitchen towel or plastic wrap and let the dough rise in a warm place for 1 to 1.5 hours, or until doubled in size.
- Step 4: Gently turn the dough onto a floured surface. Using a bench scraper, divide it into 8 equal pieces. Shape each piece into a roll, dusting with flour as needed to prevent sticking.
- Step 5: Place the shaped rolls on a baking sheet lined with parchment paper. Cover and let rise for another 30-45 minutes. Preheat the oven to 450°F (230°C) and bake for 20-25 minutes, or until golden brown and hollow-sounding when tapped on the bottom.
Previous Recipe: Easy Chicken Pot Pie with Crescent Rolls: A Family Favorite Recipe
Next Recipe: Heavenly Colonial Bread Dinner Rolls: Best 12 Comfort Food Recipes